
6 Best Fender Flares for Toyota 4Runner in 2026: Factory Fit, Trail-Proven Durability & Zero-Gap Finish Picks
If you’ve been driving a Toyota 4Runner for a while—especially a 5th gen—you already know the struggle. Stock wheel arches look fine… until you throw on wider tires or hit a muddy trail once. Suddenly, you’re dealing with paint chips, road spray all over the doors, and that awkward “something’s missing” stance.
I’ve gone through this myself, and honestly, most fender flares out there either don’t sit right, feel flimsy, or require way more effort than they’re worth. And with so many new options hitting the market recently, it’s even harder to tell what actually fits well and holds up long-term.
So instead of listing random products, this guide focuses on real-world fit, build quality, and how these flares actually look and install on a 4Runner. Whether you want a clean OEM-style upgrade or a more aggressive, wide stance for off-road use, these picks are based on what genuinely works—not just what looks good in product photos.
Best Toyota 4Runner Fender Flares: Top 2026 Picks Worth Installing This Year
#1. Rough Country Sport Fender Flares (2025–2026)
Best wide coverage fender flares for 5th gen 4Runner (new models)
#2. Husky Liners Pocket Style Fender Flares (2014–2024)
Best pocket-style fender flares for rugged off-road look & durability
#3. Garage-Pro Front Fender Flares Set (2014–2024)
Best budget OEM-style replacement fender flares (front only)
#4. Tyger Auto Bolt-Riveted Fender Flares (2014–2023)
Best bolt-on fender flares for aggressive stance & easy install
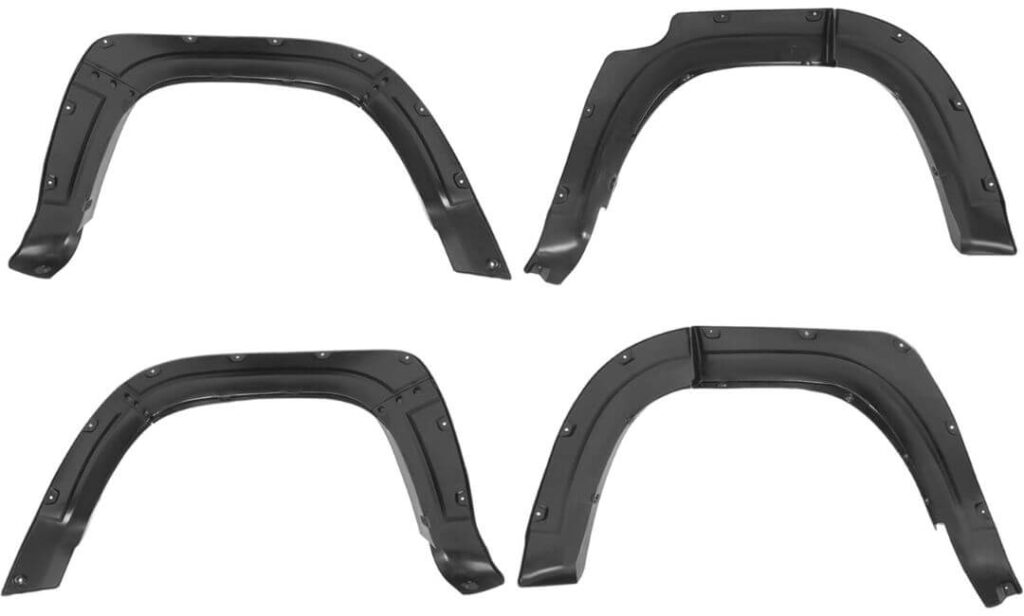
#5. YHTAUTO Pocket Rivet Fender Flares Kit (2014–2023)
Best value paintable fender flares with full hardware kit
#6. BALOCEO Pocket Style Fender Flares (2014–2023)
Best affordable textured black fender flares for daily + light off-road use
Expert Tip
If you’re stuck choosing, don’t start with the brand—start with how you actually use your 4Runner. Most people get this wrong. They chase the most aggressive-looking flares and end up with something that doesn’t sit right or feels overkill for daily driving.
If you run wider tires or hit trails often, go for proper tire coverage and rigid ABS build—that’s what actually protects your paint. If your 4Runner is mostly on-road, focus on clean fitment and minimal gap, because that’s what keeps it looking factory, not aftermarket.
And one thing most listings won’t tell you—fitment matters more than finish. A perfectly aligned matte black flare will always look better than a poorly fitted paintable one. Choose fit first, finish second, and you won’t regret it.
How We Chose These Fender Flares
We didn’t pick these based on hype, brand names, or recycled lists. Every option here was filtered down based on what actually matters once these are bolted onto a real 4Runner.
First thing we looked at was fitment consistency across 5th gen models (2014–2026). A lot of flares technically “fit,” but leave uneven gaps around the wheel arch or require forcing during install. The products included here are known to sit properly along factory lines, especially around the front fender curve where most cheap sets fail.
Next was material quality and long-term durability. All selected options use ABS or similar automotive-grade plastic that can handle heat, UV exposure, and minor impacts without turning brittle. This is where options like Rough Country and Husky stand out—they don’t just look tough, they hold their shape after months of use.
We also paid close attention to installation reality, not just what the box claims. Some flares say “bolt-on” but still need adjustments or extra effort. The picks here either come with complete hardware kits or are straightforward enough that you won’t be stuck halfway through the install. Products like Tyger Auto and YHTAUTO make this process much smoother for first-time installs.
Another key factor was coverage vs. usability. Wider flares sound great, but if they stick out too much without proper alignment, they ruin the look. The selected models strike a balance—giving you enough tire coverage for protection without making the truck look mismatched. Rough Country’s 1.75″ coverage is a good example of this done right.
We also separated products based on real use cases. Not every owner needs a full 4-piece aggressive kit. That’s why options like Garage-Pro are included—they’re practical replacements for damaged front flares without forcing you into a full aesthetic overhaul.
Finally, we avoided overhyped products with inconsistent feedback or unclear fitment claims. Since many of these are newer releases with limited long-term reviews, the focus was on build design, fitment accuracy, and install practicality—the three things that actually decide whether you’ll be happy with your purchase after 6 months.
This isn’t a random list. Every product here earns its place based on how it fits, how it installs, and how it holds up where it actually matters—on a real Toyota 4Runner.
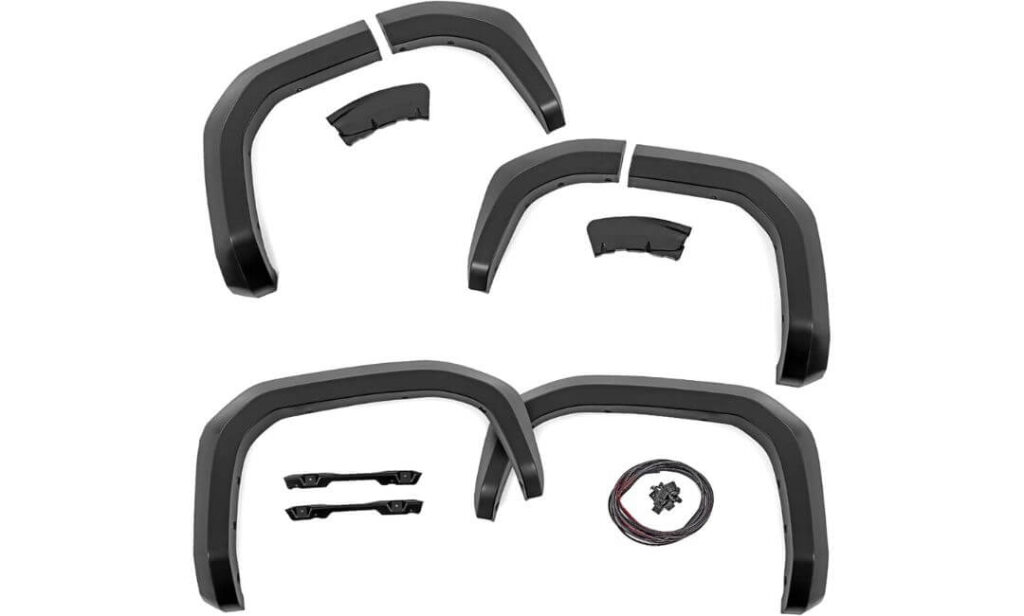
#1. Rough Country Sport Fender Flares (2025–2026)
Quick Specs:
- Adds 1.75″ real tire coverage (noticeable with wider setups, not just cosmetic)
- 5.75″ flare height (fills the wheel arch properly, no half-baked look)
- Built with Tri-Blend ABS + nylon strength (doesn’t flex like cheap plastic)
- UV-resistant matte black (won’t fade into grey after a few months)
- No-drill, factory mount points (no guesswork during install)
- Paintable finish (easy color match if you want OEM-style finish)
The moment you bolt these on, the first thing you notice isn’t just the extra width—it’s how right they look on the 4Runner. No awkward edges, no weird gaps near the front fender curve. That 1.75-inch extension actually does its job, especially if you’re running slightly wider tires (or planning to). It doesn’t scream aftermarket—it looks like it should’ve come this way from the factory.
What stands out here is the balance. You’re getting proper wheel coverage and protection without turning your 4Runner into something overbuilt for daily use. Mud, road spray, small rocks—this setup handles it without making the truck look bulky. And that 5.75-inch height? It fills the arch cleanly, which most cheaper flares fail to do (they either sit too flat or too wide).
Material quality is where this really separates itself. The Tri-Blend ABS construction feels solid in hand—not brittle, not flimsy—and the UV-resistant finish actually holds up in sun and heat. No chalking, no weird discoloration over time. And since it mounts using factory points, you’re not dealing with unnecessary drilling or alignment headaches. (Once installed, it just sits right—no adjusting every few weeks or second-guessing the fit.)
What Stands Out in Real Use
- Clean factory-style alignment (no uneven gaps around edges)
- Useful tire coverage, not just visual width
- Material feels solid and holds shape over time
- No-drill install actually works as advertised
- Paint-ready finish gives flexibility (stock look or custom match)
Where It Falls Short
- Doesn’t fit TrD Pro or Trailhunter trims (factory overfenders interfere)
4Runner Fitment Clarity
This setup is made specifically for the 2025+ Toyota 4Runner, and the fit reflects that. It lines up with factory mounting points, which is why the finish looks tight and consistent across both front and rear arches.
One thing to be clear about—if your 4Runner already comes with factory extended overfenders (like TRD Pro or Trailhunter), this won’t work. For standard 2WD and 4WD trims though, fitment is straightforward and predictable.
Installation Notes (What actually helps)
This is one of those installs that looks complicated in pictures but is actually pretty manageable if you take your time. Start with the front flares first—get the alignment right there, and the rest follows naturally.
Don’t rush tightening everything at once. Fit it loosely, check the edges, make sure the gap is even, then lock it in. Over-tightening is where most people mess up, especially with plastic mounting points.
If you’re planning to paint them, do it before installation—it saves time and gives a cleaner finish. And once everything’s on, take a quick drive and recheck the bolts. That’s it—no drama, no surprises.
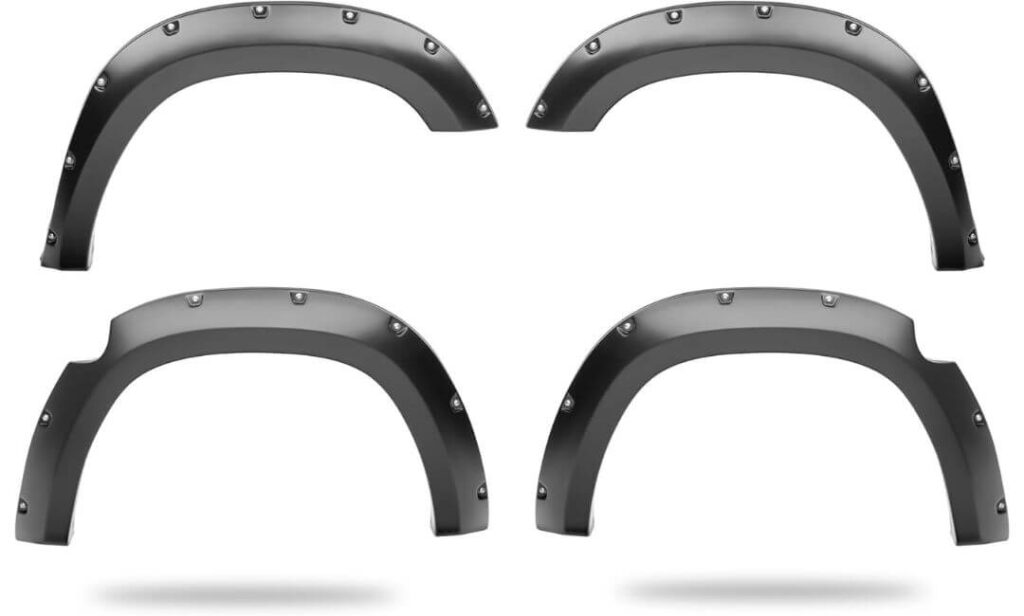
#2. Husky Liners Pocket Style Fender Flares (2014–2024)
Quick Specs:
- Designed for 2014–2024 Toyota 4Runner (non-Limited trims)
- Full-width tire coverage (ideal for low-offset & bigger wheel setups)
- Built with Dura-Flex 2000 ABS (tested for long-term flex + durability)
- 1000+ hours UV tested (no fading, cracking, or warping)
- Pocket-style with rivet design (aggressive, off-road-ready look)
- 4-piece full set (front + rear) with hardware included
- No-drill install on most models (uses factory mounting points)
This is the kind of setup you go for when stock just doesn’t cut it anymore. The moment these go on, the 4Runner takes on a completely different presence—wider, tougher, and actually built for bigger wheels. That pocket-style design with exposed rivets isn’t just for show—it visually breaks up the body lines in a way that makes the truck look more planted on the road (or trail).
But where these really earn their place is coverage. If you’re running low-offset wheels or slightly oversized tires, you already know how quickly your doors and quarter panels get hit with debris. These flares extend enough to actually fix that problem—not just reduce it. You get proper shielding from rocks, mud, and daily road spray without constantly cleaning up after every drive.
The material quality is what seals the deal here. Husky’s Dura-Flex 2000 ABS isn’t the usual stiff plastic—it has just enough flex to handle impacts without cracking, and it holds its shape over time. Add in the 1000-hour UV testing, and you’re not dealing with that faded grey look after a few months in the sun. (Once installed, they keep that deep black finish and tight fit—no warping, no weird edges showing up later.)
What Stands Out in Real Use
- Aggressive pocket-style design actually changes the stance
- True full tire coverage for wider setups
- Material flex + strength balance (doesn’t crack under stress)
- UV resistance that holds color over time
- Complete 4-piece kit with proper hardware included
Where It Falls Short
- Not compatible with Limited trim models
4Runner Fitment Clarity
These are built specifically for the 2014–2024 Toyota 4Runner, and the fit reflects that—tight along the arches with consistent spacing across all four flares. They follow the body lines well, especially around the rear quarter where cheaper kits usually mess up alignment.
Just keep in mind, if you own a Limited model, this won’t work due to factory body cladding differences. For all other trims, the fit is predictable and doesn’t require modification.
Installation Notes (What actually helps)
Installation is straightforward, but alignment is everything here. Start with one flare at a time and loosely mount it before tightening anything—this gives you room to adjust and get that clean, even gap.
Most setups won’t need drilling, but having a basic socket set and a second pair of hands makes the process smoother. Don’t rush the tightening—secure it step by step so the flare sits naturally against the body.
Also, clean the mounting area properly before starting. It sounds basic, but it makes a big difference in how tight and flush the final fit looks. Once done, do a quick turn check to make sure there’s no tire rub—and you’re good to go.
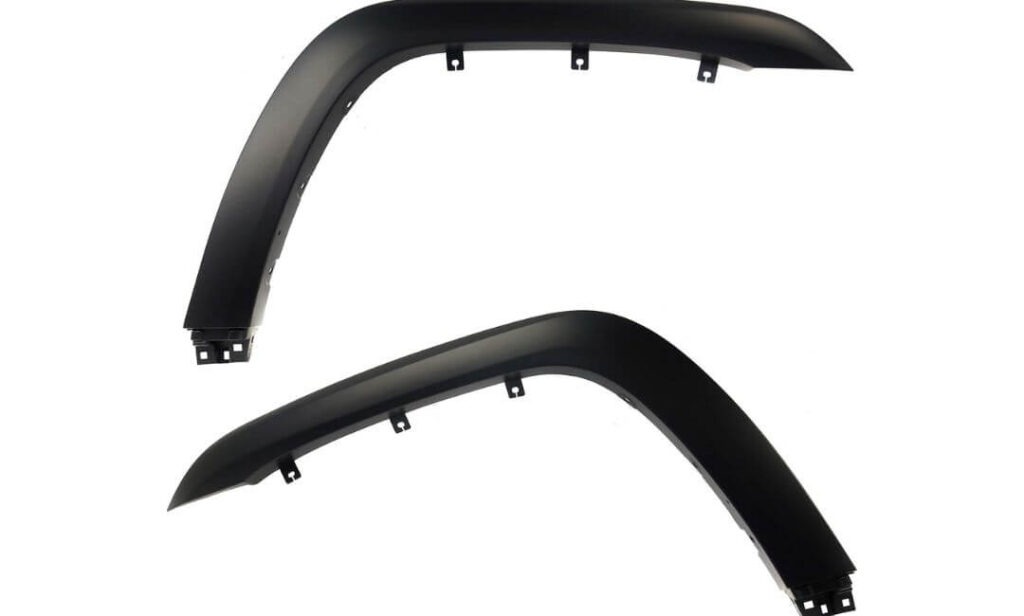
#3. Garage-Pro Front Fender Flares Set (2014–2024)
Quick Specs:
- Fits 2014–2024 Toyota 4Runner (front only – driver + passenger)
- OE-style design (matches factory shape, not aftermarket bulky)
- Comes primed (ready to paint) for exact color match
- Includes 2-piece front set (not full kit)
- Uses factory-style mounting points (simple bolt-on setup)
- Replaces OEM part numbers directly (proper alignment expected)
Not everyone wants a wide, aggressive setup—and that’s exactly where this makes sense. If your factory front flares are faded, cracked, or just don’t match anymore, this is the kind of replacement that brings the 4Runner back to how it’s supposed to look. No extra bulk, no forced styling—just a clean, factory-correct finish that blends in perfectly once painted.
What most people don’t realize is how much bad fitment stands out on the front fenders. Even a slight mismatch around the wheel arch ruins the whole look. This set follows the original OEM shape closely, so once installed and painted, it doesn’t look “replaced”—it looks untouched. That’s a big deal if you care about keeping your 4Runner looking stock but refreshed.
The primed surface is actually an advantage here. Instead of dealing with pre-colored plastic that never truly matches, you can paint it properly to your exact body color. And since it’s a front-only set, it’s a practical fix—you’re not forced to replace all four flares if only the front ones are worn out. (Once painted and installed, it blends so well that most people won’t even notice it’s aftermarket.)
What Stands Out in Real Use
- True OEM-style fit (no awkward edges or mismatch)
- Perfect option for replacing damaged front flares only
- Primed finish allows exact color match (not close, exact)
- Doesn’t change factory look—keeps it clean and original
- Simple design means less install frustration
Where It Falls Short
- Only includes front flares (not a full 4-piece set)
4Runner Fitment Clarity
This is built for the 2014–2024 Toyota 4Runner, and since it follows OEM specs, the alignment is predictable. It sits where the original flares sit—no redesign, no adjustment tricks needed.
It works across most trims because it’s not trying to change the body style—it’s simply replacing what’s already there. That’s why the fit feels natural once mounted.
Installation Notes (What actually helps)
This install is more about patience than difficulty. Start by aligning the flare properly before marking anything—once the positioning is right, everything else becomes straightforward.
You may need to drill into the plastic wheel well liner (not the metal body), so take your time there. Rushing that step is where alignment issues usually start.
Best approach—mount it loosely first, check the curve along the arch, then secure it step by step. And if you’re painting it, always do that before installation for a cleaner finish.
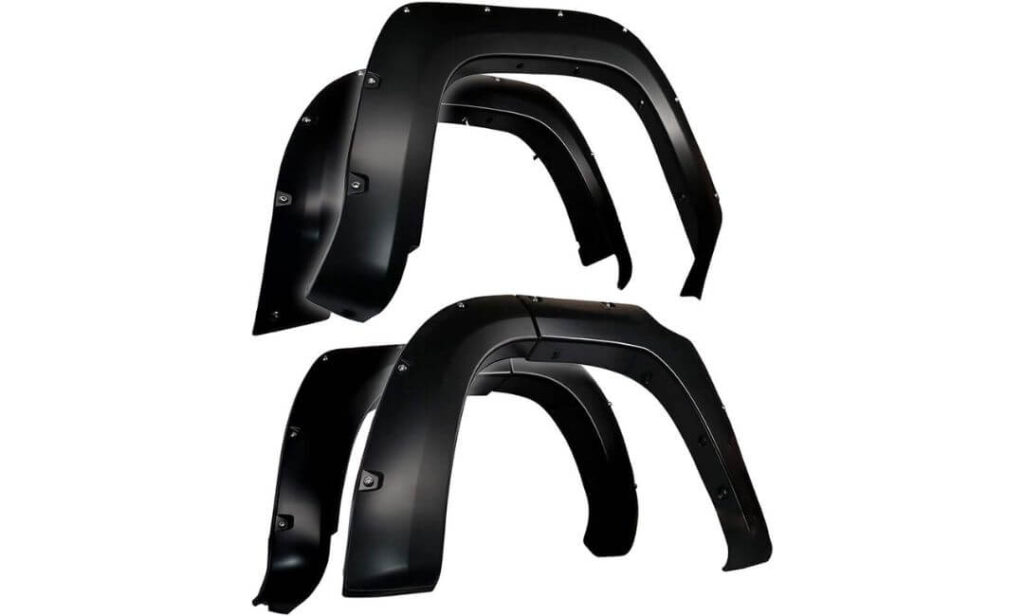
#4. Tyger Auto Bolt-Riveted Fender Flares (2014–2023)
Quick Specs:
- Fits 2014–2023 Toyota 4Runner (non-Limited trims)
- 1.5″ real tire coverage (enough for wider setups without overdoing it)
- 5.5″ flare height (fills arches cleanly front + rear)
- Injection-molded construction (strong + slightly flexible, not brittle)
- 100% UV-resistant finish (no fading or chalking over time)
- 4-piece full kit with hardware + rubber gasket included
- Minor drilling required (plastic liner only)
- Compatible with factory mud flaps
This is what most people picture when they think of a “proper” 4Runner upgrade. Not subtle, not over-the-top—just the right amount of aggression that actually matches the truck. The bolt-riveted styling with recessed pockets gives it that off-road-ready look, but what really matters is how it sits once installed. It doesn’t flare out awkwardly or leave gaps—it follows the body lines in a way that feels intentional.
The 1.5-inch tire coverage hits a sweet spot. It’s enough to handle slightly wider wheels and reduce that constant dirt spray along the doors, but it doesn’t push the flare too far out where it starts looking forced. Combined with the 5.5-inch height, it fills the arches evenly—front and rear—so the truck looks balanced from every angle, not just the side profile.
Where this setup earns trust is durability. The injection-molded build gives it strength without making it stiff and fragile. It has just enough flex to handle real-world use—gravel hits, minor trail contact—without cracking. Add the UV-resistant finish, and you’re not dealing with fading or patchy color after a few months. (Once everything is tightened down, it feels solid—no rattles, no shifting, just a clean, locked-in fit.)
What Stands Out in Real Use
- Aggressive bolt-riveted design that actually fits the 4Runner’s shape
- Balanced tire coverage (practical + visually clean)
- Durable build with slight flex (doesn’t crack under stress)
- Works with factory mud flaps (no extra adjustments needed)
- Complete kit with gasket + hardware for proper sealing
Where It Falls Short
- Requires minor drilling (plastic liner) which may not suit everyone
4Runner Fitment Clarity
Designed for the 2014–2023 Toyota 4Runner, this setup fits clean across most trims except the Limited. It replaces the factory flares, so you’re not stacking parts or forcing alignment—it sits directly where it should.
The compatibility with OEM mud flaps is a big plus here. You don’t have to remove or modify them, which keeps the install cleaner and saves time.
Installation Notes (What actually helps)
Plan around 2 hours and don’t rush the prep. You’ll need to remove the factory flares first—once that’s done, the rest is straightforward.
The only drilling involved is into the plastic wheel well liner, not the metal body, so it’s low risk if done carefully. Align everything loosely before tightening—this is where you get that clean, even gap all around.
Use the rubber gasket properly—it helps seal the edges and prevents that “unfinished” look. And if possible, have someone hold the flare while you mount it—it makes positioning much easier and avoids small alignment mistakes.
#5. YHTAUTO Paintable Pocket Rivet Fender Flares Kit (2014–2023)
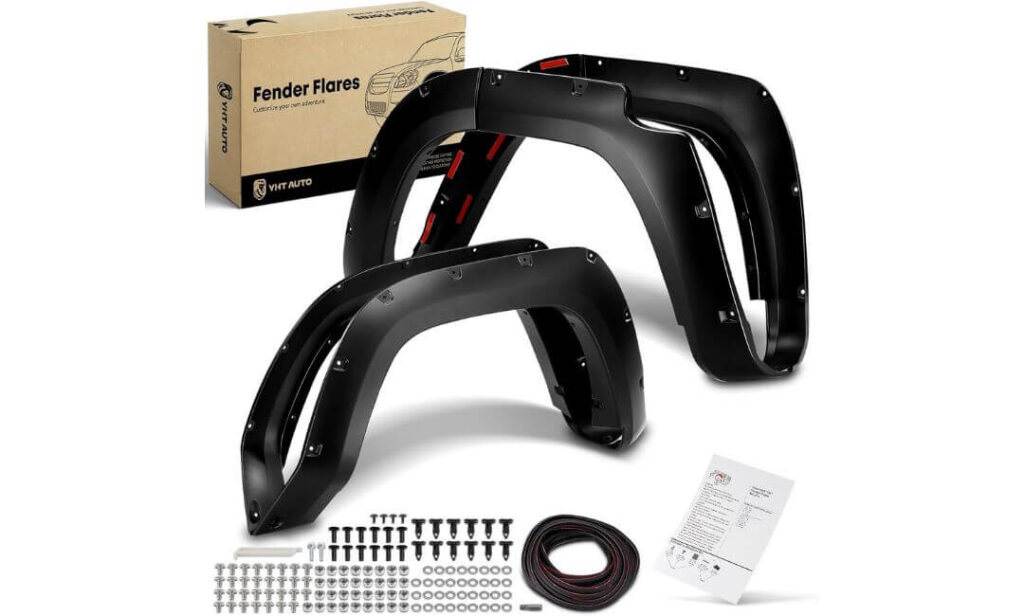
Quick Specs:
- Fits 2014–2023 Toyota 4Runner (non-Limited trims)
- Full 4-piece set (front + rear) with complete hardware kit
- Made from lightweight polypropylene (strong + flexible)
- Smooth matte black finish (fully paintable)
- Pocket bolt-riveted style (aggressive look, bolts mostly cosmetic)
- No drilling required (mounts over factory wheel arches)
- Designed to match factory body contours closely
If you want that aggressive pocket-style look without overcomplicating things, this is where it starts making sense. The first thing you notice isn’t just the styling—it’s how cleanly these follow the 4Runner’s body lines. No weird angles, no forced fit. They sit naturally along the wheel arch, which is exactly what most budget kits fail to get right.
The polypropylene build is a smart choice here. It keeps the flares lightweight but still rigid enough to hold their shape over time. You don’t get that cheap “hollow plastic” feel, and more importantly, it handles heat and sun exposure without turning chalky. For daily driving and light off-road use, it does exactly what you need—protects against debris while keeping the truck looking sharp.
What really adds value is the complete kit setup. Everything you need is included, and since it mounts over factory points, you’re not dealing with drilling or complicated adjustments. The paintable matte finish also gives you flexibility—leave it black for contrast or match it to your body color for a more OEM-style finish. (Once installed properly, it gives that clean, tightened look—like the truck just came out refreshed, not modified.)
What Stands Out in Real Use
- Clean body-line alignment (doesn’t look forced or oversized)
- Lightweight but durable material that holds shape well
- Full kit included—no missing parts or extra runs needed
- No-drill install makes it beginner-friendly
- Paintable finish gives both OEM and custom options
Where It Falls Short
- Requires removal of factory mud flaps before installation
4Runner Fitment Clarity
Built for the 2014–2023 Toyota 4Runner, these flares are shaped to follow the factory arches closely. That’s why the fit feels natural once mounted—no major adjustments or forced alignment needed.
Just note, like most pocket-style kits, this won’t fit the Limited trim due to different body cladding. For other trims, the compatibility is straightforward and consistent.
Installation Notes (What actually helps)
Before starting, remove the mud flaps completely—this is important for proper alignment. Once that’s done, the install becomes much simpler.
Work one flare at a time and loosely mount it first. This gives you room to adjust and match the body lines properly before tightening everything down.
No drilling is required, but alignment still matters. Take a few extra minutes to check the gaps—it makes a big difference in how clean the final result looks. And if possible, have someone assist while positioning—it saves time and avoids small mistakes.
#6. BALOCEO Pocket Style Fender Flares (2014–2023)
Quick Specs:
- Fits 2014–2023 Toyota 4Runner (all trims supported)
- Full 4-piece set (front + rear) with hardware included
- Made from durable PP plastic (textured black finish)
- Pocket-style with exposed rivets (bold, off-road look)
- Designed for full wheel arch coverage & protection
- Bolt-on style install (no complex modifications)
- Contoured to match factory body lines
Let’s be real—most people looking at this aren’t chasing perfection, they want something that works, looks right, and doesn’t cost a fortune. And that’s exactly where this setup lands. Once installed, the first thing you notice is how much more complete the 4Runner looks. The arches don’t feel empty anymore, and that textured black finish adds a proper rugged contrast without needing paint or extra work.
The pocket-style design with exposed rivets gives it that aggressive stance people usually go for, but what matters more is the coverage. These actually extend enough to protect your wheel wells from everyday damage—mud splashes, loose gravel, road debris—all the stuff that slowly ruins your paint over time. It’s not just visual, it’s functional in day-to-day driving.
Material-wise, the PP plastic construction keeps things simple but effective. It’s not overly heavy, doesn’t feel brittle, and holds up well against regular use. You’re not getting premium-level finishing here, but you’re getting something that installs clean, fits decently along the body lines, and does the job it’s meant to do. (For the price, it delivers exactly what most owners expect—solid coverage, clean look, and no unnecessary complications.)
What Stands Out in Real Use
- Strong value for a full 4-piece flare setup
- Textured finish hides scratches and daily wear well
- Good coverage for basic protection needs
- Aggressive styling without going overboard
- Simple setup with included hardware
Where It Falls Short
- Fitment may need extra attention during alignment for a cleaner finish
4Runner Fitment Clarity
Designed for the 2014–2023 Toyota 4Runner, this kit follows the general body shape well enough for a clean install, especially considering the price point. It covers both front and rear arches, giving the truck a more balanced, finished look.
Unlike some other options, this one is more flexible across trims, but getting that tight, factory-like alignment depends on how carefully you install it.
Installation Notes (What actually helps)
Take your time with positioning—this is where you’ll either get a clean look or a slightly off alignment. Start by placing each flare and checking the curve before tightening anything.
Use the provided hardware, but don’t over-tighten—plastic needs a firm hold, not pressure. Having someone hold the flare while you mount it helps a lot with accuracy.
If you want the best result, do a full walk-around before final tightening. Small adjustments at this stage make a big difference in how the flares sit once everything is locked in.
Best Toyota 4Runner Fender Flares for SR5 & TRD Off-Road Trims: Feature & Fit Breakdown
| Product | Best For | Coverage & Size | Material Quality | Install Reality | Fitment |
|---|---|---|---|---|---|
|
Top Pick Rough Country Sport
2025–2026
|
Clean factory look + wide stance | 1.75″ coverage 5.75″ height |
Tri-Blend ABS UV-resistant (premium feel) |
No-drill, factory mounts Very smooth install |
Perfect for new-gen Not for TRD Pro |
|
Off-Road Look Husky Liners Pocket
2014–2024
|
Wide tires + rugged styling | Full-width coverage (best for offsets) |
Dura-Flex ABS Tested for long-term use |
No-drill (mostly) Quick install |
All trims except Limited |
|
OEM Style Garage-Pro Front Set
2014–2024
|
Stock replacement (front only) | Factory size No extra width |
Standard plastic Paint-ready |
Easy bolt-on Minor drilling possible |
All trims supported |
|
Balanced Aggression Tyger Auto Riveted
2014–2023
|
Best mix of style + function | 1.5″ coverage 5.5″ height |
Injection-molded build Strong + flexible |
Minor drilling ~2 hour install |
Excludes Limited Works with mud flaps |
|
Best Value Kit YHTAUTO Kit
2014–2023
|
Full kit + paintable option | Moderate coverage Balanced look |
Polypropylene Lightweight + durable |
No-drill Very beginner-friendly |
Excludes Limited Remove mud flaps |
|
Budget Pick BALOCEO Set
2014–2023
|
Affordable full setup | Good coverage Textured finish |
Basic PP plastic Decent durability |
Easy install Needs alignment care |
Works on most trims |
Buying Guide: How to Choose the Right Fender Flares for Your Toyota 4Runner (Without Regret)
If you’ve made it this far, you’re not just browsing—you’re trying to avoid wasting money on something that either won’t fit right or won’t last. And honestly, that’s where most people go wrong. Fender flares look simple, but once you install the wrong set, you’ll notice every gap, every misalignment, every cheap finish.
So instead of throwing specs at you, here’s what actually matters when choosing the right set for your 4Runner.
Fitment Comes First (Not Style, Not Price)
This is where everything starts. If the fit isn’t right, nothing else matters.
A lot of listings say “fits 4Runner,” but that doesn’t mean it’ll sit properly along your body lines. There’s a big difference between something that fits and something that looks like it belongs there.
For example:
- Newer models (2025+) need precise factory-mount alignment like Rough Country
- 2014–2023 models need trim-specific compatibility (especially avoiding Limited trims in most cases)
If the flare doesn’t follow the curve of the front fender and rear quarter panel cleanly, you’ll end up with uneven gaps—and that’s the first thing anyone notices.
Rule: Always choose vehicle-specific, generation-matched flares over anything “universal.”
Material & Durability (This Decides Long-Term Satisfaction)
This is the difference between something that still looks good after a year… and something that fades, cracks, or warps.
From what we’ve seen in the products above:
- Tri-Blend ABS / Dura-Flex ABS → best for long-term durability (handles heat + impacts)
- Injection-molded builds → stronger and more consistent shape retention
- Polypropylene (PP) → lighter, decent for daily use, but not as tough as premium ABS
UV resistance is not optional. Without it, black flares turn grey fast—especially in harsh sun.
Rule: If you plan to keep your 4Runner long-term, invest in UV-resistant ABS over basic plastic.
Coverage vs. Real Use (Don’t Overdo It)
Wider isn’t always better.
Yes, more coverage means better protection—but if it sticks out too much without proper alignment, it ruins the look. On the flip side, too little coverage defeats the purpose.
From real-world use:
- Around 1.5″–1.75″ coverage is the sweet spot for most setups
- Full-width pocket styles are better for low-offset wheels & off-road use
- OEM-style is enough if you’re staying stock and just replacing damaged parts
Rule: Match coverage to your tire setup, not just aesthetics.
Finish Quality & Gap Alignment (This is What People Notice First)
This is where cheap flares get exposed instantly.
Even if the material is good, poor finishing or alignment ruins everything. You’ll see:
- Uneven spacing along edges
- Corners lifting slightly after install
- Rough edges that don’t sit flush
Paintable flares sound great, but only if the base fitment is solid. Otherwise, even a perfect paint match won’t save it.
Rule: Prioritize tight fit + clean edges first, paint and styling come after.
Installation Reality (Be Honest With Yourself Here)
Every product says “easy install”—but that’s not always the full story.
From this lineup:
- Some are true no-drill (Rough Country, YHTAUTO)
- Some need minor drilling into plastic liners (Tyger Auto)
- Some require extra alignment care (budget options)
Also, things like removing mud flaps or factory flares can add time.
Rule: If it’s your first install, go for no-drill + full kit options. If you’re experienced, bolt-riveted styles are worth it.
Trim Compatibility & Hidden Fit Issues
This is where most buyers get caught off guard.
Not all 4Runners are the same:
- Limited trims often have different body cladding → many flares won’t fit
- TRD Pro / Trailhunter (new gen) already have extended overfenders
Ignoring this leads to returns, wasted time, and frustration.
Rule: Always double-check trim compatibility, not just model year.
Daily Driving vs. Off-Road Use (Choose Based on Reality, Not Image)
Be honest about how you use your 4Runner.
- Daily driver → go for clean fit, lighter material, OEM-style or mild pocket
- Mixed use → balanced coverage + durable ABS (Tyger, Husky level)
- Off-road focused → full coverage + aggressive pocket style
A lot of people overbuild for looks—and regret it later when it feels unnecessary.
Value Isn’t Just Price (Think 6 Months Ahead)
Cheap options can look tempting, but the real question is:
Will it still look good after 6 months?
A slightly more expensive flare that:
- Fits better
- Holds color
- Doesn’t loosen over time
…will always feel like a better purchase than something you have to adjust or replace later.
Rule: Look at fit + durability + install experience together, not just price.
Final Thought
The right fender flare isn’t the one with the most aggressive design or the lowest price—it’s the one that fits your 4Runner cleanly, installs without headaches, and still looks right after months of use.
If you get those three things right, you won’t second-guess your decision later—and that’s what actually matters.
Installation & Maintenance: How to Get a Clean Fit and Keep It That Way on Your 4Runner
Most problems people blame on “bad fender flares” actually come from rushed installs or poor prep. The difference between a setup that looks factory-clean and one that looks off… usually comes down to how carefully it was installed.
If you follow the right process once, you won’t be adjusting, re-tightening, or second-guessing it later.
Step-by-Step Installation (What Actually Works in Real Life)
Start with preparation, not tools. Park the 4Runner on a flat surface, clean the wheel arch area properly, and remove any dirt or residue. This alone affects how flush the flare sits.
If your setup requires removing factory flares (like Tyger or similar bolt-on styles), take your time here. Don’t force anything—factory clips can break if rushed, and that creates fitment issues later.
Once the surface is clear, position the new flare without tightening anything. This is the step most people skip. Hold it in place, check the alignment along the body lines, especially near the front fender curve and rear edges. If it doesn’t sit naturally at this stage, tightening it won’t fix it.
After alignment looks right, mount it loosely using the provided hardware or factory points. Only when all bolts are in place should you start tightening—and even then, do it gradually, moving from one side to another. This keeps the pressure even and prevents gaps.
If your setup includes rubber gaskets or edge trim, install them properly. They’re not just cosmetic—they help seal the edges and give that finished, zero-gap look.
Finish with a full visual check. Walk around the truck, look at it from different angles, and make sure the spacing is consistent across all flares.
(If it looks clean before tightening fully, it will stay clean after. If it looks off early, fix it then—not later.)
Tools You’ll Actually Need (No Guesswork)
You don’t need a full workshop, but having the right basics makes a big difference:
- Socket set and basic wrenches
- Trim removal tool (helps avoid breaking clips)
- Screwdriver set
- Drill (only if required for liner drilling, not body)
- Microfiber cloth for cleaning
- Masking tape (useful for marking alignment points)
A second person helps more than any tool. Holding the flare in position while you mount it makes alignment much easier and avoids small mistakes that become visible later.
Paint & Finish Care (This Keeps It Looking New)
If you’re going with paintable flares, do it before installation. Trying to paint after mounting usually leads to uneven edges and overspray issues.
Use proper automotive-grade paint and prep the surface well—light sanding, primer, then paint. This is what gives that OEM-like finish, not just spraying color directly.
For matte or textured finishes, maintenance is simple but important. Wash regularly to prevent dirt buildup along the edges, especially where the flare meets the body. Over time, that dirt line can make even a well-installed flare look poorly fitted.
UV protection matters too. Even UV-resistant materials benefit from occasional cleaning and care—it helps maintain that deep black finish instead of letting it dull out slowly.
Common Mistakes (And How to Avoid Them)
The biggest mistake is tightening everything too early. Once you lock it in without checking alignment, you’re stuck with uneven gaps. Always fit first, tighten later.
Another common issue is over-tightening. These are plastic components—too much pressure can warp the shape slightly or stress the mounting points. Tight enough to hold, not force.
Skipping prep is another one. Installing over dirt or uneven surfaces leads to poor contact and visible gaps. Clean surface = better fit, every time.
People also ignore small details like mud flaps or trim interference. Some setups require removing or adjusting them—if you skip that, the flare won’t sit correctly no matter how much you adjust it.
Long-Term Maintenance (So It Still Looks Right After Months)
After installation, check the bolts again after a few drives. Not because they’ll fall off—but because small adjustments can settle the fit even better.
Wash the flares along with the rest of the truck, especially after off-road use. Mud and debris buildup is what causes long-term wear and that “used” look around the edges.
If you notice slight misalignment later, don’t ignore it. A quick adjustment early prevents bigger issues down the line.
Final Thought
A good fender flare setup doesn’t just depend on the product—it depends on how it’s installed and maintained. Do it right once, and it becomes something you don’t have to think about again.
That’s the goal—not just adding flares, but making them look like they were always meant to be there.
FAQs About Toyota 4Runner Fender Flares
Will adding fender flares to my Toyota 4Runner actually fix tire poke, or just hide it visually?
This depends on how much your wheels stick out. Most flares in this list give around 1.5″–1.75″ coverage, which is enough for mild to moderate poke setups. If your tires are only slightly outside the stock line, these will properly cover them and reduce spray.
But if you’re running an aggressive offset, flares won’t “fix” it completely—they’ll just reduce how noticeable it is. In that case, you’re choosing between partial coverage or stepping up to wider builds.
Real answer? Fender flares are not a cheat code—they’re a balance between protection and appearance, not a full correction for extreme setups.
Do fender flares change how a Toyota 4Runner drives or handles on-road?
Not in the way most people think. You won’t feel a difference in steering or ride quality just from adding flares.
What does change slightly is how your truck deals with road spray and airflow around the wheels. With proper coverage, you’ll notice less dirt hitting the sides and less debris bouncing back.
The only time it affects driving is if the install is poor—loose flares can vibrate at highway speeds. Installed correctly, they stay solid and don’t interfere with handling at all.
For a Toyota 4Runner daily driver, is aggressive pocket style actually worth it or just for looks?
This is where most people overdo it.
Pocket-style flares look great, but if you’re not running wider tires or doing off-road driving, you’re mostly adding visual bulk without using the extra coverage. That’s not wrong—it just needs to be intentional.
If your goal is a clean, factory-like upgrade, OEM-style or smooth flares make more sense. If you want a tougher stance and don’t mind the added width, then pocket style is worth it.
Real talk—choose based on how you use your 4Runner, not just how you want it to look in photos.
Why do some fender flares look perfect online but uneven once installed?
Because fitment isn’t just about design—it’s about installation discipline.
Even high-quality flares can look off if:
- Alignment wasn’t checked before tightening
- Mounting points were forced instead of adjusted
- Surface wasn’t cleaned properly before install
Most “bad fitment” complaints come from rushed installs, not bad products.
If you take your time aligning before tightening, even mid-range flares can look premium. If you rush it, even the best ones won’t sit right.
How do you tell if a fender flare will still look good after 6–12 months (not just day one)?
This is the question most people should be asking first.
Look at three things:
- Material type → ABS holds shape better than basic plastic
- UV resistance → prevents fading and chalking
- Edge fitment → tighter edges collect less dirt and stay cleaner
Cheap flares don’t fail immediately—they slowly lose their look. Edges start lifting slightly, color fades, and small gaps become more visible over time.
A good set will look almost the same after months as it did on day one.
(That’s the real difference between something that feels like an upgrade… and something you end up replacing again.)
Final Verdict: What Actually Makes a Fender Flare Worth It on a 4Runner
At this point, you’ve seen enough options—and more importantly, you’ve seen what separates a good flare from one that just looks good online.
The truth is simple. On a Toyota 4Runner, fender flares aren’t just an accessory—they either complete the truck… or make it look slightly off every time you walk up to it. There’s no in-between.
If your priority is a clean, factory-level finish with zero guesswork, the Rough Country setup is the closest thing to “install it and forget it.” It fits how a new-gen 4Runner should, without forcing anything.
If you want that bold, off-road stance with real coverage, Husky and Tyger are the ones that actually deliver both look and function—without turning your build into something impractical.
And if you’re working with a tighter budget or just replacing worn-out parts, options like YHTAUTO and BALOCEO do what most people actually need—they refresh the look, add protection, and don’t complicate the install.
But here’s the part most articles won’t tell you:
The “best” fender flare isn’t the most expensive one or the most aggressive one—it’s the one that fits your 4Runner cleanly, installs without stress, and still looks right after months of driving.
Because once it’s on, you’re going to see it every single day.
And you’ll know instantly whether you chose right or settled.
Take a minute, pick based on how you actually use your truck—not just how you want it to look—and you won’t have to redo this again.
Also Check: