6 Best Jeep Gladiator (JT) Front Bumpers in 2026: Heavy-Duty, Winch-Ready & Trail-Proven
There’s a point where the stock front end on a Jeep Gladiator (JT) just stops making sense—usually the first time you scrape it on a rock, or realize it can’t properly support a winch when things go sideways. If you actually use your truck the way it was built to be used—mud, trails, recovery pulls—then a proper front bumper isn’t a “mod,” it’s basic equipment.
I’ve spent enough time around Gladiator builds to know what separates a good-looking bumper from one that actually holds up. Fitment, weld quality, recovery points that don’t flex, and a winch plate that doesn’t feel like an afterthought—that’s what matters. The problem is, most listings look the same on paper, and real-world feedback on newer options is still thin.
So instead of chasing hype, this list focuses on what actually works on the JT platform right now—solid steel builds, proper mounting, usable lighting, and designs that don’t kill your approach angle. These are the bumpers Gladiator owners are picking when they want something they can trust, not just something that looks aggressive in photos.
Best Jeep Gladiator Front Bumpers: Top 2026 Picks for JT Builds That Actually Work
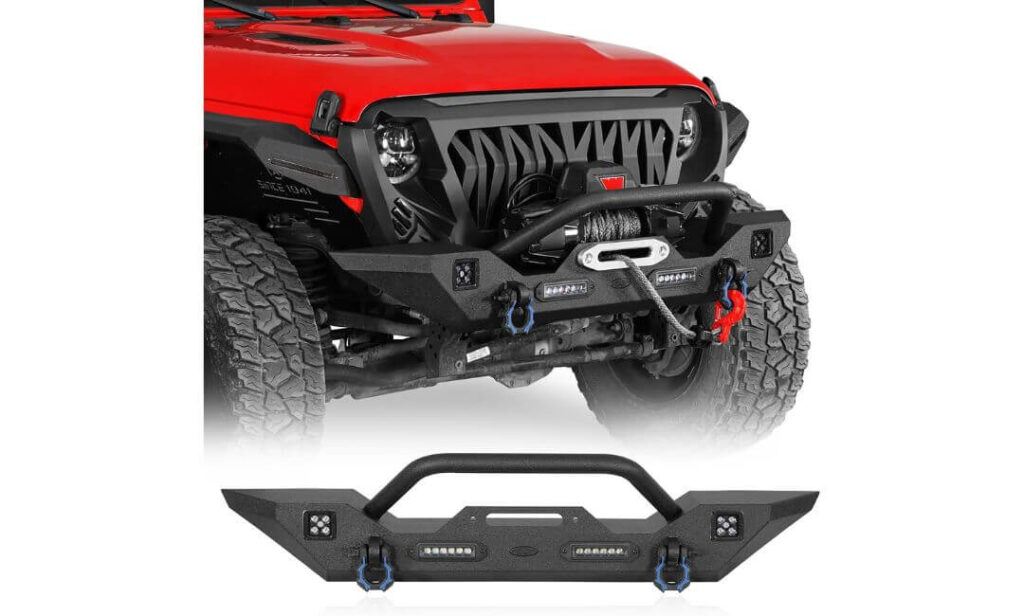
#1. Hooke Road Sturdy Front Bumper
Heavy-duty steel Jeep Gladiator front bumper with winch-ready plate, LED lights & D-rings
#2. YZONA Gladiator JT Front Bumper
Winch-ready Jeep Gladiator JT front bumper with bull bar, LED lights & recovery D-rings
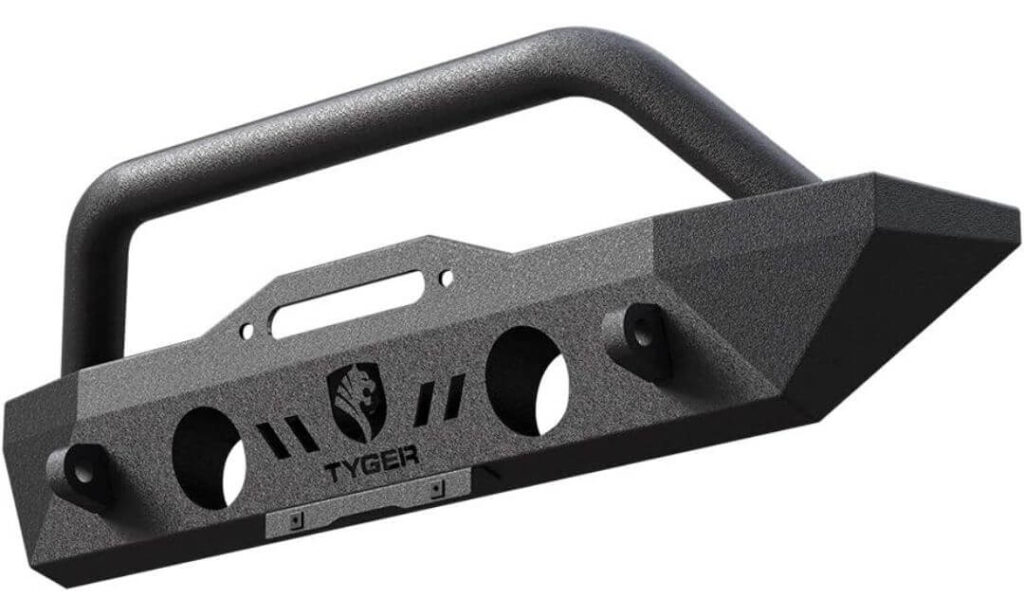
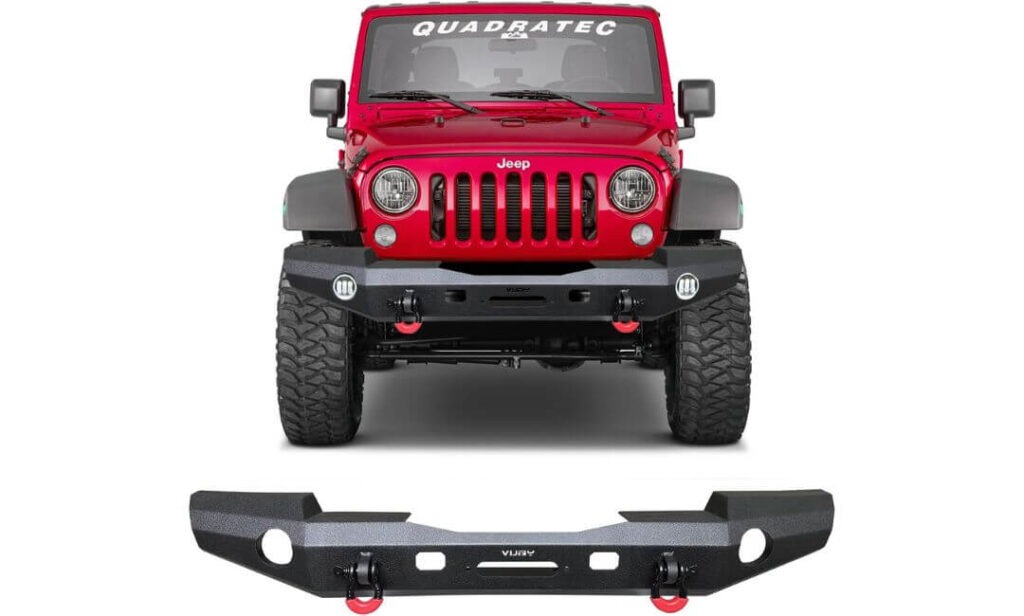
#3. Tyger Auto FURY Stubby Front Bumper
Stubby high-clearance Jeep Gladiator front bumper for off-road use with integrated winch mount
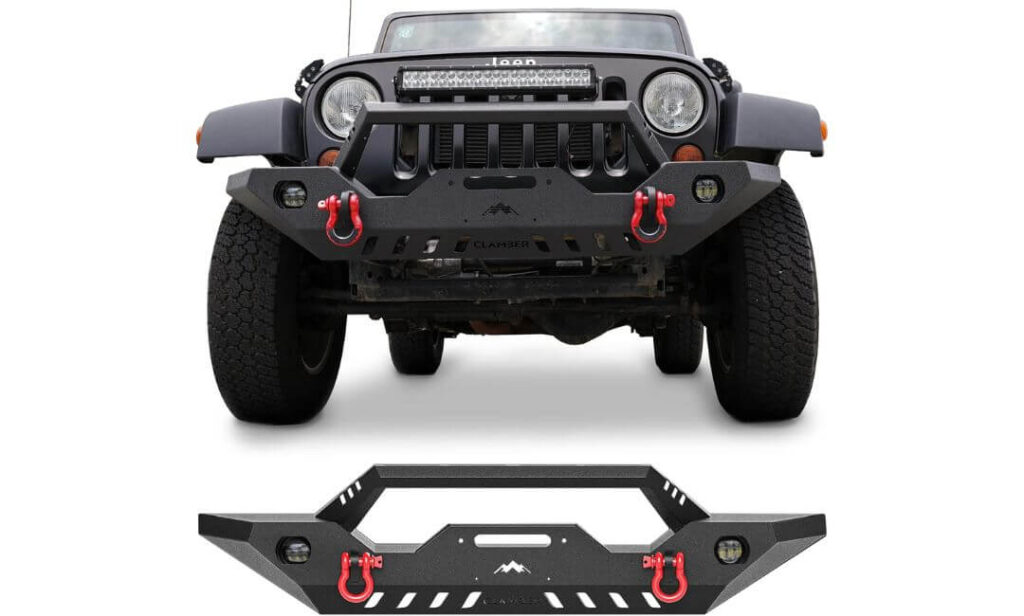
#4. CLAMBER Off-Road Front Bumper
Full-width steel Jeep Gladiator bumper with winch plate and durable powder-coated finish
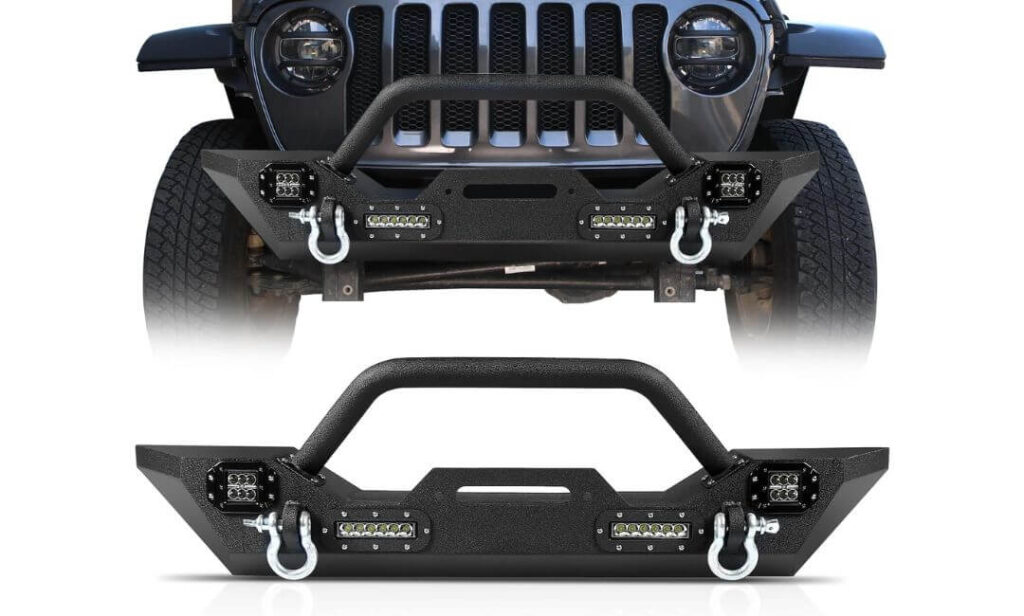
#5. Peforway Front Bumper
Affordable heavy-duty Jeep Gladiator front bumper with LED lights, D-rings & winch compatibility
#6. TIOYAR Front Bumper (Textured Black)
Budget-friendly Jeep Gladiator JT front bumper with clean design and off-road-ready build
Expert Tip (From Real Gladiator Use)
If you’re picking a front bumper for your Gladiator, stop looking at photos first—look at mounting points and winch plate design. A bumper can look aggressive and still fail where it matters. What you want is a bumper that sits tight to the frame, keeps your approach angle clean, and doesn’t flex under load.
Here’s the truth most listings won’t tell you: if the winch plate looks like an add-on instead of part of the structure, skip it. When you’re actually pulling weight—mud, incline, recovery—that’s where cheap designs start showing cracks. Also, don’t overpay for extra styling if you’re not using it. A clean stubby or mid-width bumper with proper steel thickness will outperform bulky designs on real trails every single time.
How We Chose These Jeep Gladiator Front Bumpers
There’s no shortage of bumpers online, but most of them are just variations of the same design with different branding. So instead of picking what looks good on a product page, this selection is based on what actually makes sense on a Jeep Gladiator JT in real conditions.
First, we focused on true compatibility with the JT platform. Every bumper here fits the Gladiator’s frame properly without weird gaps or forced alignment. That matters more than people think, because poor fitment leads to stress on mounting points over time—especially when you start using recovery gear.
Second, we filtered out anything that wasn’t genuinely winch-ready. Not just “supports a winch” on paper, but designs where the winch plate is integrated into the bumper structure, not bolted on as an afterthought. Products like Hooke Road, YZONA, and Tyger clearly follow this approach, which is why they made the cut.
Then comes steel quality and construction. All the bumpers listed here use heavy-duty steel with proper welds and reinforced D-ring mounts. This isn’t about specs on paper—it’s about whether those recovery points hold when you actually need them. Cheaper builds tend to cut corners here, and that’s exactly what we avoided.
We also looked at real-world usability, not just off-road extremes. Some Gladiator owners want a full-width setup for protection, others prefer a stubby high-clearance bumper for better approach angles. That’s why this list includes a mix—Tyger for clearance-focused builds, CLAMBER for full coverage, and others that sit in between.
Lighting and extras were considered, but only where they add actual value. Integrated LEDs, bull bars, and finishes like textured powder coating are useful—but only after the core structure is solid. That’s why even budget-friendly options like Peforway and TIOYAR are included—they offer functional builds without pretending to be something they’re not.
Most importantly, we didn’t rely on hype or inflated claims. These are newer products, and real long-term reviews are still limited. So the focus here is on design logic, build approach, and what holds up under real use, not just ratings. If a bumper made this list, it’s because it shows the right fundamentals to perform on a Gladiator—not just look good online.
This is the kind of shortlist you’d come up with after actually understanding the platform, not just scrolling through listings.
#1. Hooke Road Sturdy Front Bumper
Quick Specs:
- Material: 11-gauge steel plate + reinforced steel tubing (real trail-grade, not cosmetic)
- Winch Capacity: Supports up to 12,000 lbs winch (proper integrated plate, not bolt-on)
- Recovery Points: 9,500 lbs rated D-rings with isolators
- Lighting Setup: 4 LEDs (2×25W spot + 2×18W horizontal)
- Weight: ~57 lbs (balanced—strong but not overkill heavy)
- Finish: Textured black powder coat + E-coating (built for mud, water, salt)
The moment you hold this bumper in your hands, you realize it’s not built for show—it’s built for when things actually go wrong on a trail. The steel feels dense, the welds don’t look rushed, and the whole structure sits like one solid piece instead of multiple parts bolted together. That matters when you’re pulling a stuck Gladiator out of deep mud or lining up on a rocky climb where approach angle decides everything.
What stands out immediately is how the winch plate is part of the core structure, not something added later. That means when you’re running a 10K–12K winch, the load spreads properly across the frame instead of stressing a single section. Add to that the 9,500 lbs rated D-rings, and you’re looking at a setup that actually handles recovery—not just looks ready for it.
Then there’s the practicality most people overlook. The LED setup isn’t just decoration—those 25W spots and horizontal bars actually light up the trail in a usable pattern. And the install? Straight bolt-on. No cutting, no guessing, no “adjustment hacks.” It lines up with factory mounts like it was meant to be there from day one. (This is one of those bumpers that quietly proves itself after a few real trail runs—not just in photos.)
What Stands Out in Real Use
- True winch-ready design — load-bearing, not cosmetic
- Solid recovery points — no flex when it actually matters
- Balanced weight — strong without killing front-end feel
- Useful LED lighting — not just for looks, реально usable
- Clean fitment on Gladiator — sits tight, no awkward gaps
Where It Falls Short
- The paint can chip over time if you’re doing frequent hardcore runs (normal for this price range, not a dealbreaker)
Jeep Gladiator Fitment Reality
On the Gladiator JT, this bumper fits the way it should—tight to the frame, no weird overhang, and no loss of approach angle. It doesn’t stick out unnecessarily, which is exactly what you want when you’re climbing or dropping into uneven terrain.
More importantly, it doesn’t mess with the truck’s natural stance. Some bumpers throw off proportions or sit too bulky upfront. This one keeps things balanced and functional, which is why it works equally well on a daily-driven Gladiator and a weekend trail build.
Installation Notes (Real Talk)
Install is straightforward, but don’t rush it. The bumper uses factory mounting points, so no drilling headaches—but alignment can be slightly tight in some cases. That’s normal. Take your time lining it up instead of forcing bolts in.
Wiring the lights is where most people slip. It’s not plug-and-play, so expect to spend extra time getting it clean. If you do it right once, you won’t have to touch it again. Also, having a second person helps—a 57 lb steel bumper isn’t something you casually hold and align alone.
#2. YZONA Gladiator JT Front Bumper

Quick Specs:
- Material: High-strength carbon steel (built for impact, not just looks)
- Winch Capacity: Supports up to 12,000 lbs winch (properly integrated plate)
- Recovery Points: 4.75-ton D-rings (serious recovery use)
- Lighting Setup: 4 × 18W LED lights (balanced spread + forward throw)
- Weight: ~60 lbs (slightly heavier, adds front-end confidence)
- Design Add-ons: Bull bar + dual pre-runner hoops (extra protection + light mounting)
- Finish: Dual-stage textured powder coat (holds up better over time)
This is the kind of bumper you pick when you want your Gladiator to feel ready before you even hit the trail. The first thing you notice isn’t just the steel—it’s the structure. Everything feels layered with purpose, from the bull bar up front to the way the winch plate sits deep inside instead of hanging out like an afterthought.
The 12,000 lbs winch capacity isn’t just a number here—it actually matches the way the bumper is built. The load gets distributed across the frame properly, and those 4.75-ton D-rings don’t feel like weak points. Add in the bull bar and pre-runner hoops, and you’re getting real front-end protection, not just styling. This setup makes sense if you’re the kind of driver who doesn’t want to second-guess recovery situations.
Lighting is where it quietly does more than expected. The four 18W LEDs aren’t overly flashy, but they create a usable spread for night trails without blinding everything ahead. And since the bumper already has mounting options for extra lights, you’re not boxed into one setup. (It’s the kind of bumper that feels overbuilt in a good way—you notice it more when you need it, not when you’re just looking at it.)
What Stands Out in Real Use
- Integrated winch system that actually supports heavy pulls
- Bull bar + hoop protection adds real front-end security
- Strong D-rings that feel reliable under load
- Expandable lighting setup with extra mounting options
- Heavier build gives a more planted front-end feel
Where It Falls Short
- LED wiring needs separate extension harness, not included (small extra step, but manageable)
Jeep Gladiator Fitment Reality
On the Gladiator JT, this bumper sits slightly more aggressive upfront, but in a controlled way—not oversized, not awkward. It lines up with factory mounting points cleanly, and once installed, it looks like it belongs there, not like an add-on.
Because of its slightly heavier build and added structure, it suits Gladiators that are used for real off-road runs or loaded setups. If you’re running extra gear or planning recovery use often, this design actually complements the truck instead of just changing its look.
Installation Notes (Real Talk)
Installation is bolt-on, but give yourself time. The weight is a bit higher, so having an extra set of hands helps more than you think. Alignment is straightforward if you don’t rush it—get all bolts loosely in place first, then tighten evenly.
The only part that needs planning is the LED wiring. Since harnesses aren’t included, you’ll need to set that up yourself. Do it cleanly once—proper routing, secure connections—and you won’t have to mess with it again later.
#3. Tyger Auto FURY Stubby Front Bumper (TG-BP6J70078)
Quick Specs:
- Material: 5mm carbon steel (thicker than most in this range, реально tough)
- Winch Capacity: Supports up to 10,000 lbs winch (clean integrated mount)
- Design: Stubby high-clearance layout (maximum approach angle)
- Recovery Points: Welded D-ring mounts (solid, no bolt-on flex)
- Weight: ~59 lbs (compact but dense)
- Extras: Retains factory fog lights + license plate mount included
- Finish: Textured black powder coat (basic but durable enough)
This is where things get serious for actual off-road driving. Not flashy, not oversized—just a proper stubby bumper that gives your Gladiator the kind of clearance you immediately feel the moment you hit uneven terrain. The shorter width isn’t a design choice for looks—it’s there so your front wheels can actually move freely around rocks without the bumper getting in the way.
The 5mm steel construction is where this one quietly stands out. It’s thicker than what you usually see in this price range, and you feel that difference when you mount a winch or hook into recovery points. The 10,000 lbs winch plate sits perfectly aligned, not pushed forward or awkwardly placed, which keeps the load closer to the frame—exactly how it should be. And those welded D-ring mounts? They don’t feel like an add-on—they feel like part of the structure.
What really makes this bumper click is how practical it is. You can reuse factory fog lights, keep things clean, and avoid extra wiring headaches. No unnecessary bulk, no fake styling—just a tight, aggressive setup that actually improves the way your Gladiator drives off-road. (This is the kind of bumper you understand after one trail run—it changes how confident you feel approaching obstacles.)
What Stands Out in Real Use
- Stubby design = real clearance gain, not just visual difference
- Thicker 5mm steel build adds real strength without excess weight
- Winch alignment is spot-on, no awkward mounting issues
- Factory fog light compatibility saves time and effort
- Compact structure keeps front end agile on tight trails
Where It Falls Short
- You’ll need to remove the factory skid plate/splash guard, which some users may miss
Jeep Gladiator Fitment Reality
On the Gladiator JT, this bumper changes the way the truck feels up front. It sits tighter, shorter, and more purpose-built—exactly what you want if you’re pushing into rocky or technical terrain. The reduced width isn’t just noticeable—it’s useful.
One thing to know: while officially marked non-Rubicon, many real users have installed it without issues. The fit itself is clean and direct, but always double-check your setup if you’re running factory skid components or trim-specific parts.
Installation Notes (Real Talk)
Install is simple on paper, but pay attention to the details. Remove the stock bumper completely, including splash guard and skid plate—those won’t go back on. Do a dry fit first, align all bolts loosely, then tighten gradually to avoid misalignment.
Big tip—install your fog lights before mounting the bumper. It saves a lot of frustration later. And if something feels slightly off during alignment, don’t force it. Take your time—once it’s properly mounted, it sits solid and doesn’t need revisiting.
#4. CLAMBER Off-Road Front Bumper
Quick Specs:
- Material: 4mm carbon steel (solid mid-thickness, built for real use)
- Winch Capacity: Supports up to 10,000 lbs winch (standard 10×4.5 fitment)
- Recovery Points: 10,000 lbs rated D-ring mounts (welded, not cosmetic)
- Weight: ~65.6 lbs (heavier, more full-front protection feel)
- Lighting Compatibility: Works with factory fog lights (brackets included)
- Finish: E-coat + textured powder coat (better rust resistance over time)
This one hits different the moment you see it mounted—it’s not trying to be minimal or flashy, it’s built like it’s supposed to take hits and keep going. The structure feels fuller, more planted, and once it’s on your Gladiator, the front end immediately looks and feels more protected.
The 4mm steel construction is right in that sweet spot—thick enough to handle impact, but not overbuilt to the point it ruins drivability. The 10,000 lbs winch plate is properly centered and supported, so when you’re running recovery gear, it doesn’t feel like you’re stressing one weak section. Same story with the D-ring mounts—they’re welded in a way that actually inspires confidence when you hook up and pull.
Where it really makes sense is for people who want a full-width protective setup without going into overpriced territory. You keep your factory fog lights, you get a clean license plate mount, and there’s flexibility to add extra lighting if needed. It’s not trying to reinvent anything—it just focuses on doing the fundamentals right. (This is the kind of bumper you choose when you want reliability more than hype—it just quietly does its job every time.)
What Stands Out in Real Use
- Full-width protection that actually covers what matters
- Balanced steel thickness for strength without overkill weight
- Reliable winch and recovery setup that feels secure under load
- Factory fog light compatibility keeps things simple
- Strong corrosion resistance with dual coating layers
Where It Falls Short
- Fitment can need small adjustments during install, nothing major but requires patience
Jeep Gladiator Fitment Reality
On the Gladiator JT, this bumper gives a more complete front-end feel—less exposed, more protected. It sits wider than stubby options, which means you’re trading a bit of clearance for added coverage and confidence, especially on rough trails or daily driving.
It works best for Gladiator owners who want a balanced build—something that can handle off-road use but still feels practical for regular driving. Not overly aggressive, not too minimal—just a proper middle ground that actually makes sense long term.
Installation Notes (Real Talk)
Installation is bolt-on, but don’t expect it to drop in perfectly on the first try. Some users report slight misalignment in bolt holes, so take your time positioning everything before tightening.
Have a second person with you—the weight is noticeable. If you’re transferring fog lights, the brackets are there, but minor adjustments might be needed depending on your setup. Once it’s aligned and tightened properly, though, it sits solid and doesn’t need revisiting.
#5. Peforway Front Bumper
Quick Specs:
- Material: K235 carbon steel + reinforced tubing (stronger than basic mild steel builds)
- Winch Capacity: Supports up to 12,000 lbs winch (proper recovery-ready setup)
- Recovery Points: 4.75-ton D-rings (mechanically welded inside-out for strength)
- Lighting Setup: 4 × 18W LED lights (wide + focused visibility combo)
- Weight: ~58 lbs (balanced for strength + usability)
- Design Add-ons: Detachable bull bar (flexibility based on use)
- Finish: Triple-layer coating (steel treatment + E-coat + powder coat)
Straight up—this is one of those bumpers that quietly overdelivers without trying to look expensive. The moment it’s mounted on a Gladiator, it gives off that “ready for anything” feel without being bulky or overdone. It’s not chasing style points—it’s built around solving real problems you face once you leave pavement.
The 12,000 lbs winch plate is where it starts making sense. It’s positioned correctly, reinforced properly, and paired with 4.75-ton D-rings that are welded both internally and externally. That’s not common at this level. When you hook into recovery, it doesn’t feel like you’re testing limits—it feels like the setup was made for it. Add in the quad 18W LED system, and you’re getting actual usable light spread for trails, not just something that looks good in listings.
What makes it practical is the flexibility. You get a detachable bull bar, so you can run it aggressive or keep it cleaner depending on your setup. And the triple-layer coating actually does its job—mud, water, road grime—it holds up better than most basic finishes. (It’s the kind of bumper that feels like a smart buy after install—no surprises, no regrets, just solid function where it counts.)
What Stands Out in Real Use
- Strong recovery setup with reinforced D-ring mounting (real confidence under load)
- Well-positioned winch plate that doesn’t stress the frame
- Useful quad-LED lighting for actual night trail visibility
- Detachable bull bar adds flexibility based on driving style
- Triple-layer coating improves long-term durability
Where It Falls Short
- The powder coat is slightly thinner, so heavy abuse can show wear over time
Jeep Gladiator Fitment Reality
On the Gladiator JT, this bumper fits the way most people want—clean, centered, and without awkward gaps. It doesn’t sit too far out, and it doesn’t mess with the truck’s natural proportions. Once installed, it looks like a proper upgrade, not an aftermarket add-on.
It’s especially suited for Gladiator owners who want a balanced setup—something capable enough for off-road use, but still practical for daily driving. Not too heavy, not too minimal—just right in that usable middle zone.
Installation Notes (Real Talk)
Install is genuinely straightforward if you don’t rush it. It bolts directly to factory mounting points, so no drilling headaches. Start with the center bolts, keep everything loose, and then tighten evenly—that’s the easiest way to avoid alignment issues.
For the LEDs, plan your wiring properly. Use clean routing and test everything before final tightening. Also, handle the bumper carefully during install—the coating is decent, but dragging it around can cause unnecessary marks. Once mounted correctly, though, it sits solid and doesn’t need revisiting.
#6. TIOYAR Front Bumper (Textured Black)
Quick Specs:
- Material: 5/32″ low carbon steel + 2″ steel tubing (thick, impact-ready build)
- Winch Capacity: Supports up to 13,000 lbs winch (higher than most in this range)
- Recovery Points: 4.75-ton D-rings (welded mounts, ~9,500 lbs pull rating)
- Design: Full-width protection (maximum front-end coverage)
- Weight: ~79.4 lbs (heavy, planted feel)
- Lighting Compatibility: Reuses factory fog light setup
- Finish: Three-stage powder coating (better long-term resistance)
You can tell right away—this isn’t built for light use. It’s one of those bumpers that feels serious the moment it’s unboxed, and once it’s on your Gladiator, the front end just looks locked in, protected, and ready for impact. No lightweight feel, no shortcuts—just a proper chunk of steel doing its job.
The 13,000 lbs winch capacity is where it clearly separates itself. Most bumpers in this space stop at 10K–12K, but this one pushes higher, and the structure actually backs it up. Pair that with 4.75-ton D-ring mounts, and you’re getting a setup that’s built for real recovery situations, not just occasional pulls. The full-width design adds another layer—it protects more of the front end, especially if you’re running through tighter trails or unpredictable terrain.
What makes it practical is how it keeps things simple despite the heavy build. You can reuse your factory fog lights, no need to overcomplicate wiring or setups. And the triple-layer coating does its part against rust and wear. (This is the kind of bumper you choose when you want maximum front-end confidence—it’s not subtle, but it gets the job done every time.)
What Stands Out in Real Use
- Highest winch capacity in this list (13,000 lbs support)
- Full-width protection for maximum front-end safety
- Thicker steel construction gives real impact resistance
- Strong D-ring mounts that handle proper recovery loads
- Simple fog light reuse keeps installation cleaner
Where It Falls Short
- Heavier build can feel overkill for casual or daily-only users
Jeep Gladiator Fitment Reality
On the Gladiator JT, this bumper sits wide and planted, giving the truck a more aggressive and protected stance. It’s not trying to improve clearance—it’s focused on coverage and strength, which makes it ideal for tougher environments.
One thing to note—installation on Gladiator may require adjustment around factory fender flares (wheel eyebrows). It’s not a dealbreaker, but something to be aware of before you start.
Installation Notes (Real Talk)
Installation is bolt-on, but because of the weight, don’t treat it like a quick swap. Get help—it makes alignment much easier. Start by loosely fitting all bolts, then tighten gradually to avoid misalignment issues.
Fog light transfer is straightforward, but in some cases, minor adjustments may be needed for perfect fitment. Also, double-check all bolts after installation—this bumper sits solid once properly mounted, but only if you take your time setting it up right.
Best Jeep Gladiator Front Bumpers (Quick Comparison)
| Bumper | Build Type | Winch Support | Weight Feel | Best Use | Verdict |
|---|---|---|---|---|---|
| Hooke Road Most Balanced |
11-gauge steel, mid-width | Up to 12,000 lbs | Medium (57 lbs) | Daily + weekend off-road | Best overall mix of strength, fit, and usability |
| YZONA Heavy Setup |
Carbon steel + bull bar | Up to 12,000 lbs | Heavy (~60 lbs) | Loaded builds, protection focus | Feels more armored, great for serious setups |
| Tyger FURY Stubby Max Clearance |
5mm steel, stubby | Up to 10,000 lbs | Compact (~59 lbs) | Rock crawling, tight trails | Best for approach angle, pure off-road driving |
| CLAMBER Full Protection |
4mm steel, full-width | Up to 10,000 lbs | Heavy (~65 lbs) | Balanced off-road + daily | Solid coverage without going extreme |
| Peforway Best Value |
K235 steel + bull bar | Up to 12,000 lbs | Medium (~58 lbs) | Budget builds with real features | Strong features for the price, smart buy |
| TIOYAR Max Strength |
5/32 steel, full-width | Up to 13,000 lbs | Very Heavy (~79 lbs) | Hardcore protection & recovery | Overbuilt in a good way, built for extremes |
Buying Guide: How to Pick the Right Jeep Gladiator Front Bumper (JT 2020–2026)
Choosing a front bumper for your Gladiator isn’t about picking the toughest-looking option—it’s about picking something that actually matches how you use the truck. A lot of people either overspend on features they never use or go too cheap and regret it the first time they need recovery. The right choice sits in between—fit for your use, not just your build photos.
Key Questions You Need to Answer First
Before you even look at brands or designs, get clear on this—because this is where most wrong decisions start.
What’s your real budget—and what are you expecting from it?
There’s a big difference between a budget Jeep Gladiator front bumper that gets the job done and a premium setup that’s built for repeated abuse. Budget options like Peforway still offer real winch support and recovery points, but premium-feel builds like YZONA or TIOYAR bring more structure and protection. The mistake is expecting extreme durability at entry-level pricing.
Do you actually need winch readiness and recovery strength?
If you’re even slightly serious about off-roading, the answer is yes. But here’s the detail—look for a true integrated winch plate, not something bolted on. Same with D-rings. They should feel like part of the bumper, not accessories. Otherwise, you’re just adding weight without real capability.
How much protection vs clearance do you need?
This is where people get it wrong.
- If you’re into rock crawling or tight trails, go stubby (like Tyger) → better approach angle
- If you want balanced use, mid-width works best (Hooke Road, Peforway)
- If your priority is maximum protection, full-width (CLAMBER, TIOYAR) makes more sense
You can’t have all three perfectly—pick based on how you actually drive.
Are you planning to upgrade lighting or accessories?
Some bumpers come with built-in LEDs, others let you customize. If you plan to run extra lights, antennas, or recovery gear, make sure the bumper has mounting flexibility. Otherwise, you’ll end up modifying it later.
Compatibility Reality (JT 2020–2026)
Here’s something most listings don’t explain clearly—the Jeep Gladiator JT platform (2020–2026) hasn’t changed structurally in a way that affects bumper fitment. That means most bumpers labeled 2020–2026 will fit across all these years without issue.
But real-world fitment isn’t just about “it bolts on.”
Tow hooks & recovery points
Some bumpers replace factory hooks completely, others integrate better mounting. If you rely on recovery gear, make sure you’re not downgrading strength.
Sensors & electronics
If your Gladiator has front sensors, not all bumpers support them cleanly. Some require relocation, others ignore them completely. Check before buying—this is where frustration usually starts.
Skid plates & underbody fitment
Certain designs (especially stubby bumpers) may require removing factory skid plates or splash guards. Once removed, they usually don’t go back. Know this before installing—not after.
Installation Reality (What It’s Actually Like)
Every bumper says “bolt-on”—and technically, that’s true. But the real experience depends on how prepared you are.
DIY vs Professional Install
- DIY: 1–3 hours if you’ve done basic mods before
- First-timers: expect more time, especially for alignment and wiring
- Shop install: quicker, but only worth it if you’re not comfortable handling weight + wiring
What actually takes time
It’s not the bolts—it’s the alignment and wiring. Getting the bumper to sit perfectly level takes patience. Rushing this is how people end up with uneven gaps.
Extra things you’ll likely need
- Winch (if not already installed)
- Wiring harness / relay for LEDs (most don’t include it)
- Basic tools + second person (especially for heavier bumpers like TIOYAR)
Final Thought (What Most People Realize Late)
The best bumper isn’t the one with the most features—it’s the one that feels right on your Gladiator after a few real drives. When recovery points feel solid, when the winch sits properly, when clearance actually helps—that’s when you know you chose right.
Everything else is just marketing.
Installation & Maintenance Tips for Jeep Gladiator Front Bumpers (JT 2020–2026)
A front bumper install on a Jeep Gladiator (JT) isn’t complicated—but doing it right is what separates a clean build from something that keeps giving you small problems later. Most issues people face aren’t because the bumper is bad—it’s because the install was rushed or the maintenance was ignored after.
Prep Steps That Actually Make the Install Go Smooth
Before you touch a single bolt, set things up properly. This is where you either save time or waste hours later.
Start with the basics—clear workspace, proper tools, and enough time. You’ll need a socket set, torque wrench, extensions, and ideally jack stands. But the real difference comes from how you approach the install.
Always do a dry test-fit before tightening anything. Lift the bumper into place, align all mounting points loosely, and check how it sits against the frame. On Gladiator builds, even a 1–2 mm misalignment at the start turns into visible gaps later.
When tightening, don’t go one side at a time. Start from the center mounts and move outward evenly. This keeps the bumper sitting straight and prevents stress on the brackets.
If you’re installing a winch, mount it before fully tightening the bumper. It’s much easier to adjust alignment when everything is still slightly loose.
And one thing most people ignore—use proper torque, not guesswork. Over-tightening can strip threads or stress mounts, and under-tightening leads to movement over time.
Common Pitfalls (What Actually Goes Wrong by Model Type)
Different bumper styles bring different issues. Knowing this upfront saves frustration.
Stubby bumpers (like Tyger)
People forget they require removing splash guards or skid plates. Once removed, those parts usually don’t go back. Also, fog light wiring should be done before mounting, not after.
Mid-width bumpers (Hooke Road, Peforway)
Alignment is usually good, but users rush the process. Slight misalignment during install leads to uneven spacing near fenders. Also, LED wiring is often underestimated—plan it properly instead of improvising.
Full-width bumpers (CLAMBER, TIOYAR)
Weight becomes the main issue. Trying to install these solo is where things go wrong—misalignment, scratched coating, or uneven mounting. Also, some units may need minor hole adjustment or bracket tweaking—normal at this level, not a defect.
Heavy-duty setups with bull bars (YZONA)
Extra structure means more points to align. If you tighten one side too early, the whole bumper sits slightly off. Take your time here—this is where patience matters most.
Maintenance Tips That Actually Extend Bumper Life
Once installed, most people forget about the bumper until something goes wrong. That’s the mistake.
First thing—check bolts after your first few drives, especially after off-road use. Steel settles slightly under load, and bolts can loosen just enough to create movement over time.
For finishes, don’t expect any powder coat to be invincible. Even the best ones will chip eventually. The smart move is simple—touch up chips early before rust starts. A small fix now saves you from bigger issues later.
If you regularly drive in mud, water, or salty conditions, rinse the bumper properly. Dirt buildup inside corners and behind mounts is what causes hidden corrosion—not surface exposure.
For internal protection, many experienced owners apply a light anti-rust coating inside the bumper structure. It’s not visible, but it makes a big difference long term.
And finally—pay attention to recovery points. If you’re using D-rings often, check for any sign of stress, bending, or unusual wear. These are load-bearing parts, not decorative pieces.
Final Reality Most People Learn Later
A good bumper doesn’t fail suddenly—it shows small signs first. Slight movement, minor rust spots, loose bolts. If you catch these early, your bumper will last years without issues.
Ignore them, and even the best setup starts feeling like a bad purchase.
That’s the difference between just installing a bumper—and actually running it properly on a Gladiator.
Real-World Performance Notes (2026): What These Gladiator Bumpers Are Actually Like After Use
Most bumpers look solid on day one. Clean coating, tight fit, everything feels perfect. But the real story only starts after a few months—dust, water, recovery pulls, small impacts. That’s where you see what holds up and what was just built for photos.
This isn’t theory—it’s what Gladiator owners start noticing after 6–12 months of actual use.
What Durability Really Looks Like After 6–12 Months
Across these builds, the pattern is clear—structure holds up better than finish.
Bumpers like Hooke Road, YZONA, and Peforway keep their core strength intact even after repeated use. The steel doesn’t flex, mounting points stay tight, and recovery points don’t develop play if installed correctly. That’s what matters long term.
Where things start to show is the surface layer. Powder coating—no matter the brand—will pick up chips over time. Edges, corners, and D-ring mounts are usually the first spots. This isn’t failure, it’s normal wear. The difference is how early it starts showing:
- Mid-range coatings → minor chips within months (especially trail use)
- Better finishes (dual/triple coat) → hold cleaner longer but still not immune
Heavy builds like TIOYAR and CLAMBER tend to age slower structurally, simply because there’s more material and coverage. Stubby designs like Tyger stay solid too, but since they expose more of the front end, they take hits differently.
How They Handle Rock Rash, Impact & Weather
This is where design matters more than specs.
Rock Rash & Trail Impact
Stubby bumpers (Tyger) perform best here—not because they’re stronger, but because they avoid contact in the first place. Better clearance = fewer hits.
Full-width bumpers (CLAMBER, TIOYAR) take more contact, but they’re built for it. You’ll see scratches, maybe paint wear, but the structure underneath stays intact.
Mid-width options (Hooke Road, Peforway) sit in the middle—good clearance, decent coverage. For most Gladiator owners, this balance actually works best in real driving.
Weather Resistance (Mud, Rain, Heat, Salt)
All these bumpers are coated, but real-world exposure still tests them:
- Mud and water → fine if cleaned regularly
- Salt / coastal use → coating wear shows faster
- Heat → no major issues, but cheap coatings fade quicker
The important part is this—corrosion doesn’t start on the surface, it starts where moisture gets trapped. Behind mounts, inside tubing, under brackets. That’s where long-term durability is decided.
Accessory Mounting & Real Usability
This is something you only notice after using the bumper—not when buying it.
Winch Fitment & Use
Across all these options, winch mounting is generally solid—but the difference is in ease of use. Bumpers with properly integrated plates (Hooke Road, YZONA, Peforway) make installation and operation smooth. No awkward spacing, no stress on bolts.
On some tighter designs, access around the winch can feel limited—but once installed, performance is stable.
Lighting Setup Reality
Built-in LEDs work fine, but serious users almost always upgrade or add more. The key is whether the bumper allows it:
- YZONA → best flexibility (extra hoops for lights)
- Others → basic setups, but still usable
Wiring is the real challenge—not the lights themselves. Clean routing and proper connections matter more than wattage.
Snag-Free Design (Underrated but Important)
This is where cheap designs fail. Hooks, edges, exposed mounts—these catch on obstacles. The bumpers in this list generally avoid that problem:
- Stubby (Tyger) → cleanest for tight trails
- Mid-width → minimal snag points
- Full-width → slightly more exposure, but manageable
What Most Gladiator Owners Realize After Using These
After a few months, nobody talks about how the bumper looks anymore. They talk about:
- Did it hold during recovery?
- Did it stay aligned?
- Did it get in the way—or actually help?
And that’s where these picks make sense. They’re not perfect—but they follow the right fundamentals. Strong mounts, usable design, and no fake features.
That’s what actually matters once the trail starts, and the photos stop.
FAQs About Jeep Gladiator Front Bumpers
Does adding a heavy front bumper mess with the balance of a Jeep Gladiator JT on real drives?
Short answer—yes, but only if you don’t think it through. The Jeep Gladiator (JT) already has a longer wheelbase than a Wrangler, so adding a 70–80 lb bumper + winch shifts noticeable weight forward.
What you feel isn’t just “heavier steering”—it’s how the front dips slightly more under braking and how suspension reacts on uneven terrain. Now here’s the real part:
- Mid-weight bumpers (Hooke Road, Peforway) → barely noticeable change
- Heavy setups (TIOYAR, CLAMBER + winch) → you start feeling it
If you’re planning a full build, this is where people later add leveling kits or upgraded springs. Not mandatory—but once you go heavy upfront, you’ll eventually think about it.
On a Jeep Gladiator, is a stubby bumper actually better than full-width—or just hype?
It’s not hype—but it’s also not for everyone.
Stubby bumpers (like Tyger) give you real-world clearance advantage, especially when your front wheels are climbing rocks or dropping into uneven sections. You’ll feel the difference the first time you don’t scrape.
But here’s what most people don’t say:
- You lose side protection
- Your fenders take more exposure
- Daily driving confidence slightly drops in tight spaces
Full-width bumpers (CLAMBER, TIOYAR) do the opposite—more protection, less freedom.
So the real answer is simple:
- If you drive technical trails → stubby wins
- If you want protection + daily comfort → full-width makes more sense
Most Gladiator owners end up preferring mid-width setups, because they don’t force a compromise.
Are “winch-ready” Gladiator bumpers actually safe for recovery, or just marketing terms?
This is where a lot of buyers get fooled.
A bumper saying “winch-ready” doesn’t mean it’s built for real recovery stress. What matters is how the winch plate is integrated.
Real signs of a proper setup:
- Plate sits low and close to frame rails
- Load is distributed across multiple mounting points
- No visible flex when tension is applied
Fake or weak setups usually:
- Use thin plates bolted on top
- Sit too far forward (adds stress leverage)
In this list, setups like Hooke Road, YZONA, and Peforway actually follow proper structure. That’s why they feel stable under load—not just labeled for it.
Why do most Gladiator bumpers start showing paint wear early—even expensive ones?
Because powder coating is protection, not armor.
Even high-end finishes will chip when:
- D-rings swing and hit the bumper
- Rocks hit edges under angle
- Recovery chains rub against surfaces
Here’s the real truth—finish quality only decides how fast it shows, not if it shows.
What separates a good bumper from a bad one isn’t paint—it’s what happens after:
- Does rust spread quickly? (bad coating underneath)
- Or does it stay controlled and surface-level? (good base treatment)
That’s why triple-layer coatings (like Peforway, TIOYAR) age better—but even they aren’t immune.
After installing a front bumper, what’s the one thing most Gladiator owners regret not checking?
Alignment and bolt tension—sounds simple, but this is where most long-term issues start.
People install the bumper, tighten everything once, and forget it. Then after a few drives:
- Slight vibration starts
- Small gap appears near fender
- Recovery points feel less tight
The reality is, steel settles under load.
What experienced owners do differently:
- Re-check all mounting bolts after 100–200 km
- Inspect alignment after first off-road run
- Keep an eye on D-ring mounts if used frequently
It’s a 10-minute check that saves you from months of small annoyances. Most people learn this the hard way.
Final Verdict: What Actually Matters After Everything
At this point, you’ve seen the specs, the builds, the differences—but none of that really matters unless the bumper fits how you actually use your Gladiator.
Because here’s the truth most people don’t say out loud—there is no “best” bumper in isolation. There’s only the one that feels right after you’ve driven it, loaded it, and trusted it in a situation where it actually matters.
If you want something that just works without overthinking, the balanced setups (like Hooke Road or Peforway) are hard to beat. They don’t try to be extreme—they just deliver where it counts.
If your build is getting serious—extra gear, tougher trails—then heavier options like YZONA or TIOYAR start making more sense. You feel that added structure, especially when things get rough.
And if you’re the kind of driver who actually chases technical terrain, the stubby route (Tyger) changes how your Gladiator moves—it’s not subtle, but it’s effective.
But the real decision isn’t about brands—it’s about honesty.
Be honest about:
- how often you’ll actually go off-road
- whether you’ll ever use a winch under load
- if you want protection… or performance
Because once the bumper is on, you don’t think about the listing anymore. You only notice:
- how it sits
- how it holds
- and whether it gets in your way—or gets you through
That’s the difference between a random upgrade and a setup that actually becomes part of your truck.
Pick the one that matches your reality—not the one that just looks right on screen.
Also Check: