5 Best Bull Bar for GMC Sierra 1500 in 2026: Top Skid Plates, LEDs & Heavy-Duty Builds
If you own a GMC Sierra 1500, the right bull bar is less about making the truck look tougher and more about getting the fitment right for your exact generation. The Sierra has changed substantially over the years, from the 2007–2013 models to the 2014–2018 trucks, the 2019–2021 new-body generation, and the current 2022–2026 Sierra 1500. A bar that fits one body style may not fit another, and newer trucks can also have front sensors or driver-assistance hardware that needs clearance.
That is why we focused this list on vehicle-specific options, not generic universal bars. We also looked at tube construction, skid-plate coverage, lighting provisions, installation requirements, and the fitment exclusions that can easily be missed when shopping online. For example, the Black Horse option measures 44 × 21 × 10 inches, weighs about 29 lb, uses stainless-steel tubing, and includes a removable skid plate.
Best GMC Sierra 1500 Bull Bar: Top 2026 Picks for Skid Plates & Steel Tubing
#1. Black Horse Stainless Steel Bull Bar BB037415-SP
Best Stainless Steel Bull Bar for 2019–2026 GMC Sierra 1500 Owners Wanting Removable Skid Plate Coverage and a Clean Frame-Mounted Fit
#2. PARTREE Heavy-Duty Bull Bar with LED Lights
Best GMC Sierra 1500 Bull Bar for 2019–2026 Models Looking for Steel Construction, Front-End Protection and Integrated LED Lighting
#3. Future Trucks Bull Bar with Skid Plate & 25-inch LED
Best LED Bull Bar for 2019–2024 GMC Sierra 1500 with Skid Plate Coverage, Steel Construction and a Built-In 25-Inch Light Bar
#4. Tyger Auto TG-GD6C60048 Front Bumper Guard
Best GMC Sierra 1500 Bumper Guard for 2007–2018 Models with Heavy-Duty Tubing, Textured Finish and a Dedicated Light Mount
#5. Westin HDX 57-2295 1-Piece Grille Guard
Best Heavy-Duty GMC Sierra 1500 Grille Guard for 2007–2013 Models Seeking Wider Front-End Protection and One-Piece Steel Construction
Expert Tip
Before you order any GMC Sierra 1500 bull bar, check the truck’s exact year and body configuration—not just the “Sierra 1500” name. That matters here because the 2007–2018 trucks and 2019–2026 trucks use very different front-end designs and mounting points. On newer Sierras, also look closely at front sensors, Super Cruise equipment, tow hooks, and bumper clearance. A bar can be advertised for a wide year range and still have an important trim-level exclusion.
One more practical point: don’t choose a bull bar only because it looks heavier in the photos. Tube size, mounting method, skid-plate coverage, material, and the amount of actual bumper protection tell you much more about what you’re buying. That’s why the five picks above aren’t simply five versions of the same product.
How We Chose These GMC Sierra 1500 Bull Bars
We approached this list the way we would if we were buying one for a Sierra ourselves: fitment first, construction second, useful protection third, and appearance last.
1. We Started With Actual Sierra Generations
The biggest mistake with this category is treating every Sierra 1500 as the same truck. We deliberately included options across different generations so the list works for both older 2007–2013/2018 trucks and newer 2019–2026 models.
That is also why the products are not ranked simply by price. A Westin grille guard may make more sense for one older Sierra owner, while a stainless-steel Black Horse bar is a much more logical choice for someone with a newer truck.
2. Fitment Had to Make Sense
We looked at the listed model years and application details rather than assuming that a universal-looking bar would fit. This is particularly important with the newer Sierra, where bumper design and factory technology can change what works.
For example, the Black Horse BB037415-SP has broad 2019–2026 Sierra 1500 coverage, but its published fitment information includes exclusions worth knowing before purchase. That kind of detail is exactly what we wanted this roundup to surface instead of hiding it behind a simple “fits 2019–2026” claim.
3. We Compared What You Actually Get for the Money
A bull bar should offer more than a tougher-looking front end. We paid attention to steel or stainless-steel construction, tube design, skid plates, welded construction, mounting style, light provisions, and overall coverage.
That is why the Future Trucks option stands apart with its 25-inch LED light bar and skid plate, while the Black Horse option earns attention for its stainless-steel construction and removable skid plate. The Tyger option takes a different approach with a textured finish and dedicated light mount, making it more relevant to owners of older trucks.
4. We Didn’t Treat a Grille Guard Like a Bull Bar
The Westin HDX is intentionally included as the outlier. It is a full one-piece grille guard, not simply another small bull bar.
That distinction matters. If someone wants a compact bar mainly around the center of the bumper, a grille guard may be more than they need. But if the priority is broader front-end coverage, the Westin can make considerably more sense for the right 2007–2013 Sierra.
5. We Looked for the Reason Each Product Deserves a Place
There is no value in publishing five products that all do essentially the same thing. Each selection needed a clear purpose:
- Black Horse: stainless construction and removable skid-plate coverage for newer Sierras.
- PARTREE: a newer-generation option combining steel construction with integrated lighting.
- Future Trucks: a lighting-focused setup with a 25-inch LED and skid plate.
- Tyger Auto: a practical older-generation bumper guard with a textured finish and light mount.
- Westin: a heavier, wider grille-guard approach for 2007–2013 trucks.
That gives you five genuinely different buying cases rather than five interchangeable recommendations.
6. We Kept the Fitment Caveats Visible
This is probably the most important part of our selection process. A product being listed for your truck does not automatically mean it is right for every trim.
Sensor interference, tow-hook removal, body-style differences, factory equipment, and model-year changes can all affect installation. Some of the newer products also have narrower verified applications than their marketplace titles initially suggest.
So wherever a limitation matters, we would rather tell you before you buy than make the product sound better for the sake of a higher ranking.
The Bottom Line
We chose these five because they cover the Sierra 1500 market from different angles without pretending that one bull bar is perfect for everyone. The best choice is the one that matches your exact Sierra, the protection you actually need, and the features you will genuinely use. If you verify those three things before ordering, you are far less likely to end up with a bar that looks great online but creates a fitment headache once it reaches your garage.
#1. Black Horse Stainless Steel Bull Bar BB037415-SP
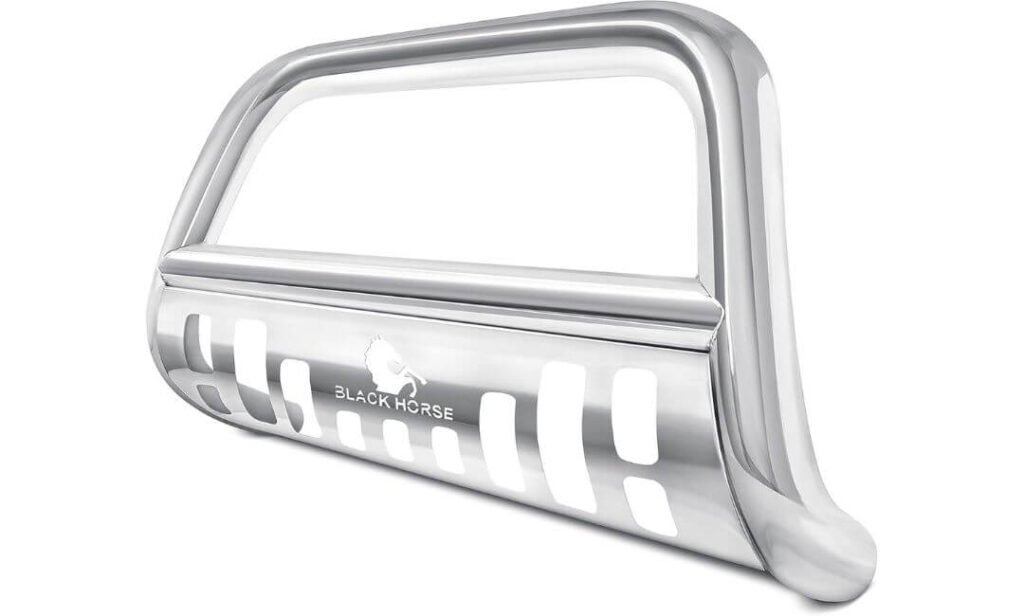
Quick Specs:
- Fitment: 2019–2026 GMC Sierra 1500; also listed for 2019–2026 Chevrolet Silverado 1500
- Construction: One-piece welded, mandrel-bent stainless-steel tubing
- Finish: Polished stainless steel with a mirror-like appearance
- Protection: Removable integrated skid plate
- Mounting: Solid frame-mounted bolt-on design; no drilling or welding
- Size: 44″L × 21″W × 10″H
- Weight: About 28.35 lb
- Lighting: Pre-drilled mounting provisions for compatible auxiliary lights; lights are separate
- Included: Mounting brackets, hardware and installation instructions
- Notable fitment: Includes 2022 Sierra 1500 LTD and diesel models with DEF tanks
- Important exclusions: 2019–2021 Sierra 1500 LD and 2022–2026 models equipped with Super Cruise
The first thing you notice here is that it doesn’t try to imitate a chrome bumper. The polished stainless-steel finish gives the front of a Sierra a cleaner, more finished appearance while also making sense for an owner who doesn’t want to constantly worry about a painted surface getting chipped. Because the tubing is mandrel-bent and welded as a one-piece structure, the design feels more purpose-built than a generic universal bar adapted to the truck.
The removable skid plate is the feature I would pay particular attention to. It adds useful coverage below the center section of the bar without forcing every owner into the appearance of a full grille guard. If you prefer a cleaner front end later, you can remove it rather than replacing the entire setup. There are also pre-drilled provisions for auxiliary lighting, so the bar is ready for a lighting upgrade without pretending that the lights are included.
Installation is another reason this makes the cut. It uses a frame-mounted bolt-on arrangement, with the brackets and hardware supplied, so there is no welding or drilling involved in the intended installation. At roughly 28.35 lb, it is substantial enough to feel like a proper steel accessory without being an unnecessarily massive addition to the front of the truck. (In other words: solid where it needs to be, without turning the Sierra’s nose into a full-on fabrication project.)
What we like about it
- The stainless-steel construction is a genuine advantage if you want durability without committing to a black painted finish.
- The removable skid plate gives the bar more useful lower-front coverage while keeping the overall design relatively clean.
- No-drill, bolt-on mounting makes this much more approachable for an owner who wants a proper fit without custom fabrication.
- The 44-inch-wide vehicle-specific design is made around the Sierra/Silverado front end rather than being a one-size-fits-all accessory.
- The built-in auxiliary-light mounting provisions leave room for a future lighting setup instead of locking you into one configuration from day one.
The one thing we’d check before ordering
The fitment notes deserve a quick look before you buy. The published application excludes 2019–2021 Sierra 1500 LD models and 2022–2026 trucks with Super Cruise, and the manufacturer also warns that the bar may interfere with front sensors when equipped. That isn’t a reason to dismiss the bar; it simply means your exact trim and factory equipment should be checked first.
GMC Sierra 1500 fitment worth checking
For the standard 2019–2026 GMC Sierra 1500, this is a broad-coverage option, and the application specifically includes the 2022 Sierra 1500 LTD and diesel versions with DEF tanks. That makes the fitment more useful than a vague “fits Sierra” marketplace description.
The important distinction is the truck’s actual configuration. If yours is a 2019–2021 Sierra 1500 LD or a 2022–2026 Sierra with Super Cruise, this particular application is not the right match. For trucks with front-facing driver-assistance sensors, check clearance and compatibility before installation as well.
The Insider Pro-Tip
If your Sierra has the standard front-end setup and falls inside the listed application, I’d choose this primarily for the combination of stainless construction, skid-plate coverage and straightforward frame mounting—not simply because the polished finish looks expensive. Those are the parts you’ll appreciate after the novelty of a new accessory wears off.
And don’t order it from the headline alone. Read the exact model designation on your truck before checkout, especially if you have a 2019 LD, Super Cruise, or factory front sensors. Spending two minutes confirming that detail is far better than discovering after delivery that the bar is beautifully made but designed around a different Sierra configuration.
#2. PARTREE Heavy-Duty Bull Bar with LED Lights
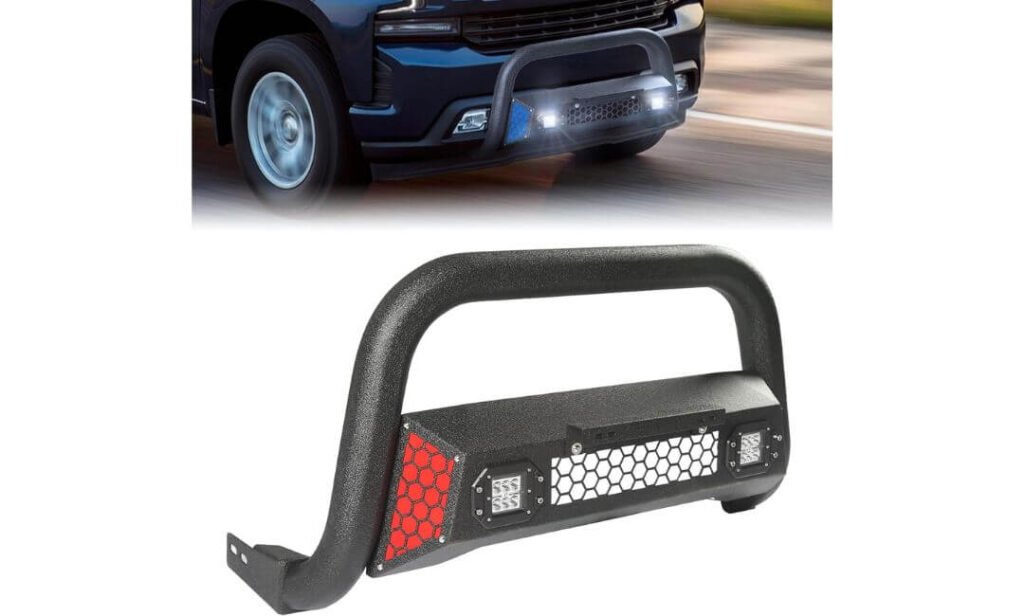
Quick Specs:
- Fitment: 2019–2026 GMC Sierra 1500 and Chevrolet Silverado 1500
- Construction: Thickened carbon-steel tubing
- Tube size: 3-inch
- Finish: Black powder coat for added rust and corrosion resistance
- Lighting: Integrated LED light included
- Mounting: Vehicle-specific bolt-on installation; no drilling
- Included: Mounting hardware, installation instructions and license-plate bracket
- Customization: Paintable trim panel for a personalized finish
- Important compatibility: Not designed for vehicles equipped with a front radar system
Some bull bars are bought for protection, others because the truck simply looks better with something substantial across the front. This one clearly sits closer to the second category, while adding a useful lighting feature. The 3-inch carbon-steel tubing gives the Sierra a noticeably tougher front-end appearance, and the black powder-coated finish keeps the design understated rather than overly flashy.
The built-in LED light is probably the biggest reason to consider it over a basic bar. You don’t have to buy a separate light just to get the finished look shown in the product listing. There’s also a license-plate bracket included, and the trim panel can be painted if you want to break up the all-black appearance and match another accent on the truck.
Installation is refreshingly straightforward on paper: it is a vehicle-specific, bolt-on design with no drilling, and the required mounting hardware and instructions are included. That’s useful for an owner who wants to add the accessory without turning the installation into a fabrication job. At the same time, I would keep expectations realistic—the available feedback suggests this is better viewed as a styling and light-duty front-end accessory than as a serious impact-management system.
What we like about it
- The integrated LED light gives you a useful feature without making you source a separate light bar.
- The 3-inch steel tubing gives the Sierra a substantial look without moving into full grille-guard territory.
- No-drill bolt-on mounting makes the installation considerably less intimidating for a DIY owner.
- The included license-plate bracket is a small detail, but it saves you from figuring out another mounting solution afterward.
- The paintable trim panel gives you an easy way to personalize the otherwise black front-end setup.
One detail we would not overlook
The most important limitation is fitment with factory technology. The listing specifically says vehicles equipped with a front radar system are not supported. If your Sierra has radar-based driver-assistance equipment, don’t assume the bar will work simply because your model year appears in the 2019–2026 fitment range. Check the exact equipment on your truck first.
GMC Sierra 1500 fitment
The listed application covers 2019–2026 GMC Sierra 1500 models, which puts it firmly in the newer-generation section of this roundup. The vehicle-specific design is a better starting point than buying a universal bar and hoping the brackets line up.
The bigger question is what equipment sits behind your Sierra’s front bumper. Because the manufacturer specifically excludes front radar-equipped vehicles, fitment should be confirmed at the trim/equipment level before ordering. If your truck clears that requirement, the bolt-on design makes this a relatively simple upgrade.
The Insider Pro-Tip
I’d buy this one for the combination of appearance and integrated lighting, not because the word “guard” makes it sound like a heavy-duty collision product. That’s an important distinction. The steel construction gives it substance, but the available feedback includes concerns about flexibility and limited impact resistance, so it shouldn’t be treated as a substitute for a true heavy-duty bumper or full grille guard.
If your Sierra doesn’t use the excluded front-radar setup and you’re mainly after a cleaner, more aggressive front end with built-in LED lighting, this makes a lot more sense. Just verify the technology behind your bumper before checkout—that one check can save you a frustrating return later.
#3. Future Trucks Bull Bar with Skid Plate & 25-inch LED
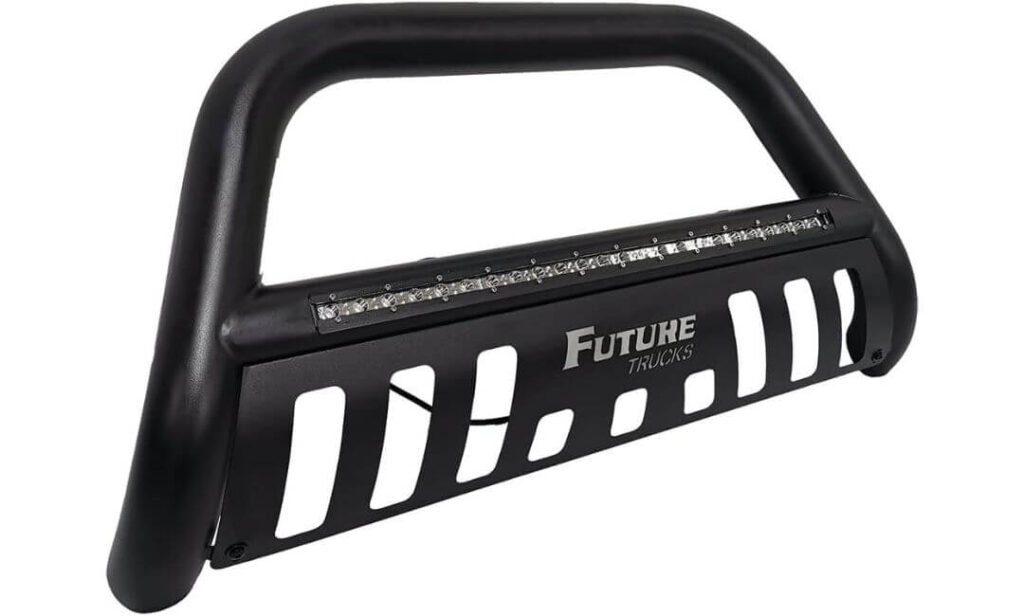
Quick Specs:
- Fitment: 2019–2024 GMC Sierra 1500 and Chevrolet Silverado 1500
- Construction: 3-inch alloy-steel tubing
- Finish: Matte black powder coating for added rust and corrosion resistance
- Lighting: Flush-mounted 25-inch LED light bar included
- Skid plate: Removable stainless-steel skid plate with matte-black brushed finish
- Mounting: Vehicle-specific bolt-on design
- Installation: Basic hand tools; mounting brackets and hardware included
- Weight: About 31.65 lb
- Warranty: 2-year manufacturer warranty
- Important fitment: Gasoline models only; does not fit Silverado 1500 Diesel
- Potential installation note: Minor lower-valance trimming may be required on some 2022+ trucks
- Sensor note: May interfere with parking/front motion sensors
If the first two choices are about balancing protection and everyday usability, this one has a much clearer personality: it is built around the 25-inch LED light bar. The flush-mounted light sits directly into the bull-bar assembly, so you get a finished lighting setup rather than having to figure out where to mount an aftermarket bar later. For a Sierra owner who actually drives dark back roads or trails, that is a much more meaningful feature than another styling badge.
Underneath that lighting, you get 3-inch alloy-steel tubing with a matte-black powder-coated finish and a removable stainless-steel skid plate. That combination gives the front end a noticeably tougher stance while adding coverage below the center of the bumper. The skid plate can also be removed, which is handy if you prefer the cleaner tubular look at certain times of the year.
The installation is another practical win. It is designed as a vehicle-specific bolt-on system, and the brackets and hardware are supplied, so you’re not starting with a pile of parts and wondering what belongs where. At roughly 31.65 lb, it is a fairly substantial accessory, but the important thing is that the manufacturer has designed it around the Sierra/Silverado application rather than selling it as a generic truck bar. (That distinction matters more than a flashy product photo ever will.)
What we like about it
- The 25-inch flush-mounted LED is the standout feature and is included rather than sold as an extra.
- A removable stainless-steel skid plate adds useful lower-front coverage without permanently changing the bar’s appearance.
- 3-inch alloy-steel tubing gives it a strong visual presence while keeping the design relatively simple.
- The vehicle-specific bolt-on setup keeps installation within reach of an owner with basic hand tools.
- The 2-year manufacturer warranty adds a useful layer of confidence for a newer accessory purchase.
One thing to know before you click Buy
The biggest consideration isn’t the light or the steel—it’s factory sensor compatibility. The manufacturer warns that the bar may interfere with parking sensors, and customer feedback indicates that front motion-sensing functions can stop working once it is installed. That is worth checking carefully if your Sierra relies on those systems.
GMC Sierra 1500 fitment
This application covers 2019–2024 GMC Sierra 1500 models and is aimed at the newer body style shared with the Silverado 1500. However, the broad year range should not be treated as universal trim compatibility: diesel models are excluded, and some 2022+ trucks may require minor lower-valance trimming during installation.
So, if you have a gasoline Sierra within the listed years, the basic fitment is promising. If your truck has parking sensors or other equipment integrated into the front bumper area, verify that setup before ordering rather than assuming the vehicle-specific label guarantees everything will remain functional.
The Insider Pro-Tip
This is the one I’d look at when the LED is genuinely useful to you, not merely because it makes the truck look more aggressive in a driveway photo. A built-in 25-inch light, skid plate and bolt-on design make a pretty convincing package for the money—but only if your truck’s factory equipment plays nicely with it.
And one small detail is easy to miss: there is no license-plate bracket included. That’s not a deal-breaker, but it is something I’d account for before installation. More importantly, if front sensors are important to how you use your Sierra every day, I’d put that compatibility check ahead of everything else. A great-looking bull bar isn’t much of an upgrade if it creates a nuisance every time you park.
#4. Tyger Auto TG-GD6C60048 Front Bumper Guard
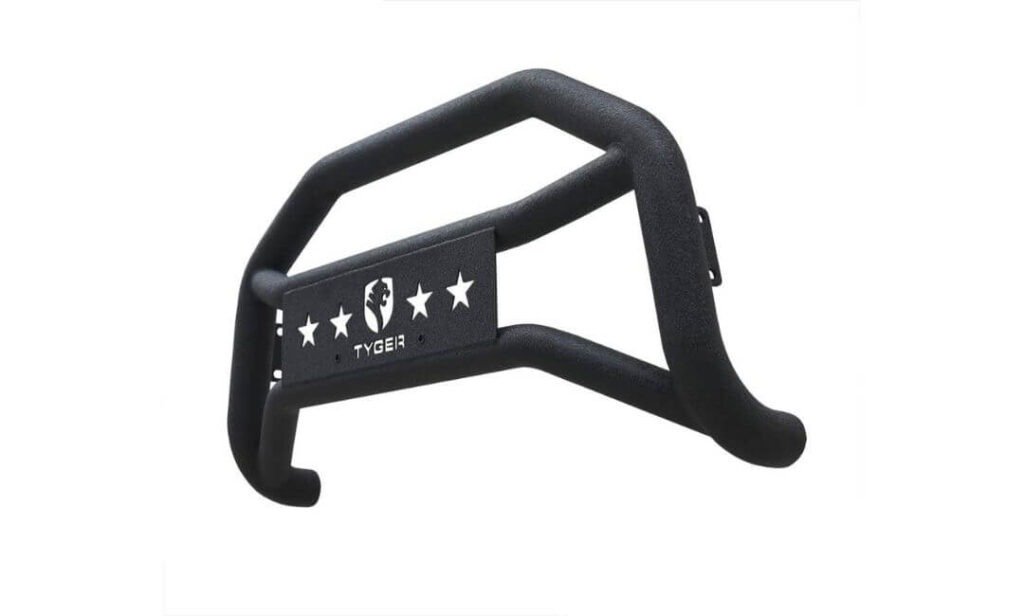
Quick Specs:
- Fitment: 2007–2018 GMC Sierra 1500; also listed for 2019 Sierra/Silverado LD and Limited
- Exclusions: 2007 Classic and 2019+ new-body Sierra/Silverado 1500
- Construction: 2.5-inch marine-grade carbon-steel tubing
- Structure: Seamless-welded tubular frame
- Finish: Textured black
- Lighting: Pre-welded light-mount channel; LED lights sold separately
- License plate: Two pre-drilled holes for relocation
- Mounting: Bolt-on installation with included hardware
- Installation note: Tow hooks must be removed if equipped; minor cutting may be needed on trucks without tow hooks
- Weight: About 27.96 lb
- Dimensions: 42″L × 21″W × 10″H
- Warranty: 5-year limited manufacturer warranty for U.S. customers
- Sensor note: May interfere with front sensors when equipped
Older Sierra owners often have a simpler decision than someone shopping for a newer truck: find a bar actually designed around the 2007–2018 front end and make sure the mounting hardware works with the truck you have. That is where this Tyger guard earns its place. The 2.5-inch marine-grade carbon-steel tubing, seamless welding and vehicle-specific design give it the substantial tubular look most people are after without stepping all the way up to a full grille guard.
The pre-welded light-mount channel is a particularly useful touch. You can add auxiliary LEDs later without having to modify the main bar, which keeps the initial purchase simpler. There are also two pre-drilled holes for relocating the license plate if the factory position gets covered. Those aren’t headline-grabbing features, but they’re exactly the sort of small details that make an accessory easier to live with.
Installation is reasonably DIY-friendly, but this isn’t a completely hands-off bolt-on. Factory tow hooks need to come off, and depending on the truck configuration, some minor cutting may be required. The supplied hardware and installation manual help, but I’d still set aside enough time to deal with the existing hardware rather than expecting a 20-minute job. The included 5-year warranty is another worthwhile advantage for an accessory intended to stay on an older daily driver for years.
What we like about it
- 2.5-inch marine-grade carbon steel gives the guard a sturdy, purposeful construction without excessive bulk.
- The pre-welded light channel makes adding auxiliary lighting later much easier.
- Pre-drilled license-plate relocation holes show that the design accounts for real installation issues, not just appearance.
- The 42-inch-wide vehicle-specific design keeps the proportions appropriate for the older Sierra front end.
- A 5-year manufacturer warranty gives this option more long-term reassurance than many budget-oriented alternatives.
One thing worth knowing beforehand
The main installation compromise is the factory tow hooks. They need to be removed, and depending on the truck, getting them out can be more involved than the phrase “bolt-on installation” suggests. Also, if your truck has front sensors, check them before ordering because the guard may interfere with their operation.
GMC Sierra 1500 fitment
This is primarily an older-generation Sierra 1500 choice, covering 2007–2018 models. It also has a specific application for the 2019 Sierra/Silverado LD and Limited, but that should not be confused with the redesigned 2019+ full-size trucks.
The 2007 Classic is excluded, and the product does not fit the 2019+ new-body Sierra 1500. If you have one of those trucks, move on to one of the newer-generation options in this list rather than trying to make the brackets work.
The Insider Pro-Tip
For a 2007–2018 Sierra, this is the kind of bull bar I’d consider when you want a noticeable front-end upgrade, optional lighting and a proper tubular steel structure without paying for a full grille guard. Its dimensions also keep the setup relatively compact compared with larger front protection systems.
Just don’t confuse a sturdy-looking tubular guard with a replacement bumper. Real-world feedback is mixed on impact durability, so I’d treat its primary strengths as front-end presence, light-duty protection and accessory functionality. Get the fitment right, remove the tow hooks as required, and this becomes a much more sensible purchase than choosing an attractive bar based on photos alone.
#5. Westin HDX 57-2295 1-Piece Grille Guard
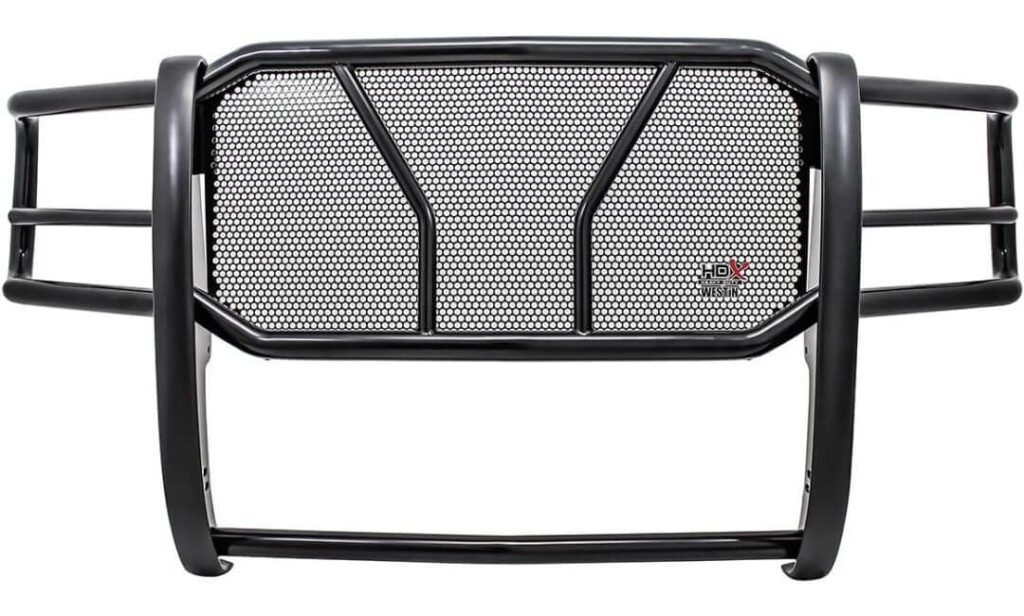
Quick Specs:
- Fitment: 2007–2013 GMC Sierra 1500
- Construction: Fully welded one-piece powder-coated steel
- Main tubing: 2-inch diameter steel tube
- Coverage: Full wraparound wings with integrated headlight guards
- Grille protection: Full punch-plate grille
- Bumper protection: Extra-wide rubber bumper
- Finish: Black powder coat
- Mounting: Vehicle-specific bolt-on design
- Included: Mounting kit and hardware
- Weight: About 124 lb
- Overall size: 83″L × 35″W × 26″H
- Warranty: 3-year limited manufacturer warranty
- Installation reality: Heavy and awkward to position; experienced help or professional installation is recommended
There is a noticeable difference between adding a tubular bar across the center of the bumper and putting a full grille guard on an older Sierra. This Westin sits firmly in the second category. The one-piece construction wraps around the front with 2-inch tubing, full wings, headlight guards and a punch-plate grille, so the coverage is considerably more extensive than the smaller bull bars earlier in this list.
The 124-pound weight tells you something important before you even open the box: this isn’t a lightweight styling accessory. The steel construction, wraparound design and integrated guards are what give it that substantial presence, but they also make installation a completely different proposition. Once fitted, though, the setup has the kind of broad front-end coverage that makes sense for an owner who specifically wants more than a center-mounted push bar.
The rubber bumper is another thoughtful detail. It adds a layer between the steel guard and the bumper area, while the powder-coated finish keeps the exterior relatively easy to maintain. Mounting hardware is included and the guard is designed as a bolt-on system, but I’d strongly recommend having another person available—or paying for installation. Customer experience suggests that alignment and mounting can take considerably longer than the word “bolt-on” makes it sound.
What we like about it
- Full wraparound wings provide considerably more front-end coverage than a conventional bull bar.
- Integrated headlight guards and punch-plate grille protection make this a genuinely different level of front protection.
- The fully welded one-piece construction gives the guard a solid, substantial feel once installed.
- The rubber bumper protection helps keep the metal structure from sitting directly against vulnerable painted areas.
- The 3-year warranty adds useful peace of mind for a heavy accessory that is expected to stay on the truck.
The part we’d plan for before ordering
The biggest issue isn’t the product itself—it’s the installation. At 124 lb, this is not something I’d recommend trying to hold in position by yourself. Some owners report several hours of work and alignment challenges, and installation may require experienced help. If you’re not comfortable handling a large steel guard, professional installation is the sensible route.
GMC Sierra 1500 fitment
The listed application is specifically for 2007–2013 GMC Sierra 1500 models. That’s important because this isn’t a broad-generation accessory you can carry forward to newer Sierras. Its large wraparound design and mounting system are built around this particular truck generation.
If your Sierra falls within those years and you want maximum front-end coverage rather than a compact bull-bar appearance, this is the option in our lineup that most clearly fits that job. Just confirm the exact model year before ordering.
The Insider Pro-Tip
I’d choose this over a smaller bull bar only if you actually want the extra coverage. The headlight guards, wraparound wings and full punch-plate grille make it much more protective-looking, but that comes with real weight and installation complexity. There is no point carrying 124 lb of steel on the front of the truck if all you wanted was a simple center bar.
One more thing worth knowing: this guard is not intended to be paired with Westin’s 46-22275 winch mount, so don’t build your purchase around the assumption that the grille guard can become a winch setup later. For a 2007–2013 Sierra owner who wants a serious, full-front guard and is prepared for the installation, however, this is the most substantial protection-focused choice in this particular lineup.
Best GMC Sierra 1500 Bull Bar (2007–2026): Side-by-Side Specs & Fitment
| Bull Bar | Best Match | Build & Protection | Useful Features | Installation Reality | Watch Before Buying |
|---|---|---|---|---|---|
|
Black Horse BB037415-SP
Best Overall
|
2019–2026 GMC Sierra 1500 Also listed for Silverado 1500 |
Stainless steel 1-piece welded, mandrel-bent tubing Removable skid plate |
3-inch-style tubular build Auxiliary-light mounting provisions Polished finish 28.35 lb |
Bolt-on No drilling or welding Frame-mounted Hardware included |
2019–2021 LD excluded 2022–2026 Super Cruise excluded Front-sensor interference possible |
|
PARTREE Heavy-Duty Bull Bar with LED Lights
Best Value + Lighting
|
2019–2026 GMC Sierra 1500 Vehicle-specific fit |
Carbon steel 3-inch thickened tubing Black powder-coated finish |
Integrated LED included Paintable trim panel License-plate bracket Off-road lighting |
Bolt-on No drilling Hardware + instructions included |
Front radar not supported Check ADAS equipment before ordering |
|
Future Trucks Bull Bar + 25-inch LED
Best Built-In Lighting
|
2019–2024 GMC Sierra 1500 Gasoline models |
Alloy steel 3-inch tubing Removable stainless-steel skid plate |
25-inch flush LED included Matte-black finish 31.65 lb 2-year warranty |
Bolt-on Basic hand tools Brackets + hardware included |
Diesel excluded Parking-sensor interference reported Minor trimming may be needed on some 2022+ trucks |
|
Tyger Auto TG-GD6C60048
Best Older-Sierra Pick
|
2007–2018 GMC Sierra 1500 Also listed for 2019 LD/Limited |
Marine-grade carbon steel 2.5-inch tubing Seamless welding |
Pre-welded light channel License-plate relocation holes 27.96 lb 5-year warranty |
Bolt-on DIY-friendly Tow hooks may need removal |
2007 Classic excluded 2019+ new body excluded Front sensors may be affected |
|
Westin HDX 57-2295
Maximum Coverage
|
2007–2013 GMC Sierra 1500 |
Powder-coated steel Fully welded 1-piece construction Full wraparound wings Punch-plate grille |
Integrated headlight guards 2-inch tubing Rubber bumper protection 124 lb |
Bolt-on Hardware included Two-person/pro installation is sensible |
Heavy and difficult to align Shipping damage should be checked Not compatible with Westin 46-22275 winch mount |
GMC Sierra 1500 Bull Bar Buying Guide: What Actually Matters Before You Order
A bull bar can look like a straightforward accessory, but fitment, mounting points, front-end technology, and the amount of protection you actually want matter far more than the product photo. The Sierra 1500 has gone through several major front-end changes, so the right bar for a 2007–2013 truck should not be treated as an option for a 2019–2026 model. Start with your exact year, body style, trim, and factory equipment, then compare the construction and features.
Start With the Material, Not the Finish
For most Sierra 1500 owners, the choice comes down to steel versus aluminum, with steel being the more common choice for the products in this roundup.
Steel generally makes more sense when you want a substantial tubular structure and more confidence against everyday bumps, brush, road debris, and light-duty impacts. The trade-off is weight. A smaller steel bull bar may add around 28–32 lb, while a full grille guard such as the Westin HDX can weigh roughly 124 lb.
Aluminum can reduce weight and may make sense for an owner who prioritizes keeping additional mass off the front axle, but it is not automatically the “better” material. For a Sierra used regularly on rough roads, look beyond the material name and check tube diameter, wall construction, weld quality, mounting structure, and the actual coverage provided.
Also pay attention to the finish. A polished stainless-steel bar offers a different ownership experience from black powder-coated carbon steel. Stainless resists corrosion well and gives you the brighter finish, while powder coating is generally easier to live with if you prefer a darker appearance.
Match the Mounting System to Your Sierra
A good-looking bar is not a good buy if the brackets were designed around a different bumper or frame layout.
The products here use vehicle-specific bolt-on mounting, which is preferable to trying to adapt a universal bar. Check whether the installation uses the factory frame mounting points, whether tow hooks need to be removed, and whether any trimming is mentioned for your specific configuration.
There is also a meaningful difference between a bull bar and a grille guard. A bull bar normally concentrates protection around the center of the front bumper and leaves the upper grille area relatively open. A grille guard extends farther outward and can include wraparound wings, headlight guards, and grille coverage.
That distinction is obvious with the Westin HDX. It is substantially larger and heavier than the other choices because it is designed to provide fuller front-end coverage, not simply the appearance of a tubular bull bar.
Decide Whether You Need Lighting Built In
Integrated lighting can be genuinely useful, but only if you will use it.
The PARTREE option includes an integrated LED light, while the Future Trucks model goes further with a flush-mounted 25-inch LED light bar. Those setups make sense if you regularly travel on dark roads or trails and want the lighting integrated into the bar rather than adding a separate accessory later.
Other bars, such as the Black Horse and Tyger Auto options, are light-ready rather than light-included. That can actually be preferable if you already have a specific LED light in mind or want to choose the brightness, beam pattern, and brand yourself.
Before buying, check exactly what comes in the box. “Light-ready” and “LED included” are two very different things.
Look at Skid-Plate Coverage Separately
A bull bar and a skid plate do different jobs, so don’t assume that one automatically means you have the other.
The Black Horse and Future Trucks options include removable skid plates, giving you additional coverage beneath the center portion of the front end. That’s useful if you spend time on gravel, uneven access roads, or trails where debris can reach below the bumper.
A removable plate is also a nice compromise for a daily-driven truck because you can change the appearance or access that area later without replacing the complete bar.
Still, don’t mistake a bull-bar skid plate for a complete underbody protection system. It covers a specific area; it does not replace dedicated engine, transmission, transfer-case, or full underbody skid plates.
Think About the Look You Actually Want
This sounds cosmetic, but it matters because a bull bar permanently changes the character of the front end.
A center-mounted tubular bull bar keeps more of the factory grille and bumper visible and usually gives the Sierra a cleaner, less bulky appearance. A full grille guard creates a much more substantial profile and provides wider coverage.
For example, the polished Black Horse finish has a more upscale appearance, while the PARTREE, Future Trucks, and Tyger options lean toward a darker, more aggressive truck look. The Westin HDX goes considerably further with its wraparound wings and full punch-plate grille.
There isn’t one correct style. The mistake is buying a full grille guard when you really wanted a simple bull bar—or buying a compact bull bar when what you actually wanted was broader headlight and grille protection.
Installation Is Where Product Listings Can Be Misleading
“Bolt-on” does not necessarily mean “effortless.”
Before starting, have the correct sockets, ratchet, torque tools, a level working surface, and enough space to safely support the bar. For larger guards, a second person is extremely useful. The Westin HDX is a particularly good example: at around 124 lb, trying to position it alone is asking for unnecessary trouble.
Common installation issues include:
- Factory tow hooks needing removal.
- Minor lower-valance trimming on certain applications.
- Brackets not lining up because the truck is the wrong body style or model-year configuration.
- Front sensors sitting directly where the new accessory needs clearance.
- Forgetting to check license-plate placement after the bar is installed.
- Assuming included hardware means every step will be completely straightforward.
If you’re not comfortable supporting and aligning a heavy steel accessory, professional installation can be money well spent.
Don’t Ignore Sensors and Driver-Assistance Equipment
This is probably the most important consideration on a newer Sierra.
Several of the products in this roundup have warnings involving front radar, parking sensors, or other front-mounted technology. A bar can physically bolt onto the truck and still be a poor choice if it interferes with equipment your Sierra relies on.
The Black Horse application, for example, excludes 2022–2026 models with Super Cruise and warns that front sensors may be affected. PARTREE specifically states that vehicles equipped with a front radar system are not supported. Future Trucks and Tyger also carry sensor-related warnings.
So don’t stop at “2019–2026 GMC Sierra 1500.” Check your truck’s actual equipment before ordering.
Model-Year Compatibility Is Not Optional
The Sierra 1500’s generations make year verification especially important.
The 2007–2013 trucks have a different front-end and mounting environment from the 2014–2018 generation. The redesigned 2019+ new-body Sierra changed things again, which is why a bar designed for the older trucks should not be assumed to fit a newer one.
Even within a broad year range, there can be exceptions. The Tyger application covers 2007–2018, but excludes the 2007 Classic and the 2019+ new-body trucks. The Black Horse application covers newer trucks but excludes specific configurations such as 2019–2021 LD and 2022–2026 Super Cruise models.
In other words, year + body style + trim/equipment is the combination to verify—not the year alone.
Check What Is Actually Included
Before comparing prices, open the product details and check the box contents.
Depending on the model, you may receive:
- Mounting brackets and hardware
- Installation instructions
- Skid plate
- Integrated LED lighting
- Light-mount provisions
- License-plate relocation provisions
You may also need to purchase something separately. The Future Trucks model, for example, does not include a license-plate bracket, while its 25-inch LED is included. The Black Horse and Tyger options provide provisions for auxiliary lights, but the lights themselves are separate.
These little differences can change the real cost of the installation.
The Practical Sierra Owner’s Checklist
Before you place the order, confirm these in this order:
- Exact Sierra year and body style
- Trim and factory front-end equipment
- Radar or parking-sensor compatibility
- Tow-hook requirements
- Whether trimming is required
- Steel, stainless, or aluminum construction
- Bull bar versus full grille-guard coverage
- Skid plate included or optional
- LED included or only light-ready
- Actual weight and installation requirements
If all ten line up with what you need, you’re no longer choosing a bull bar because it “looks tough.” You’re choosing one that actually makes sense for your Sierra 1500.
GMC Sierra 1500 Fitment & Front-End Guide: Get the Bar Right Before Installation
A bull bar can be beautifully made and still be the wrong part for your Sierra. The safest way to avoid that mistake is to treat fitment as a combination of model year, body style, trim, and factory equipment, rather than relying on a marketplace title that simply says “GMC Sierra 1500.” The trucks covered in this article span very different generations, so the mounting points, bumper shape, tow-hook arrangement, and front-end technology can vary considerably.
How to Check Fitment for Your Exact Sierra 1500
Start with the model year and body style, then compare that information with the manufacturer’s application list. Don’t assume that two trucks with the same “Sierra 1500” badge share the same brackets.
For this lineup, the fitment breaks down into a few useful groups:
- 2007–2013 Sierra 1500: The Westin HDX 57-2295 is specifically designed around this generation and provides full grille-guard coverage.
- 2007–2018 Sierra 1500: The Tyger Auto TG-GD6C60048 covers this broader older-generation range, but it specifically excludes the 2007 Classic.
- 2019–2024 Sierra 1500: The Future Trucks option is aimed at this newer generation, but diesel models are excluded, and some 2022+ applications may require minor trimming.
- 2019–2026 Sierra 1500: The Black Horse and PARTREE options provide the broadest newer-generation coverage in this roundup, but both still have important equipment-related considerations.
- 2019–2021 Sierra 1500 LD: Don’t confuse these trucks with the newer-body Sierra. Some products list the LD separately, while others specifically exclude it.
- 2022–2026 with Super Cruise: The Black Horse application specifically excludes these models.
The best habit is simple: take the exact year from your registration or vehicle information, identify whether it is an LD/Limited or new-body truck, and then check the manufacturer’s fitment notes for your equipment. That takes less time than dealing with a return after the brackets fail to line up.
Look at the Front Bumper Before You Touch the Hardware
Once you’ve confirmed the year, look underneath and around the front bumper.
Check where the tow hooks, recovery points, factory brackets, parking sensors, and radar equipment are located. A vehicle-specific bar should use the intended mounting points, but the surrounding equipment can still affect installation.
If the product instructions mention tow-hook removal, don’t treat that as a minor footnote. The Tyger guard, for example, requires factory tow hooks to be removed when equipped. Some configurations can also require minor trimming.
Before tightening anything, loosely position the brackets and confirm that the bar sits centered and evenly spaced from the bumper. This is where patience pays off. Tightening one side completely before checking the other can make a simple alignment issue much harder to correct.
For larger guards, especially something as substantial as the 124-pound Westin HDX, use another person to hold and align the assembly. You’re not gaining anything by trying to prove you can install a large steel guard alone.
What to Do When the Bar Doesn’t Sit Perfectly
Small alignment differences can happen during installation, but there is a difference between adjusting a bracket and forcing a part into position.
If the bar appears too high, too low, or noticeably off-center:
- Recheck that the correct brackets are being used for your model year.
- Confirm that factory tow hooks or other components have been removed when required.
- Leave the mounting bolts slightly loose while positioning both sides.
- Compare the left and right bracket positions before final tightening.
- Check bumper and grille clearance from several angles.
- Make sure the skid plate is not contacting the bumper or other components.
- Don’t enlarge holes or bend brackets simply to make an incorrect fit work.
A genuine vehicle-specific accessory should not require you to “make it fit” through aggressive modification. If something looks fundamentally wrong, stop and verify the application before reaching for a drill or grinder.
Front Sensors Can Change the Answer Completely
This deserves its own check because newer Sierra owners can easily overlook it.
A bull bar may physically clear the bumper and still interfere with front radar or parking sensors. PARTREE specifically states that vehicles equipped with a front radar system are not supported. Black Horse warns that front sensors may be affected and excludes certain Super Cruise-equipped trucks. Future Trucks and Tyger also carry sensor-related warnings.
If your Sierra uses adaptive cruise, forward-collision technology, parking sensors, or other equipment mounted toward the front, identify where those sensors sit before ordering. A clean physical fit is not the same thing as a complete vehicle-compatible installation.
If the manufacturer says the application is incompatible, don’t assume that moving a sensor or changing a bracket will solve the problem. Those systems can depend on precise positioning and calibration.
GMC Sierra 1500 Front Bull Bar vs. Grille Guard
These terms are often mixed together online, but they describe noticeably different products.
A GMC Sierra 1500 front bull bar generally protects the center portion of the front bumper. It is usually lighter, more compact, and less visually dominant. The Black Horse, PARTREE, Future Trucks, and Tyger products in this roundup fit broadly into this tubular-bar category, although their construction and coverage differ.
A GMC Sierra 1500 grille guard goes much farther. It can extend across the grille area and outward toward the headlights, adding features such as wraparound wings, headlight guards, and punch-plate protection. The Westin HDX is the clearest example here.
The practical difference is just as important as the visual one:
| Front Bull Bar | Full Grille Guard |
|---|---|
| More compact front-end addition | Much broader front-end coverage |
| Usually lighter | Can be substantially heavier |
| Center-focused protection | Grille, headlight and side coverage |
| Easier to live with on a daily driver | More substantial physical presence |
| Often easier to install | Can require more time and additional help |
| Works well for styling + light-duty protection | Better suited to owners prioritizing maximum coverage |
Neither design is automatically better. Choose the bull bar if you want targeted protection without covering the whole front end; choose the grille guard if wider coverage is the actual reason you’re buying one.
Don’t Judge Fitment From a Product Photo
Photos are useful for understanding the general shape, but they’re one of the weakest ways to verify compatibility.
A listing can show a beautiful Sierra with the bar installed while your particular truck has a different bumper configuration, sensor package, tow-hook setup, or body style. This is especially easy to miss with 2019-era trucks, where LD and new-body applications can appear deceptively similar in online listings.
The manufacturer’s fitment notes, installation instructions, and exclusion list are much more valuable than the photograph.
The Final Fitment Check
Before ordering any of the five products, verify these details together:
- Your exact model year
- Whether the truck is LD, Limited, or new-body
- Your trim and factory front-end equipment
- Radar and parking-sensor configuration
- Tow-hook requirements
- Whether trimming is mentioned
- Whether the product is a bull bar or full grille guard
- Included brackets and hardware
- Any stated model-year or equipment exclusions
That’s the difference between buying something that merely looks like it belongs on a GMC Sierra 1500 and buying something actually designed to work with the truck sitting in your driveway.
GMC Sierra 1500 Bull Bar Installation Overview: A Practical Start-to-Finish Check
Installing a bull bar on a GMC Sierra 1500 is usually manageable if the product is genuinely vehicle-specific, but the job becomes frustrating when you rush the first few steps. The important part is not simply getting the bar bolted on; it is making sure the brackets, bumper clearance, sensors, tow hooks, skid plate, and final alignment are all correct before you put the truck back on the road.
The exact procedure varies by product and Sierra generation, so always treat the supplied instructions as the final authority for bolt locations and torque specifications. The process below is a practical high-level workflow for preparing and checking the installation.
Step 1: Confirm the Truck and Parts Before Starting
Before touching a wrench, put the truck on a level surface and confirm that the product matches the exact Sierra model year and body style.
Lay out the bull bar, mounting brackets, hardware, skid plate, and any supplied accessories. Compare the brackets with the installation instructions and make sure you have everything you need.
This is also the right time to check whether your particular product requires:
- Factory tow-hook removal
- Lower-valance trimming
- License-plate relocation
- Removal or repositioning of another component
- Special clearance around front sensors
- A second person for positioning
Don’t start disassembling the truck until those requirements are clear.
Step 2: Gather the Right Tools
Most of these products are designed for bolt-on installation, but “bolt-on” doesn’t mean you should begin with whatever tools happen to be lying around the garage.
A useful basic setup includes:
- Socket and ratchet set appropriate for the supplied hardware
- Combination wrenches
- Torque wrench
- Screwdrivers and trim-removal tools where required
- Pliers
- Work gloves
- Safety glasses
- Floor jack or suitable support equipment if the instructions require additional access
- Flashlight or work light
- Measuring tape for checking final alignment
For a heavier grille guard such as the Westin HDX, have another person available. At roughly 124 pounds, safely holding and aligning it is a two-person job in practical terms, even though the mounting system itself is bolt-on.
Step 3: Protect the Bumper Before Positioning Anything
Before bringing the bar toward the truck, protect the areas around the bumper and grille with clean blankets or suitable protective material.
This sounds unnecessary until a steel bracket slips against freshly painted bodywork.
Keep the hardware separated by mounting location as you work. Mixing bolts and washers from different sections is an easy way to turn a straightforward installation into guesswork later.
Step 4: Test-Fit the Mounting Brackets First
Don’t immediately tighten everything.
Install the mounting brackets loosely according to the supplied instructions, leaving enough movement to position the bull bar correctly. This gives you room to check whether both sides are sitting evenly before the weight of the complete assembly is locked into place.
For products requiring tow-hook removal, complete that part according to the manufacturer’s instructions before attempting final positioning.
If the bracket holes don’t naturally line up, stop and recheck the application. Do not assume that forcing, bending, drilling, or modifying the bracket is the normal solution to a fitment problem.
Step 5: Position the Bull Bar and Check Every Gap
With the brackets loosely installed, carefully position the main bar.
This is where a second person becomes extremely useful. Check the bar from directly in front of the truck, then from both corners.
Look for:
- Even left-to-right positioning
- Consistent bumper clearance
- Clearance around the grille
- Clearance around tow points and other hardware
- Adequate space around parking or radar sensors
- Skid-plate clearance underneath
- Proper license-plate visibility
- Adequate room for any planned auxiliary lighting
Don’t judge alignment from one angle. A bar can look centered from the driver’s seat and still sit noticeably high or low when viewed straight on.
Step 6: Check Sensor and Lighting Clearance Before Tightening
If your Sierra has front parking sensors, radar equipment, or other driver-assistance hardware, this is a critical inspection point.
The bar should not be installed with the assumption that sensor warnings are merely cosmetic. Several products in this roundup specifically warn about sensor compatibility, and some applications are outright excluded.
Likewise, if the bar has integrated or optional lighting, confirm that the wiring path will not interfere with moving, hot, or sharp components.
For light-ready products, decide where your auxiliary lights will sit before final tightening. It is much easier to plan the wiring and access while the mounting hardware is still accessible.
Step 7: Tighten Gradually and Check Alignment Again
Once everything looks correct, tighten the mounting hardware progressively rather than completely tightening one side first.
Follow the manufacturer’s specified torque values whenever they are provided. Do not substitute a guess based on how tight another truck accessory feels.
After tightening, step back and inspect the entire assembly again. The bar can move slightly as the brackets settle under load, so the final check matters.
Step 8: Install the Skid Plate and Accessories
If your model includes a removable skid plate, install it after the main bar is properly positioned.
Check that the plate has enough clearance from the bumper and surrounding components and that it isn’t sitting against anything that could cause rattling.
For lighting-equipped models, finish the electrical installation according to the light manufacturer’s instructions. Keep wiring secured and protected from heat, abrasion, and moving components.
If the product uses a license-plate relocation bracket, check that the plate remains visible and securely mounted after everything else is installed.
Step 9: Do a Static Test Before Driving
Before taking the Sierra onto the road, perform a simple stationary inspection.
Turn the steering fully in both directions and make sure nothing contacts the new installation. Check the bumper and grille clearances again, then inspect all visible fasteners.
If the truck has parking sensors or other front-end technology, verify their operation according to the vehicle manufacturer’s normal procedure. If a warning appears, don’t simply ignore it because the bar is physically secure.
Also listen for obvious movement by gently checking the bar by hand. A properly installed accessory should not have unexplained looseness or excessive flex.
Step 10: Recheck Everything After the First Drive
After the first short drive, park on a level surface and inspect the mounting points again.
Look for:
- Any loose hardware
- New rattling or vibration
- Changed bumper clearance
- Skid-plate movement
- Bracket movement
- Wiring that has shifted
- Any new sensor warnings
If everything remains secure, the installation has passed the most important real-world check.
Safety Notes That Are Easy to Ignore
A bull bar is heavy steel equipment, so treat it accordingly.
Wear eye protection and gloves, use proper lifting technique, and don’t position yourself underneath a suspended accessory. If a component is too heavy to hold comfortably, get another person to help rather than trying to balance it while starting bolts.
Most importantly, never treat the bull bar as a substitute for the vehicle’s original airbag, crash-management, radar, or driver-assistance systems. If installation changes the position or operation of factory safety equipment, stop and resolve the compatibility issue before driving normally.
A Simple Test-Fit Rule
The best installation habit is also the simplest: loose first, inspect second, tighten last.
If the brackets line up naturally, the bar sits centered, the bumper has clean clearance, the skid plate isn’t touching anything, and the factory sensors remain appropriately clear, you’re on the right track. If something requires excessive force to make it line up, that’s usually a signal to recheck the fitment—not an invitation to modify the truck.
For the Sierra 1500, that extra five minutes of test fitting can be the difference between a clean professional-looking installation and an accessory that never quite sits right.
Practical GMC Sierra 1500 Bull Bar Considerations: What Matters After the Installation
Buying the right bull bar is only half the job. Once it is mounted on your Sierra, the things that matter are surprisingly simple: keep the finish clean, inspect the mounting points, make sure the lighting remains secure, and keep the paperwork. A few minutes of attention every so often can prevent a small issue from becoming an expensive one.
Keep the Bar Looking Good Without Overdoing It
Maintenance depends heavily on the finish.
For polished stainless steel, regular washing is usually enough to remove road salt, mud, insects, and grime before they sit on the surface for long periods. If the mirror-like appearance starts looking dull, use a stainless-steel-safe polish rather than an aggressive abrasive product. This is particularly relevant to the Black Horse option, where the polished finish is part of its appeal.
For powder-coated steel, use normal automotive soap, clean water, and a soft microfiber cloth. Avoid harsh chemicals or abrasive brushes that can damage the coating. If you notice a stone chip exposing bare metal, deal with it early rather than allowing moisture to work underneath the surrounding coating.
The goal isn’t to constantly polish the accessory. Keep contamination off it, inspect damage early, and the finish will generally take care of itself.
Don’t Forget the Mounting Hardware
A bull bar experiences vibration, road shock, temperature changes, and the occasional rough road. That makes the mounting hardware worth checking periodically.
During normal vehicle maintenance, take a quick look at:
- Mounting bolts and visible fasteners
- Brackets for bending or movement
- Welded joints for obvious damage
- Skid-plate fasteners
- Any unusual gaps between the bar and bumper
- New rattling or vibration
If you have recently installed the bar, an early inspection is particularly worthwhile after the first few drives.
Don’t automatically tighten everything harder if you find movement. Find out why it moved first. A loose fastener, incorrectly seated bracket, damaged hardware, or an alignment problem can require different solutions.
Give Integrated and Auxiliary LEDs Their Own Check
Lighting adds another maintenance point.
For the PARTREE integrated LED and Future Trucks 25-inch LED setups, inspect the light housing, mounting points, wiring, and connectors from time to time. Look for water intrusion, damaged insulation, loose wiring, or a light that has started vibrating out of alignment.
For bars that are only light-ready, such as the Black Horse and Tyger options, the same principle applies to whatever auxiliary light you install later.
Keep wiring away from sharp edges, exhaust heat, steering components, and anything that moves. If an LED suddenly flickers, don’t immediately assume the light itself has failed; check the connector, ground, wiring and mounting first.
Understand the Warranty Before You Need It
A warranty is useful only if you know what it actually covers.
The products in this roundup don’t all have the same warranty terms. For example, the Tyger Auto guard carries a 5-year warranty for manufacturing defects for U.S. customers, Future Trucks lists a 2-year manufacturer warranty, and the Westin HDX carries a 3-year limited warranty based on the supplied product information.
Before purchasing, save a copy of the product page, invoice, installation instructions, and warranty information. Product listings can change, and having the original information makes a warranty conversation much easier.
Also pay attention to what the warranty does not cover. Installation damage, modifications, improper installation, accidents, corrosion caused by neglect, or damage from misuse may be treated differently from a genuine manufacturing defect.
Take Photos Before and After Installation
This is one of those small habits that can save you a headache.
Before installation, take clear photos of the bumper, brackets, hardware, and the unopened product. After installation, photograph the finished mounting points and overall alignment.
If something arrives damaged, is missing from the package, or develops an unusual issue shortly after installation, those photos give you a useful record of the product’s condition and installation.
For a heavy grille guard such as the Westin, I’d also inspect the packaging carefully before throwing the box away, particularly because large steel accessories can occasionally suffer cosmetic damage during shipping.
Read the Return Policy Before You Install Anything
This matters more with vehicle-specific accessories than many buyers realize.
A product can arrive looking perfect and still turn out to be unsuitable once you discover that your truck has an excluded trim, radar system, LD configuration, tow-hook arrangement, or another fitment issue.
So check the return conditions before drilling, cutting, painting, modifying brackets, or permanently installing anything.
An unused product in its original condition is generally much easier to return than an accessory that has already been modified. Keep the packaging until you’re confident the fitment is correct.
What About Your Truck’s Factory Warranty?
Adding a bull bar does not automatically mean your entire GMC warranty disappears. However, warranty disputes can become more complicated if an aftermarket modification is directly connected to the problem being claimed.
For example, if an accessory is incorrectly installed and causes damage to a bumper component, wiring, sensor, or mounting structure, that specific issue may be treated differently from an unrelated mechanical warranty claim.
The sensible approach is not to assume either extreme. Don’t believe that every aftermarket accessory voids everything, but don’t assume the manufacturer will cover damage caused by an accessory either.
Use the vehicle manufacturer’s warranty terms and the accessory manufacturer’s instructions as your reference, especially if the installation affects factory wiring or driver-assistance equipment.
Insurance Is a Separate Question
Insurance treatment can vary depending on your insurer, policy, location, and how the accessory is covered.
A bull bar may be considered an aftermarket modification or accessory, and some policies may have specific limits for non-factory equipment. If the accessory is expensive, especially a large grille guard, it is worth asking your insurer whether it needs to be declared or separately covered.
Don’t wait until after an accident to find out what your policy says.
Also keep your purchase receipt and product information. If the accessory needs to be considered in a future claim, having documentation of what you bought and what it cost is far more useful than trying to reconstruct the information months later.
Sensors, Airbags and Safety Equipment Deserve Extra Attention
This is the area where appearance should take a back seat.
If your Sierra has front radar, parking sensors, adaptive cruise, forward-collision technology, or other driver-assistance equipment, monitor it after installation. Several products in this article carry specific compatibility warnings.
If a warning appears after installing the bull bar, don’t simply clear the warning and continue driving as though nothing changed. The accessory may be affecting the sensor’s field of view or the vehicle’s ability to operate its assistance systems correctly.
Likewise, don’t modify a mounting bracket or relocate factory safety equipment unless the manufacturer specifically provides a compatible procedure.
The Long-Term Ownership Test
After the first few weeks, the bull bar should become something you barely think about.
That’s a good sign.
It should remain secure, quiet, properly aligned, corrosion-free, and compatible with the truck’s equipment. If you start noticing movement, rattling, damaged coating, wiring problems, or sensor warnings, investigate early.
The best aftermarket accessory is not the one that demands attention every weekend. It’s the one that fits correctly, does the job you bought it for, and quietly stays out of your way for years.
FAQs About GMC Sierra 1500 Bull Bars
Can I use the same bull bar on a 2019–2026 GMC Sierra 1500?
Not necessarily. This is one of those fitment assumptions that can cost you a return, because 2019–2026 is not a blanket compatibility statement. Some products cover the newer Sierra range broadly, while others have specific exclusions for LD models, Super Cruise, diesel configurations, or front-mounted sensors.
For example, the Black Horse option covers the standard listed 2019–2026 application but excludes 2019–2021 Sierra 1500 LD and 2022–2026 models with Super Cruise. Future Trucks has a narrower 2019–2024 application and excludes diesel models. So before ordering, check the exact truck configuration, not just the year printed in the product title.
Will a GMC Sierra 1500 bull bar interfere with radar or parking sensors?
It can, and this is more important than the appearance of the finished installation. A bar can bolt on perfectly and still be a poor match for the truck’s electronics.
The products in this roundup make that clear:
- PARTREE specifically excludes vehicles equipped with a front radar system.
- Black Horse warns that front sensors may be affected and excludes certain Super Cruise-equipped trucks.
- Future Trucks warns about parking-sensor interference.
- Tyger also warns that its guard may interfere with front sensors.
If your Sierra uses radar or parking sensors, verify compatibility before purchasing. Don’t assume a sensor warning is something you can simply live with; the accessory can change what the vehicle’s factory system can “see.”
Is a skid plate on a GMC Sierra 1500 bull bar actually useful, or is it mostly for looks?
A removable skid plate can provide real additional coverage, but it shouldn’t be confused with complete underbody armor. Its usefulness depends on where and how you drive.
The Black Horse and Future Trucks options are particularly interesting because their removable plates extend protection below the central front area of the bull bar. That can help against loose gravel, trail debris, and minor contact underneath the front bumper.
But if you’re expecting protection for the entire engine, transmission, transfer case, or other exposed components, a bull-bar skid plate isn’t the answer. Think of it as an additional layer, not a replacement for a dedicated underbody skid-plate system.
Is a full grille guard a better choice than a bull bar for an older Sierra 1500?
Only if you actually want the extra coverage. A full grille guard is not simply a “stronger bull bar”; it is a substantially larger front-end accessory with a different purpose.
The Westin HDX 57-2295, for example, uses a one-piece welded structure with 2-inch tubing, wraparound wings, integrated headlight guards and a full punch-plate grille. At approximately 124 lb, it is in a completely different class from the lighter tubular options in this article.
For an owner who wants broader grille and headlight coverage, that extra size makes sense. For someone who simply wants a cleaner tubular front-end upgrade, it can be unnecessary weight and complexity. The right answer comes down to coverage versus simplicity, not which product looks more intimidating.
What should I verify if a Sierra bull bar says “bolt-on” but I want to install it myself?
“Bolt-on” tells you the basic mounting method; it doesn’t tell you how easy the actual job will be. Before starting, check the tow-hook requirements, trimming notes, sensor clearance, bracket alignment, and weight of the assembly.
A sensible installation sequence is:
- Confirm the exact model-year and trim fitment.
- Lay out every bracket and piece of hardware.
- Test-fit the brackets without fully tightening them.
- Position the bar with another person when necessary.
- Check bumper, grille, skid-plate and sensor clearance.
- Confirm the bar is centered before final tightening.
- Follow the manufacturer’s specified torque values.
- Recheck the hardware and alignment after the first drive.
That last step gets overlooked. A successful installation isn’t just “the bolts went in.” The bar should remain centered, secure and quiet after the truck has actually been driven. If a bracket needs to be forced, bent, drilled or modified simply to make an incorrect fit work, stop and verify the application instead of treating the modification as normal installation.
Final Take: Choose the GMC Sierra 1500 Bull Bar That Fits Your Truck, Not Just Your Build
A good bull bar should make sense after the excitement of installation wears off. That means the brackets fit your exact Sierra, the bar clears the bumper and factory equipment, the construction matches the kind of driving you actually do, and the features you paid for are genuinely useful.
For newer trucks, the Black Horse BB037415-SP stands out for its stainless-steel construction and removable skid plate, while the PARTREE and Future Trucks options make more sense if integrated lighting is high on your list. For older Sierras, the Tyger Auto gives you a simpler tubular setup, while the Westin HDX is the serious choice when broader grille and headlight coverage matters more than keeping the front end light.
The biggest lesson from this roundup is simple: don’t buy from the headline alone. Check your exact model year, body style, factory sensors, Super Cruise or radar equipment, diesel configuration where applicable, tow-hook setup, and installation requirements. Those few checks are far more valuable than another dozen product photos.
And if two bull bars look equally good on your Sierra, choose the one that gives you fewer compromises in real ownership. The best accessory is not necessarily the biggest, brightest, or most aggressive-looking one. It’s the one that fits properly, performs the job you bought it for, and still feels like the right decision months after the purchase.
Also Check: