
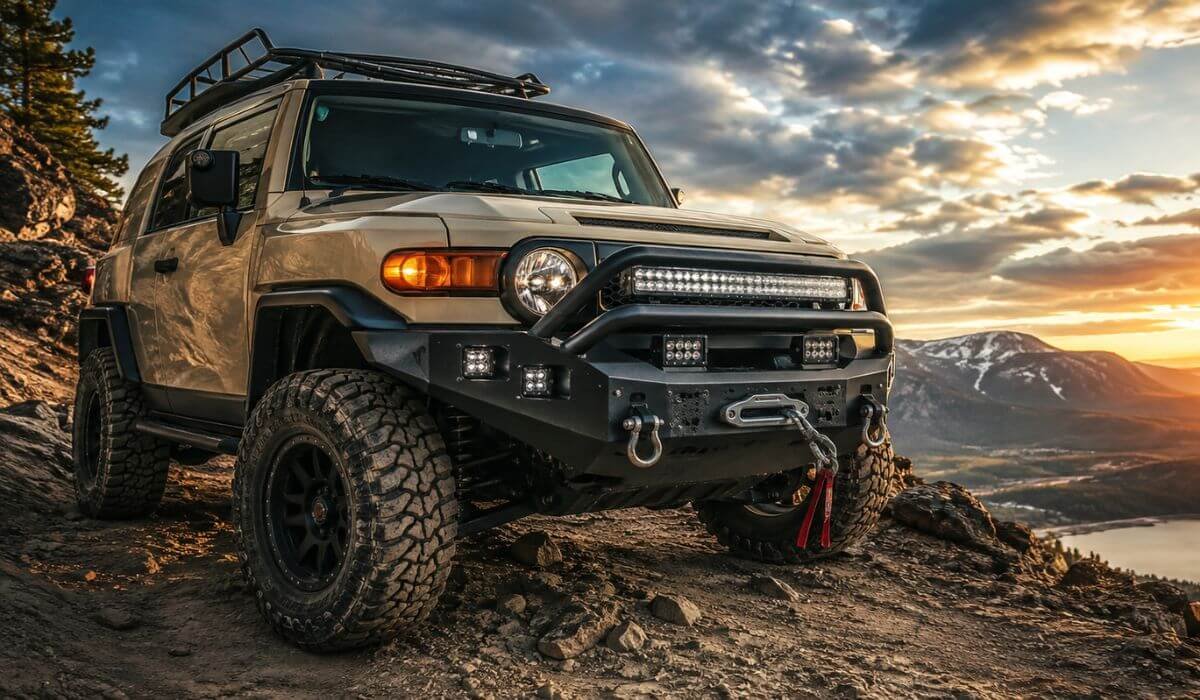
5 Best FJ Cruiser Front Bumper in 2026: Winch Ready Builds, Rock Crawling Armor & LED Lighting
If you own a 2007–2014 Toyota FJ Cruiser, the factory front bumper is fine for everyday driving, but it is not what I would choose once the truck starts seeing rocks, trails, recovery work, or a winch. The right aftermarket bumper adds useful protection without turning the FJ into a nose-heavy project.
For this guide, I focused on 2007–2014 fitment, steel construction, winch-plate design, recovery points, lighting, and the details that actually matter when you are bolting one onto an older FJ Cruiser. These are not interchangeable with newer Toyota models, so check your exact year and trim before ordering. Toyota’s own records identify 2007–2014 as the first-generation FJ Cruiser range, with 2014 being the final U.S. model year.
I also gave extra weight to products that bring something useful beyond appearance — whether that means a winch-ready center section, D-ring recovery points, rock-crawling protection, or integrated LED lighting. That is the difference between a bumper that simply looks aggressive and one you will actually appreciate when the trail gets ugly.
Best Toyota FJ Cruiser Front Bumper: Top 2026 Picks for Steel Armor & Trail Protection
#1. Nilight Steel Off-Road Front Bumper
Best FJ Cruiser Front Bumper for 2007-2014 Models With Winch Mounting, 120W Light Bar, LED Pods and D-Ring Recovery Points
#2. Tyger Auto FURY Rock-Crawler Front Bumper
Best FJ Cruiser Rock-Crawler Bumper for 2007-2014 Models Wanting High-Impact Trail Protection and Aggressive Clearance
#3. KUAFU Heavy-Duty Steel Front Bumper
Best Winch Bumper for 2007-2014 FJ Cruiser With D-Rings, LED Lighting, Bull Bar and Powder-Coated Steel Protection
#4. Longsun Full-Feature Front Bumper
Best FJ Cruiser Front Bumper With Winch Plate for 2007-2014 Models Needing LED Lights, D-Rings and Practical Trail Hardware
#5. Aaiwa Steel Winch-Ready Front Bumper
Best FJ Cruiser Front Bumper With LED Light Bar for 2007-2014 Models Seeking Steel Protection and Integrated Winch Support
Expert Tip
One thing I would not overlook on an FJ Cruiser: do not choose a bumper by appearance alone. The useful upgrade is the one that matches how you actually use the truck. If you need recovery capability, make the winch plate and D-ring arrangement the priority. If you spend more time on dark trails, integrated lighting becomes genuinely useful. And if approach angle matters, a bulky bumper that hangs lower than expected can work against the reason you bought it in the first place.
These five were selected with that in mind. They are all built around the 2007–2014 FJ Cruiser, but they are not identical solutions. Nilight is the most complete package for someone wanting winch hardware plus serious lighting, while Tyger Auto makes more sense for a rock-crawling-focused build. KUAFU adds a bull bar and recovery hardware, Longsun gives you a more complete bumper setup, and Aaiwa keeps the formula simpler with steel protection, a winch plate and light bar support.
How We Chose These FJ Cruiser Front Bumpers
We did not rank these simply by how aggressive they look in product photos. The starting point was fitment: every bumper had to specifically cover the first-generation FJ Cruiser’s 2007–2014 model range. That matters because an attractive bumper is worthless if the mounting points, front-end shape or required hardware do not match your truck.
From there, we looked at what each bumper actually gives you.
Winch compatibility was one of the biggest factors because this is one of the main reasons FJ Cruiser owners move away from the factory bumper. Nilight, Tyger Auto, KUAFU, Longsun and Aaiwa all provide a winch-oriented design, but their approach is different. We treated that difference as a buying factor rather than pretending every product offers the same setup.
We also gave real weight to recovery points. Nilight and KUAFU stand out here with D-rings, while the other designs focus more heavily on their overall bumper configuration. For someone who actually travels off-road, recovery hardware is not decorative equipment; it is something worth considering before the truck gets stuck.
Lighting was another deliberate part of the selection. Nilight’s 120W light bar and additional LED pods give it a clear advantage for buyers who want lighting already incorporated into the bumper. Longsun and Aaiwa also bring LED lighting into the package, while KUAFU includes lighting support without making it the entire point of the bumper.
We also considered construction and protection rather than chasing the longest feature list. The Tyger Auto FURY, for example, earns its place because its rock-crawler-oriented design speaks directly to a different type of FJ owner. It would be misleading to rank it lower simply because another bumper includes more lighting.
Finally, we looked at the products as different solutions for the same FJ Cruiser, not five copies of one another. That is why the order is intentional: Nilight comes first for the strongest combination of winch capability, recovery hardware and lighting; Tyger Auto follows for a more trail-focused rock-crawler build; KUAFU balances steel protection with recovery and bull-bar hardware; Longsun is attractive for buyers wanting a more complete package; and Aaiwa is the straightforward choice for steel protection with winch and LED-lighting support.
That approach is important with newer aftermarket products because a small number of reviews does not automatically make a bumper good or bad. When long-term owner feedback is limited, the safer approach is to judge what can actually be verified from the product design and stated fitment, rather than inventing durability claims or pretending we have thousands of miles of personal experience with every bumper.
For an FJ Cruiser owner, that is ultimately what matters: the bumper should solve a real problem on your truck, not simply make the front end look tougher in a photograph.
#1. Nilight Front Bumper
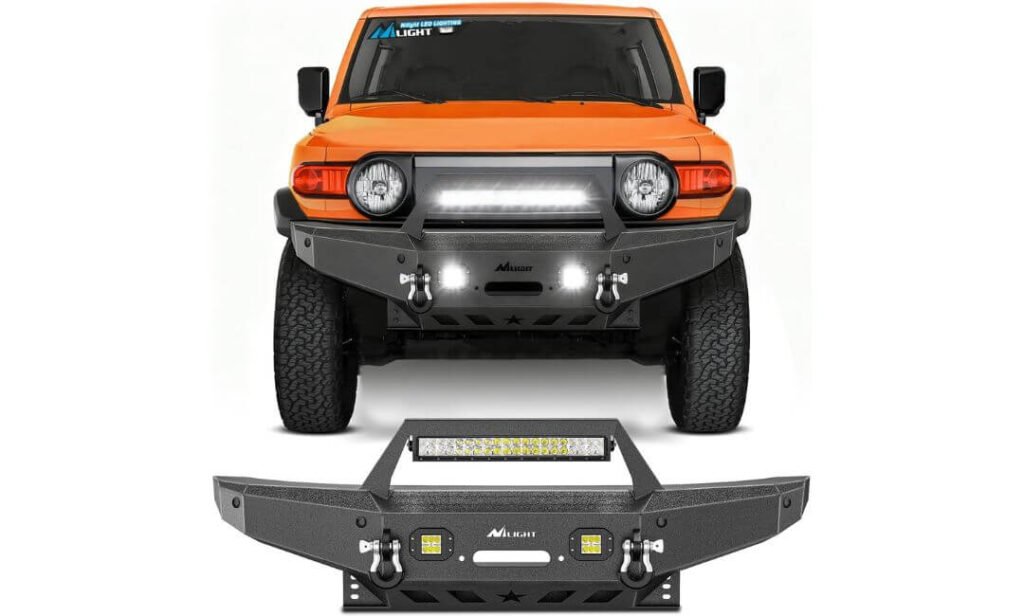
Quick Specs:
- Fitment: 2007–2014 Toyota FJ Cruiser
- Construction: 5/32-inch steel sheet with 2 × 0.120-inch steel tubing
- Winch Capacity: Built-in plate rated for up to 12,000 lbs
- Recovery Setup: Two 4.75-ton D-ring mounts with isolators
- Lighting: 120W LED light bar + two 18W LED spot pods
- Finish: Textured black two-stage powder coating
- Installation: Designed to bolt to factory mounting points without drilling or cutting
- Overall Size: 40″W × 20″D × 12″H
- Weight: 74.8 lbs
There is a lot going on here, but the useful part is that the hardware is not there just to make the FJ look aggressive. The built-in 12,000-lb winch plate, welded recovery points and integrated lighting give this bumper a genuinely practical purpose. For an FJ Cruiser that sees trails, recovery situations or poorly lit roads, those are the upgrades you are actually likely to appreciate.
The construction is another reason it made the top of our list. The combination of 5/32-inch steel plate and 2 × 0.120-inch tubing gives the front end considerably more substance than a cosmetic replacement bumper. The textured two-stage powder coat is also a sensible touch for an off-road vehicle because the finish has to deal with dirt, moisture and the occasional trail scrape rather than just look good on installation day.
Then there is the lighting package. A 120W LED light bar plus two 18W spot pods is a much more useful combination than simply adding decorative LEDs. You get broader illumination from the bar and more concentrated light from the pods, which suits the way an FJ is commonly used after sunset. The three-piece design also keeps the bumper looking purposeful instead of turning the front of the vehicle into an oversized steel wall.
What We Like
- 12,000-lb winch support gives the bumper genuine recovery capability.
- The included 4.75-ton D-rings and isolators mean the recovery setup is not an afterthought.
- The 120W bar + 18W pods make the lighting package genuinely useful on dark trails.
- Factory-hole installation keeps the swap much cleaner than a bumper requiring custom fabrication.
- At 74.8 lbs, it adds substantial protection without being an unnecessarily enormous front-end assembly.
One Thing to Know
The full-width steel design and integrated equipment naturally make it a more substantial upgrade than a simple factory-style replacement, so it is worth checking your winch dimensions, mounting hardware and available front-end clearance before ordering.
FJ Cruiser Fitment & Installation
This bumper is specifically listed for the 2007–2014 Toyota FJ Cruiser, covering the complete first-generation model range used for this guide. That makes the fitment straightforward, but I would still match your exact vehicle year before checkout rather than assuming every FJ configuration has identical equipment around the front end.
The design is intended to use the factory mounting holes, with no additional drilling or cutting stated as necessary. You will still want normal installation equipment and enough working room to handle a roughly 75-pound bumper, particularly if you are fitting the winch and lighting at the same time.
The Insider Pro-Tip
If your FJ is actually going to see recovery work, decide on the winch and fairlead first, not after the bumper arrives. The 12,000-lb plate gives you plenty of headroom, but the physical dimensions of the winch, control placement and fairlead position still need to make sense with the finished bumper.
And one small detail is easy to overlook: wire the lighting cleanly while the bumper is off the vehicle. Getting the bar and pods connected before everything is tightened down is far easier than trying to route wiring around a finished installation. That is the sort of five-minute decision that can save you an hour of frustration later.
#2. Tyger Auto TG-BP6T80668 FURY Front Bumper
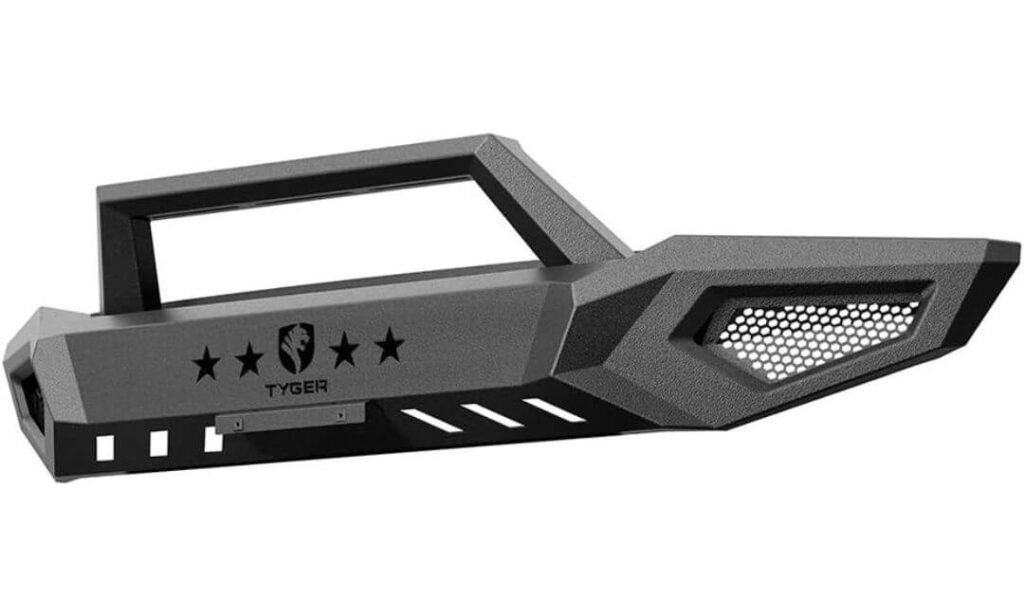
Quick Specs:
- Fitment: 2007–2014 Toyota FJ Cruiser
- Construction: 5mm heavy-duty carbon steel
- Weight: 79.3 lbs
- Finish: Textured black powder coat
- Light Bar Support: Up to 22-inch centre light bar
- Side Lighting: Up to 3-inch light pods
- Light Mounts: Pre-welded mounting channels and included brackets
- Light Covers: Removable
- Installation: Bolt-on design with one cutting step; no drilling
- Skid Plate: Optional TG-SP6T80668
- Warranty: 3 years for U.S. customers
- Winch: No built-in winch mounting provision
Some FJ Cruiser bumpers are built around the idea that bigger automatically means better. The FURY takes a different route. Its 5mm carbon-steel construction gives it a properly substantial feel, while the design keeps the front end focused on trail protection and clearance rather than trying to turn the FJ into a rolling accessory catalogue.
The lighting setup is particularly well thought out. You can run a 22-inch centre light bar and 3-inch side pods, with the mounting channels already integrated into the bumper. The lights themselves are not included, which is actually useful if you already have a preferred lighting brand or want to choose the beam pattern yourself. The removable light covers also let you change the look without replacing the bumper.
Installation is worth understanding before buying. This is still a bolt-on installation with no drilling, but it is not a completely untouched factory swap because one cutting step is required around the side body molding and wheel-well trim. That is a small distinction, but it is exactly the sort of detail that makes a product recommendation feel honest rather than overly polished.
What We Like About It
- The 5mm carbon steel gives this bumper a serious rock-crawler character.
- The built-in lighting channels accommodate a 22-inch centre bar plus side pods.
- Removable light covers give you some flexibility after installation.
- No drilling is required, keeping the mounting process relatively straightforward.
- The 3-year U.S. warranty adds useful reassurance for a long-term build.
One Detail Worth Knowing
This is not a winch bumper. If recovery capability is the main reason you are replacing the factory bumper, the Nilight above is the better match. The FURY makes more sense when your priority is front-end protection, clearance and a dedicated lighting setup.
FJ Cruiser Fitment & Installation Notes
The FURY is specifically designed for the 2007–2014 Toyota FJ Cruiser, so it fits the generation this guide is targeting rather than relying on a generic Toyota application. The supplied mounting design uses the vehicle’s existing mounting points, with no drilling called for.
You should, however, be comfortable with the stated single cutting step around the side body molding and wheel-well trim. If you are doing the job yourself, measure twice before making that cut. The bumper is around 79 pounds, so having a second person help with positioning and bolt alignment is also a very sensible move.
The Insider Pro-Tip
If you choose this bumper specifically because you like its rock-crawler profile, I would not treat the optional skid plate as an afterthought. The bumper can do its job without turning the entire front underside into armor, but the separate skid plate is the piece that helps complete the protection underneath the front end.
And because the bumper does not include lights, this is actually a good opportunity to build the lighting around your driving rather than buying whatever happens to be bundled. A wider 22-inch bar suits open trail visibility, while smaller side pods can add useful peripheral illumination. Build that part around how you drive the FJ, and the bumper becomes much more than an aggressive-looking front end.
#3. KUAFU Steel Front Bumper
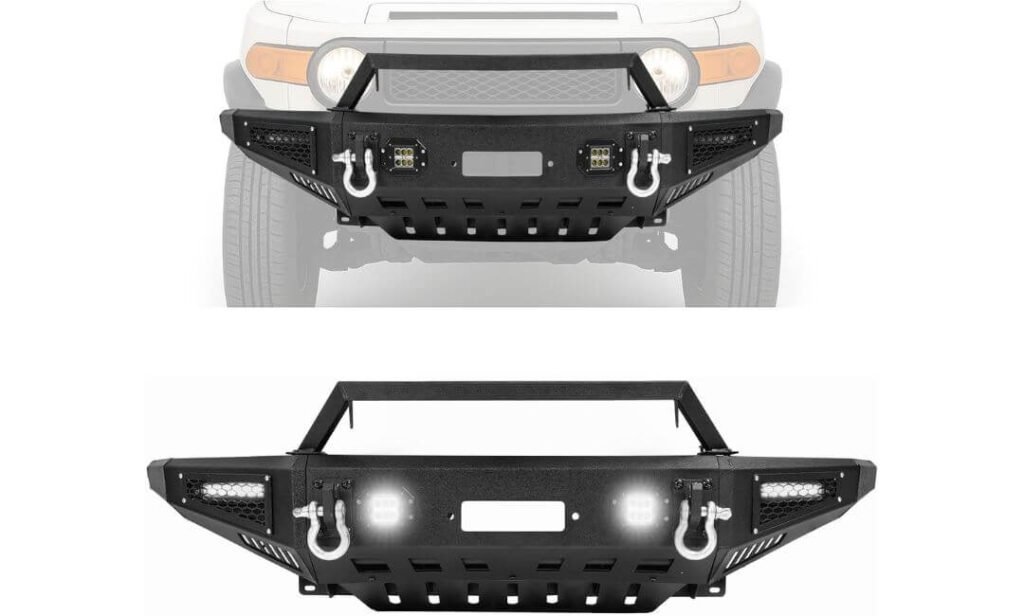
Quick Specs:
- Fitment: 2007–2014 Toyota FJ Cruiser
- Construction: High-strength alloy steel
- Finish: Black powder coating
- Recovery: Built-in winch plate + 2 D-ring recovery points
- Lighting: 4 integrated lights
- Bull Bar: Includes 2 mounting points for an additional light bar
- Dimensions: 40″D × 20″W × 15″H
- Installation: Screw/bolt installation with mounting hardware included
- Package: Front bumper assembly + mounting hardware + assembly manual
The KUAFU makes sense for a different kind of FJ build. Instead of concentrating on one standout feature, it puts several useful pieces into the same front-end package: a built-in winch plate, two D-rings, four integrated lights and a bull bar with additional light-bar mounting points. For someone building an FJ for mixed road and trail use, that combination is hard to ignore.
The steel construction is also doing more than giving the bumper an aggressive appearance. Its high-strength alloy-steel body and powder-coated finish are intended for the kind of dirt, moisture and rough use an off-road bumper is expected to encounter. The integrated lighting is particularly practical if you regularly drive after dark, while the bull bar leaves room for adding another light source later instead of forcing you to settle for the lighting configuration on day one.
There is one installation detail I would take seriously before ordering. The mounting hardware is included, but the supplied documentation is not especially detailed. That does not make the bumper a bad choice; it simply means this is one of those jobs where having the right tools and some mechanical confidence matters. If you have already installed suspension, recovery gear or other bolt-on FJ parts, it should feel much less intimidating.
What We Like About It
- Winch plate and two D-rings give the bumper genuine recovery usefulness.
- Four integrated lights add practical visibility without requiring a separate lighting bracket.
- The bull bar has additional light-bar mounting points, leaving room for a future lighting upgrade.
- Powder-coated steel gives the bumper a purpose-built off-road finish.
- Mounting hardware is included, so the basic package is ready for installation.
One Detail Worth Knowing
The installation documentation is relatively basic, so first-time DIY installers may find the process easier with professional help or someone experienced with FJ Cruiser bumper installations.
FJ Cruiser Fitment & Installation Notes
This bumper is specifically listed for the 2007–2014 Toyota FJ Cruiser, which matches the model range covered throughout this guide. Its vehicle-specific design means you are not trying to adapt a universal bumper to the FJ’s front structure.
The bumper comes with mounting hardware, but I would set everything out before starting and loosely assemble the major pieces first. At 40 inches deep, 20 inches wide and 15 inches high, it is not a small component, so getting the positioning right before final tightening can make the installation considerably smoother.
The Insider Pro-Tip
The smartest way to approach this one is to decide whether you actually need the additional light-bar position on the bull bar. If the four integrated lights already cover your normal driving, leave that area clean. If you regularly travel remote trails after dark, that second lighting position gives you a useful upgrade path without replacing the bumper later.
Also, do not rush the first fitment. Get the bumper sitting correctly, check clearance around the front-end components and lighting, then tighten everything progressively. A few extra minutes during alignment are much easier than discovering after final tightening that something needs to move.
#4. Longsun FJ Cruiser Front Bumper Set
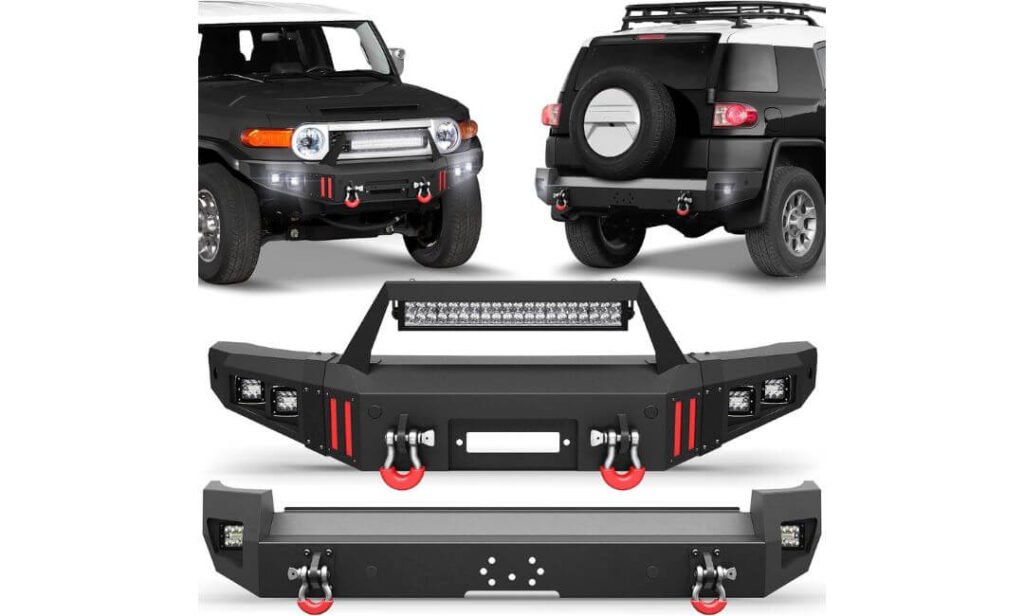
Quick Specs:
- Fitment: 2007–2014 Toyota FJ Cruiser
- Construction: Low-carbon steel
- Package: 3-piece bumper set
- Weight: 185 lbs
- Finish: Textured black powder coating
- Winch Support: Winch plate rated for pulling forces up to 12,000 lbs
- Lighting: 144W light bar + four 18W fog lights
- Recovery: D-rings included
- License Plate: Bracket included
- Parking Sensors: Pre-drilled sensor holes; sensors not included
- Dimensions: 73.07″W × 18.87″D × 10.77″H
What separates this setup from the usual single-piece bumper upgrade is the amount of hardware being addressed at once. You are getting winch support, D-rings, a 144W light bar, four 18W fog lights and a license-plate bracket in the package, so the front end can be built around one cohesive design instead of collecting separate accessories afterward.
The construction also explains why this is the heaviest option in our lineup. At 185 pounds, this is not a lightweight cosmetic replacement. The low-carbon-steel construction and three-piece design are aimed at creating a more substantial front-end setup, while the textured black powder coating keeps the finished look consistent with the FJ’s rugged character.
One detail I particularly like is the attention to the little things that are easy to forget during a bumper swap. Pre-drilled parking-sensor holes are already provided, although the sensors themselves are not included. The package also includes the license-plate bracket, which means fewer awkward little jobs after the main installation is finished.
What We Like About It
- The 144W light bar and four 18W fog lights create a serious factory-replacement lighting package.
- 12,000-lb winch support makes it suitable for a recovery-focused FJ build.
- D-rings and a license-plate bracket are already included.
- The three-piece construction makes the overall bumper assembly easier to manage during installation.
- Pre-drilled parking-sensor provisions show useful attention to vehicle-specific details.
One Detail Worth Knowing
At 185 pounds, this is considerably more substantial than the other bumpers in this list, so I would plan the installation around proper support and ideally have another person available during positioning.
FJ Cruiser Fitment & Installation Notes
Longsun specifically lists this bumper set for the 2007–2014 Toyota FJ Cruiser, matching the full model range covered in this article. The three-piece construction is designed around that vehicle rather than being a generic universal setup.
The bumper arrives in three separate parcels, and the manufacturer recommends professional installation if you are not comfortable handling a large steel assembly. If your FJ has parking sensors, remember that the bumper has the holes prepared, but the sensors themselves are not part of the package.
The Insider Pro-Tip
If you are choosing this one, plan the installation around the complete setup rather than just the steel bumper. Get the winch, lighting and sensor requirements figured out before the final tightening stage. It is much easier to route everything properly while the bumper is accessible than to crawl back underneath afterward.
And because this is a 185-pound assembly, do not let the three-piece design fool you into treating it like a lightweight bolt-on. Use proper support while aligning the sections. Once everything is sitting correctly, the finished result makes far more sense: one coordinated front-end upgrade instead of several unrelated accessories bolted onto the FJ at different times.
#5. Aaiwa Steel Winch-Ready Front Bumper
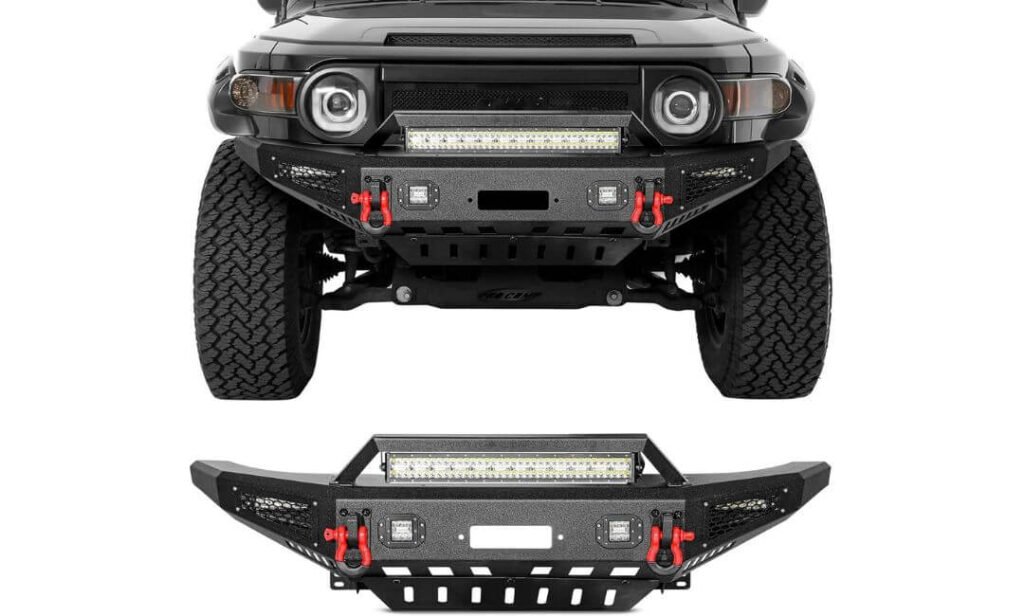
Quick Specs:
- Fitment: 2007–2014 Toyota FJ Cruiser
- Construction: 5/32-inch heavy-duty steel
- Winch Support: Built-in plate for up to 12,000 lbs
- Lighting: 25-inch LED light bar + 4 LED pods
- Finish: Textured black powder coating
- Installation: Bolt-on design with no cutting or drilling stated
- Package: Bumper, light bar, four pods and mounting hardware
- Weight: Approximately 116.8 lbs
- Dimensions: 68.82″W × 22.83″D × 17.28″H
Aaiwa takes the idea of a complete front-end upgrade and keeps it refreshingly simple. You get the steel bumper, 12,000-lb winch plate, 25-inch light bar and four LED pods in one package, so there is no need to start hunting for compatible lighting brackets immediately after the bumper arrives.
The 5/32-inch steel construction gives it the kind of substantial build expected from a serious off-road bumper, while the textured powder-coated finish adds another layer of protection against the elements. At roughly 116.8 pounds, it is heavier than some of the other choices here, so this is clearly designed as a protection-and-equipment upgrade rather than a lightweight styling piece.
The lighting arrangement is also worth looking at closely. The 25-inch light bar provides the main forward illumination, while the four smaller pods can supplement it from different positions. That makes the package particularly appealing if you want to finish the lighting side of the build at the same time as the bumper rather than buying everything separately.
What We Like About It
- 12,000-lb winch plate gives the bumper real recovery potential.
- The included 25-inch light bar and four LED pods make it a complete lighting package.
- 5/32-inch steel provides substantial front-end construction.
- The supplied mounting hardware keeps the package straightforward.
- Factory-style bolt-on installation is intended without cutting or drilling.
One Detail Worth Knowing
The bumper is listed at roughly 116.8 pounds, so installation is much easier with a second person helping hold and align it rather than trying to position the assembly alone.
FJ Cruiser Fitment & Installation Notes
Aaiwa lists this bumper specifically for 2007–2014 Toyota FJ Cruiser models, matching the fitment range used throughout this guide. The bumper is designed as a vehicle-specific replacement rather than a universal off-road bumper.
The supplied hardware is included, and the manufacturer describes the installation as a bolt-on process without cutting or drilling. Because of the bumper’s size and weight, however, take your time during alignment before fully tightening the mounting points. That small step can make a noticeable difference to how cleanly the finished bumper sits.
The Insider Pro-Tip
If you are buying this primarily for the winch capability, choose the winch before installation, not afterward. The bumper provides the mounting provision, but checking the winch’s physical dimensions and control-box arrangement beforehand can save you from having to rearrange wiring once everything is bolted together.
For the lighting, I would also test the 25-inch bar and four pods independently before final cable routing. Once you know exactly where you want the light pattern and switches, secure the wiring properly and keep it away from moving or hot components. It is a small bit of preparation, but it is what turns a bundled accessory package into a properly finished FJ build.
Best Toyota FJ Cruiser Front Bumper Comparison (2007–2014)
Buyer’s Guide: How to Pick the Right FJ Cruiser Front Bumper
Choosing an FJ Cruiser bumper is less about finding the toughest-looking design and more about matching the bumper to the way you actually use the vehicle. A daily-driven FJ that occasionally visits trails does not need the same front-end setup as a truck carrying a winch into remote terrain every weekend. The five bumpers in this guide cover noticeably different priorities, so the right choice comes down to a few practical details.
Winch Compatibility and Recovery Setup
If recovery is the reason you are replacing the factory bumper, start here. A winch-ready bumper needs more than a hole where a winch can sit. Look at the rated mounting provision, available space for the winch and fairlead, control-box placement, and how easily you can access the equipment after installation.
For this lineup, the Nilight, KUAFU, Longsun and Aaiwa options all provide built-in winch mounting provisions, with the listings specifying support for winches up to 12,000 pounds on several models. The Tyger Auto FURY is different: it is designed more around rock-crawling protection and lighting and does not provide a winch mount.
D-rings are another important distinction. If you expect to use recovery straps or shackles, proper recovery points are much more useful than decorative tow hooks. Nilight and KUAFU are particularly straightforward here because their recovery hardware is part of the bumper setup.
Protection, Clearance and Approach Angle
A heavier bumper is not automatically better protection. What matters is where the steel sits and what it protects.
For trail use, pay attention to the lower front section, corners, mounting structure and the amount of bumper extending ahead of the factory bodywork. A bumper that keeps unnecessary material tucked away can help preserve the FJ Cruiser’s approach angle, while an oversized design that hangs low can reduce some of the clearance you were trying to gain.
The Tyger FURY is the most obvious choice in this group for buyers thinking specifically about a rock-crawling style build. Its design prioritises trail-oriented protection and lighting accommodation rather than winch hardware. Nilight, KUAFU, Longsun and Aaiwa take a more equipment-heavy approach, adding recovery or lighting hardware directly into the bumper design.
Lighting and Useful Accessories
Integrated lighting can be genuinely useful on an FJ Cruiser, but there is a difference between useful illumination and simply filling every available opening with LEDs.
Nilight comes with a 120W light bar and two 18W spot pods, while Aaiwa includes a 25-inch light bar and four LED pods. Longsun goes even further with a 144W light bar and four 18W fog lights. KUAFU includes four integrated lights and provides additional mounting points on the bull bar for another light bar.
Tyger Auto takes the more flexible approach. Its FURY bumper supports a 22-inch centre light bar and 3-inch side pods, but the lights are not included. That can actually be an advantage if you already know which beam pattern or lighting brand you want.
Before buying, think about where you drive at night. A wide light bar can make sense on open trails, while smaller side lights can improve peripheral visibility. You also need to plan wiring, switches and relay placement rather than treating those as an afterthought.
Weight and Mounting Hardware
This is one area where the product specifications tell an important story.
| Bumper | Listed Weight | What That Means |
|---|---|---|
| Nilight | 74.8 lbs | Substantial steel construction without being the heaviest option |
| Tyger Auto FURY | 79.3 lbs | Heavy-duty 5mm carbon-steel design |
| KUAFU | Not stated | High-strength alloy-steel construction |
| Longsun | 185 lbs | Very substantial three-piece setup |
| Aaiwa | Approx. 116.8 lbs | Heavy steel package with integrated lighting |
A bumper weighing 75–80 pounds is already something you should ideally install with another person helping. The 185-pound Longsun setup deserves even more planning because its weight, three-piece construction and additional equipment make handling considerably more demanding.
Also look beyond the bumper itself. A winch, fairlead, recovery shackles, lighting, wiring and other accessories can add meaningful weight to the front of the FJ. If your vehicle already carries a steel skid plate, heavy recovery gear or other front-end equipment, consider the combined load rather than judging the bumper in isolation.
Compatibility With Skid Plates, Steps and Existing Armor
This is the part I would check before clicking the buy button, especially if your FJ already has aftermarket protection underneath.
A new bumper can look perfect in isolation and still create an annoying fitment problem when paired with an existing skid plate, rock sliders, steps or lower front armor. Check where the bumper terminates underneath the vehicle, where the mounting hardware sits, and whether your current protection was designed around the factory bumper.
The Tyger FURY has an optional TG-SP6T80668 skid plate, which is useful if you want the bumper and underside protection to work as one system. With the other bumpers, I would verify the manufacturer’s mounting dimensions against your existing armor before assuming everything will line up.
Steel vs. Aluminum vs. Composite
For this particular FJ Cruiser lineup, steel is the dominant choice, and there is a practical reason for that. These bumpers are aimed at owners looking for protection, recovery hardware and off-road equipment, where strength and mounting rigidity matter more than saving every possible pound.
Steel is the sensible choice if you want a serious winch mounting structure, recovery points and physical protection. The trade-off is weight, and that matters because additional front-end mass can affect ride height and suspension behaviour.
Aluminum can reduce weight considerably and makes sense for an overland build where payload management is important, but it is not the material I would automatically choose when heavy recovery use is the priority.
Composite bumpers can be attractive when weight and appearance matter most, but they are a different proposition from the steel recovery-focused products covered here. If the main reason for the upgrade is a winch and trail protection, the structural mounting design matters more than having the lightest possible bumper.
FJ Cruiser Model Year and Front-End Fitment
All five products selected for this guide are listed for the 2007–2014 Toyota FJ Cruiser. That is important because the FJ Cruiser covered here is the first-generation model, and these bumpers are designed around that specific body and mounting configuration.
Do not assume that a bumper advertised for another Toyota truck or SUV will transfer directly to an FJ Cruiser. Check the exact year before ordering, particularly if your vehicle has aftermarket lighting, sensors, grille modifications or previous bumper modifications.
Also inspect the area around the radiator, lower grille and front cooling openings before final installation. A heavy off-road bumper should protect the front of the vehicle without unnecessarily restricting airflow or interfering with components behind it.
Installation, Tools and Realistic Time
None of these bumpers should be treated as a five-minute accessory installation.
The Nilight design is intended to use factory mounting holes without additional drilling or cutting. Aaiwa is also described as a bolt-on installation without cutting or drilling. Tyger Auto requires one cutting step around the side body molding and wheel-well trim, although drilling is not required.
KUAFU includes mounting hardware, but its installation documentation is relatively basic. Longsun uses a three-piece design and recommends professional installation where necessary, particularly because of the size and weight of the assembly.
For a typical home installation, I would have:
- A complete socket and wrench set
- Torque equipment appropriate for the mounting hardware
- Jack stands or suitable support equipment
- A second person to help position the bumper
- Basic electrical tools if installing the included lights
- Trim-removal tools where body molding needs to be moved
- Extra time for alignment before final tightening
The exact installation time will depend heavily on your tools, experience and whether you are adding a winch and wiring at the same time. The real goal should not be finishing as quickly as possible. Correct alignment, secure mounting and clean wiring are worth more than saving an hour.
One Final Buying Check
Before ordering, compare the bumper against your actual build rather than the product photograph. If you need a winch and recovery points, Nilight, KUAFU, Longsun and Aaiwa make more sense. If your priority is rock-crawling protection and a custom lighting setup, the Tyger Auto FURY has a clearer purpose.
Most importantly, check the winch dimensions, fairlead position, existing skid-plate compatibility, front-end clearance and total added weight before committing. Those five checks will tell you far more about whether a bumper belongs on your FJ Cruiser than an aggressive product photo ever will.
Installation Basics for an FJ Cruiser Front Bumper
A front bumper installation is one of those jobs where preparation matters more than speed. The bumper may be advertised as bolt-on, but you are still handling a large steel component, aligning multiple mounting points, and, in four of these options, potentially connecting a winch and several lights. Taking a little time before the first bolt is tightened makes the finished installation cleaner and safer.
Pre-Install Checklist
Before removing the factory bumper, put the new bumper, mounting hardware and accessories somewhere you can actually inspect everything. Do not start the job and discover halfway through that a bracket, fastener or light connection is missing.
For this FJ Cruiser lineup, check these points first:
- Confirm your FJ Cruiser is a 2007–2014 model and matches the bumper’s stated fitment.
- Read the supplied installation instructions before lifting the bumper into position.
- Lay out every bracket, bolt, washer and nut so you know which hardware belongs where.
- Check the bumper for shipping damage, especially around mounting tabs and welded sections.
- If using a winch, verify its physical dimensions and mounting pattern against the bumper before installation.
- Check the fairlead position and make sure the winch rope or synthetic line will have a clean path.
- If installing LED lights, identify the light-bar and pod wiring before the bumper is mounted.
- Inspect existing skid plates, recovery gear, steps or other front-end accessories for possible interference.
- Have a second person available. A steel bumper is awkward to hold and align, even when its listed weight looks manageable.
- Disconnect the vehicle battery before beginning electrical work.
One particularly useful habit is to take a few photos of the factory bumper’s mounting area before removing it. Once the original bumper is off, those photos can make it much easier to remember how brackets, wiring and trim were originally positioned.
Understanding Bolt-On vs. Cutting and Drilling
“Bolt-on” does not mean every bumper in this guide installs in exactly the same way.
The Nilight and Aaiwa designs are listed as using the factory mounting points without additional drilling or cutting. That is the easiest type of installation because the vehicle itself requires very little modification.
The Tyger Auto FURY is slightly different. It uses a bolt-on mounting approach and does not require drilling, but the manufacturer specifies one cutting step around the side body molding and wheel-well trim. That is important information to know before starting, because you should have the correct cutting and trimming tools ready rather than discovering the requirement halfway through the job.
KUAFU includes mounting hardware, while Longsun uses a three-piece bumper arrangement. In both cases, take the manufacturer’s supplied hardware seriously rather than automatically substituting bolts from your own toolbox.
Mounting and Alignment
Once the factory bumper is removed, resist the temptation to fully tighten the first bolt you install.
Start by positioning the bumper and getting the major mounting points engaged loosely. This gives you room to adjust the bumper from side to side and correct its height before everything becomes locked in place.
A sensible sequence is:
- Remove the factory bumper and retain any vehicle hardware that the manufacturer’s instructions specifically call for.
- Inspect the factory mounting points for damage, corrosion or previous modifications.
- Position the new bumper with assistance and align the main brackets.
- Install the supplied hardware by hand first, leaving enough movement for adjustment.
- Check the bumper’s position relative to the grille, headlights, fenders and lower bodywork.
- Check clearance around the radiator and other components behind the bumper.
- Confirm that the fairlead, winch opening and recovery points are sitting where intended.
- Make any necessary adjustments before final tightening.
- Tighten the hardware according to the manufacturer’s instructions and recommended torque specifications.
- Recheck the bumper alignment once everything is fully secured.
This is especially important with a wide, heavy bumper. A small alignment error at the beginning can become surprisingly obvious once the bumper is fully tightened.
Winch Installation and Electrical Planning
If you are installing a winch at the same time, do the planning before the bumper goes completely into place.
The Nilight, KUAFU, Longsun and Aaiwa options provide winch mounting provisions, but the winch itself is not included with these bumper packages. Check the winch’s mounting dimensions, motor orientation, control-box location and fairlead position before committing to the final installation.
The electrical side deserves just as much attention as the steelwork. A winch can draw substantial current, so its power cables should be routed carefully, protected from sharp edges and kept away from moving or excessively hot components. Follow the winch manufacturer’s wiring and battery requirements rather than guessing at cable routing or connection methods.
Do not treat the winch cable as ordinary accessory wiring. Use the supplied or manufacturer-specified cables, terminals, breaker or solenoid arrangement, and make sure connections are secure before testing the system.
LED Light Wiring
The lighting packages vary considerably across these five bumpers.
Nilight includes a 120W light bar and two 18W spot pods, Longsun includes a 144W light bar and four 18W fog lights, and Aaiwa includes a 25-inch light bar with four LED pods. KUAFU provides four integrated lights and additional light-bar mounting provisions, while the Tyger FURY allows up to a 22-inch centre bar and 3-inch side pods but does not include the lights.
Before mounting the bumper permanently, identify where each light’s wiring will travel. Keep cables away from:
- Exhaust and other high-temperature components
- Steering and suspension movement
- Sharp metal edges
- Winch rope or fairlead movement
- Areas likely to collect water or mud
Use properly protected connections and secure loose wiring so vibration cannot gradually pull on terminals. If your lighting kit requires relays, fuses or switches, install them according to the lighting manufacturer’s instructions rather than assuming the bumper manufacturer has already accounted for your exact electrical setup.
Safety Checks Before Driving
Once the bumper is installed, do not immediately head out for a trail run.
First, stand back and inspect the entire front end. Check that the bumper sits evenly, the mounting hardware is properly secured, and there is no contact with the grille, fenders, suspension or other components.
Then check the recovery points and winch mounting area visually before relying on them. If a winch is installed, perform its initial test according to the winch manufacturer’s procedure rather than immediately putting it under a heavy recovery load.
For the lights, test every function individually. Check the light bar, pods, switches and any additional lighting before securing the final sections of wiring.
After the first short drive, park the FJ and inspect the bumper again. Pay particular attention to mounting hardware, wiring, clearance and alignment. If everything remains secure, you have a much better indication that the installation is ready for normal road and trail use.
LED Lighting, Winches, and Armor Integration
A bumper becomes much more useful when the lighting, recovery gear, and lower protection work together instead of being treated as three separate upgrades. On an FJ Cruiser, that matters because adding a heavy bumper and accessories changes the front-end layout, so the best setup is one where every component has enough clearance and a clear purpose.
Getting the Most From Integrated LED Lighting
The lighting packages in this lineup are quite different, so there is no reason to treat them as equivalent.
The Nilight setup includes a 120W light bar and two 18W spot pods. That gives you a useful combination of broader forward illumination and more concentrated lighting. The Longsun setup goes further with a 144W light bar and four 18W fog lights, while Aaiwa includes a 25-inch light bar and four LED pods.
KUAFU takes a more flexible approach, with four integrated lights plus two additional mounting points on the bull bar for another light bar. The Tyger Auto FURY does not include lights, but its mounting channels can accommodate up to a 22-inch centre light bar and 3-inch side pods.
For the cleanest result, think about the beam pattern before worrying about how many LEDs you can fit. A wide bar is useful for open trail visibility, while smaller side-mounted pods can help illuminate areas outside the main forward beam.
A few simple installation habits make a noticeable difference:
- Aim the main light bar so it illuminates the trail without unnecessarily shining into oncoming traffic.
- Keep pod lights positioned where the bumper structure does not block their useful beam.
- Protect wiring from sharp steel edges and moving suspension components.
- Use appropriate fusing, relays and switches according to the light manufacturer’s instructions.
- Test every light before completing the final wiring and securing the bumper.
The important point is that more light is not automatically better. Proper positioning and beam coverage usually make a bigger difference than simply adding another set of pods.
Choosing the Right Winch for Each Bumper
Four of these five bumpers provide a winch-oriented setup, but that does not mean you should automatically buy a 12,000-pound winch.
| Bumper | Winch Provision | Listing-Stated Capacity | Practical Direction |
|---|---|---|---|
| Nilight | Built-in winch plate | Up to 12,000 lbs | Strong choice for serious recovery use |
| KUAFU | Built-in winch plate | Not specified | Match the winch to the manufacturer’s mounting requirements |
| Longsun | Built-in winch plate | Up to 12,000 lbs | Suitable for a substantial recovery setup |
| Aaiwa | Built-in winch plate | Up to 12,000 lbs | Good fit for a dedicated winch build |
| Tyger Auto FURY | No winch mount | Not applicable | Choose this only if winch mounting is not a requirement |
The capacity shown above is the bumper’s stated winch support, not a recommendation that you must install a winch of exactly that rating.
For an FJ Cruiser, choose the winch based on the vehicle’s actual weight, recovery conditions and the manufacturer’s recommendations. A larger number on the winch label is not automatically the smarter purchase. You also need to consider the winch’s physical dimensions, mounting-hole pattern, fairlead type, rope or cable arrangement, control-box position and electrical requirements.
With the Nilight, Longsun and Aaiwa listings specifying 12,000-pound winch support, those bumpers leave plenty of room for a substantial recovery setup. KUAFU has a built-in winch plate, but its supplied information does not give us a specific capacity, so it would be irresponsible to invent one.
The Tyger FURY is the clearest case of buying according to your actual needs. It does not have a winch mount, and that is not a flaw if your FJ is being built around rock-crawling protection and lighting rather than vehicle recovery.
Winch Setup: What Needs to Line Up
Before bolting a winch into any of the compatible bumpers, check the physical arrangement rather than relying only on the bumper’s advertised capacity.
The winch should sit securely on the designated mounting surface, with the fairlead aligned with the rope path. The control box also needs a sensible location where it will not interfere with the grille, lighting, wiring or other components.
Once installed, route the heavy battery cables carefully. They should be protected from abrasion, heat and moving components, with connections made according to the winch manufacturer’s instructions.
If you are using a synthetic rope, pay particular attention to the fairlead and the condition of the rope path. A clean, unobstructed route is far more important than making the installation look complicated.
Making the Bumper Work With Skid Plates
This is where many otherwise good-looking builds can become unnecessarily complicated.
A front bumper protects the vehicle from the front, while a skid plate protects the vulnerable area underneath it. Ideally, those two pieces should meet without creating a large exposed section between them.
The Tyger FURY has an optional TG-SP6T80668 skid plate, giving owners a straightforward way to extend protection below the bumper. With the other products, check the mounting points and dimensions of your existing skid plate before installation. Do not assume that an aftermarket plate designed around the factory bumper will automatically clear a new steel bumper.
Look underneath the FJ after the bumper is loosely positioned. Check for:
- Clearance around the radiator and lower cooling area
- Contact between the bumper and existing skid plates
- Exposed gaps between bumper and underbody protection
- Winch and fairlead clearance
- Access to recovery hardware
- Suspension and steering movement
- Wiring routes around the lower front end
Why Armor Integration Matters
The strongest bumper in the world does not replace proper underside protection. If the FJ is regularly used on rocky trails, the bumper, skid plate and recovery equipment should be planned as one system.
For example, a rock can bypass the bumper and hit the lower radiator area if there is a large uncovered section underneath. Likewise, a skid plate can become difficult to remove later if the new bumper blocks its fasteners or overlaps its mounting points.
That is why the best time to check armor compatibility is before the bumper is fully tightened, when you can still adjust positioning and identify interference.
For a mostly road-driven FJ, the existing underbody protection may be perfectly adequate. For a vehicle that regularly sees rocks, steep approaches and recovery situations, extending protection underneath the bumper is a much more meaningful upgrade than simply adding more exterior accessories.
Build the Front End Around the Way You Actually Drive
There is no single perfect combination here.
If you want the most complete winch + recovery + lighting package, Nilight has the strongest combination in this lineup. Longsun makes sense for someone wanting a much more substantial, equipment-heavy setup. Aaiwa combines a 12,000-pound-rated winch provision with a large lighting package, while KUAFU gives you recovery hardware and room for additional lighting. Tyger Auto is the outlier, but deliberately so: it is the better fit when rock-crawler styling, protection and custom lighting matter more than carrying a winch.
The smart approach is to choose the bumper first, then make sure the winch, fairlead, lighting and skid plate all physically work with it. That way, the front of the FJ becomes one properly planned system rather than a collection of expensive parts that happen to be bolted together.
Keeping an FJ Cruiser Front Bumper in Good Shape
A steel bumper does not become maintenance-free just because it has a powder-coated finish. On an FJ Cruiser that spends time around mud, standing water, salt, dust or rocky trails, a few simple checks can make a noticeable difference over the years. The goal is not to constantly work on the bumper; it is to catch small problems while they are still small.
Protecting the Steel From Corrosion
All five bumpers use steel construction with a coated finish, but the coating should be treated as protection, not permanent immunity from rust. Off-road use can put scratches, chips and abrasions into areas that never show up in product photographs.
After muddy or wet trips, rinse the bumper thoroughly, particularly around:
- Lower edges and corners
- Welded areas
- D-ring mounts
- Winch-plate openings
- Light-bar mounting points
- Brackets and hardware
- Areas where the bumper meets the vehicle
Do not immediately cover a dirty bumper with another layer of wax or dressing. Get the dirt and road grime off first, then allow the surface to dry properly.
If a rock chip exposes bare steel, deal with it early. Clean the damaged area, remove loose corrosion and use a suitable touch-up or corrosion-protection product compatible with the existing finish. A tiny coating chip is easy to manage; leaving exposed steel through several wet seasons is what turns it into a bigger problem.
Keep the Mounting Hardware Under Review
A bumper can remain visually perfect while its mounting hardware gradually becomes the thing worth checking.
The FJ Cruiser experiences vibration from normal road use, and off-road driving adds considerably more movement. After the first few drives following installation, inspect the main mounting hardware and then make it part of your normal vehicle inspection routine.
Look for:
- Loose or visibly shifted fasteners
- Damaged washers or brackets
- Fresh marks around mounting points
- Cracked or damaged weld areas
- Unusual movement when the bumper is gently checked
- Corrosion around exposed hardware
Do not guess at torque values. Use the bumper manufacturer’s specifications and the vehicle’s service information for the appropriate fastener torque rather than applying a generic number from another bumper installation.
A Five-Minute Post-Trail Check
You do not need to dismantle the bumper after every trail run.
A quick inspection immediately after a difficult trip is usually enough to catch the things that matter. Look underneath and around the bumper before the mud has completely dried into every corner.
Check the D-rings, winch plate, fairlead area, light mounts and lower edges for fresh impacts. If the bumper has taken a hard hit, inspect the mounting points as well, not just the visible outer surface.
For vehicles running integrated lighting, also look at the wiring. A branch, rock or piece of debris can pull a cable loose without immediately switching the light off.
If the trip involved mud or salt, give the bumper a proper rinse rather than letting the contamination sit there for days.
Looking After the Powder-Coated Finish
The textured black finish used across these products is part of the bumper’s visual appeal, but aggressive cleaning can do more harm than good.
Use a mild automotive cleaning method and avoid treating the coating like a surface that needs constant polishing. The textured finish is supposed to look rugged, so minor changes in appearance are far less important than keeping the coating intact.
Pay particular attention to welds, edges and exposed mounting areas, because those are the places where coating damage is more likely to develop after repeated trail use.
If you use a pressure washer, keep sensible distance from electrical connections and do not deliberately blast high-pressure water into wiring connectors, light housings or other openings.
Long-Term Durability: What Actually Matters
The lifespan of an aftermarket bumper is not determined by the steel thickness alone.
How the bumper is installed, how often the vehicle is driven off-road, whether impacts are taken, how quickly damaged coating is repaired, and whether the mounting hardware remains secure all matter.
The five products here use different designs and weights, so their long-term behaviour can vary. The Nilight and Tyger Auto bumpers are around the 75–80-pound range, while the Aaiwa is roughly 117 pounds and the Longsun setup is listed at 185 pounds. That additional mass makes suspension condition and front-end hardware worth keeping an eye on, especially on a vehicle that already carries other heavy accessories.
If you add a winch, recovery gear, skid plates and auxiliary lighting, remember that the bumper is now only one part of the total front-end load.
When a Bumper Deserves a Closer Inspection
A routine inspection is different from a situation where you should stop and investigate.
Take a closer look if you notice:
- A bumper that no longer sits evenly
- A new gap around the grille or fender
- Movement that was not present before
- A damaged or visibly distorted mounting bracket
- Cracks around welds
- Serious corrosion around structural areas
- A D-ring or recovery point that appears damaged
- A winch or fairlead that no longer sits correctly
- Lighting that suddenly stops working after an impact
That does not mean the bumper has failed; it means something changed and is worth understanding before the next recovery or trail run.
The Simple Routine That Keeps It Looking Good
For most FJ Cruiser owners, maintenance can stay remarkably simple:
After a muddy or salty drive: rinse the bumper and let it dry.
After a demanding trail run: inspect mounting points, recovery hardware, lights and visible damage.
Every so often: check fasteners and wiring, paying particular attention to anything that has been moved or modified.
After an impact: inspect the bumper structure and mounting points rather than judging the damage from the outside alone.
When the coating is damaged: repair exposed steel before moisture has time to turn a small chip into corrosion.
That is really the secret to keeping a steel FJ Cruiser bumper healthy. Do not wait for a serious problem to announce itself. A few minutes of attention after hard use is far easier than repairing corrosion, damaged wiring or a mounting problem after it has been ignored for months.
FAQs About FJ Cruiser Front Bumper
Can I install a 2007–2014 FJ Cruiser winch bumper without modifying the vehicle?
It depends on the bumper, and this is exactly where product descriptions can be misleading if you only look at the words “bolt-on.” The Nilight and Aaiwa options in this guide are listed for factory-mount installation without drilling or cutting, while the Tyger Auto FURY still requires one cutting step around the side body molding and wheel-well trim.
Before ordering, check more than the mounting holes. Look at the winch dimensions, fairlead position, existing skid plate, front lighting and any previous bumper modifications. A bumper can technically fit the FJ Cruiser and still require extra planning because of the accessories already installed on the vehicle.
Is a 12,000-pound winch actually necessary for a Toyota FJ Cruiser?
Not necessarily. A 12,000-pound rating on the bumper’s winch plate does not mean you need a 12,000-pound winch. It tells you what the particular bumper is designed to support according to its listing.
The smarter approach is to choose the winch around the FJ Cruiser’s actual recovery requirements, vehicle weight and intended terrain. Also check the physical dimensions before buying, because a winch that is technically strong enough can still create problems if the motor, control box or fairlead does not work with the bumper.
For this guide, the Nilight, Longsun and Aaiwa listings specify support for up to 12,000 pounds. KUAFU provides a built-in winch plate but does not state a specific capacity in the supplied specifications, so we have not guessed one.
Will adding a heavy steel bumper change how my FJ Cruiser drives?
It can, particularly when the bumper is combined with a winch, skid plate and other recovery equipment. The difference is not something I would ignore simply because the vehicle still drives normally after installation.
The listed weights in this comparison range from roughly 75 pounds to 185 pounds, before adding a winch or other accessories. The Longsun setup is the heaviest at 185 pounds, while Nilight and Tyger Auto are around 75–80 pounds.
If you are building a heavily equipped FJ, keep an eye on the front suspension and ride height. A bumper upgrade does not automatically mean you need new springs, but once several heavy accessories are added, the combined front-end weight becomes much more relevant than the bumper’s advertised weight by itself.
How do I know whether my existing skid plate will work with a new FJ Cruiser bumper?
Do not assume it will just because both parts are advertised for the same FJ Cruiser generation. Bumper and skid-plate mounting geometry can be different, and the lower edge of one component can interfere with the mounting points of another.
Before installation, compare the mounting locations and clearance around the lower front end. You want to make sure the skid plate does not push against the bumper and that the bumper does not block access to the skid-plate fasteners.
A useful check is to loosely position the bumper first and inspect:
- Lower radiator and cooling clearance
- Skid-plate overlap
- Exposed gaps underneath the bumper
- Winch and fairlead clearance
- Access to mounting bolts
The Tyger FURY has an optional TG-SP6T80668 skid plate, which makes that particular combination easier to plan because the manufacturer offers a matching protection component.
Which FJ Cruiser bumper makes the most sense if I want recovery capability now but may add more equipment late
If you know a winch is part of the plan, I would start with a bumper that gives you the recovery foundation before buying the lighting and cosmetic accessories.
The Nilight is the strongest all-around option in this lineup because it combines a winch plate, D-rings and substantial integrated lighting. KUAFU also gives you a useful recovery foundation while leaving additional lighting options on the bull bar. Longsun and Aaiwa take the more complete-package approach.
The bigger point is to build in stages without creating conflicts. Decide your winch and fairlead first, then plan the lighting, skid plate and wiring around the bumper. That is much better than buying several impressive-looking parts separately and discovering later that two of them occupy the same space.
For an FJ that is primarily a rock-crawling project and does not need a winch, the Tyger FURY is the obvious different route. Its strength is the protection and lighting flexibility rather than recovery hardware, and choosing it for that reason makes far more sense than buying a winch-ready bumper you will never use.
The Bottom Line
A good FJ Cruiser front bumper should earn its place on the vehicle. It should protect something you actually need protected, support equipment you genuinely plan to use, and fit the way your FJ is already built. That is why there is no point calling every heavy steel bumper “the best” just because it looks tougher than the factory setup.
For this 2007–2014 FJ Cruiser lineup, the Nilight is the strongest all-around choice when winch capability, recovery points and integrated lighting are all priorities. The Tyger Auto FURY makes more sense for a rock-crawler build where winch mounting is not required. KUAFU sits nicely between those two approaches, while Longsun is aimed at buyers wanting a much more substantial, equipment-heavy setup. Aaiwa is the straightforward option for combining steel protection, a 12,000-pound-rated winch provision and a large lighting package.
The smartest purchase is ultimately the one that matches your build rather than the one with the longest feature list. Check your winch dimensions, front-end clearance, skid-plate compatibility, total added weight and installation requirements before ordering. Those details are not as exciting as a product photo, but they are what determine whether you will still be happy with the bumper months after the installation.
And if your FJ spends real time off pavement, give the bumper the same attention you would give the rest of the vehicle. Keep the mounting hardware checked, repair coating damage early, inspect recovery points after hard use and keep the wiring protected. A properly chosen bumper is not just an appearance upgrade; it becomes part of the FJ Cruiser’s working equipment.
Also Check:


