
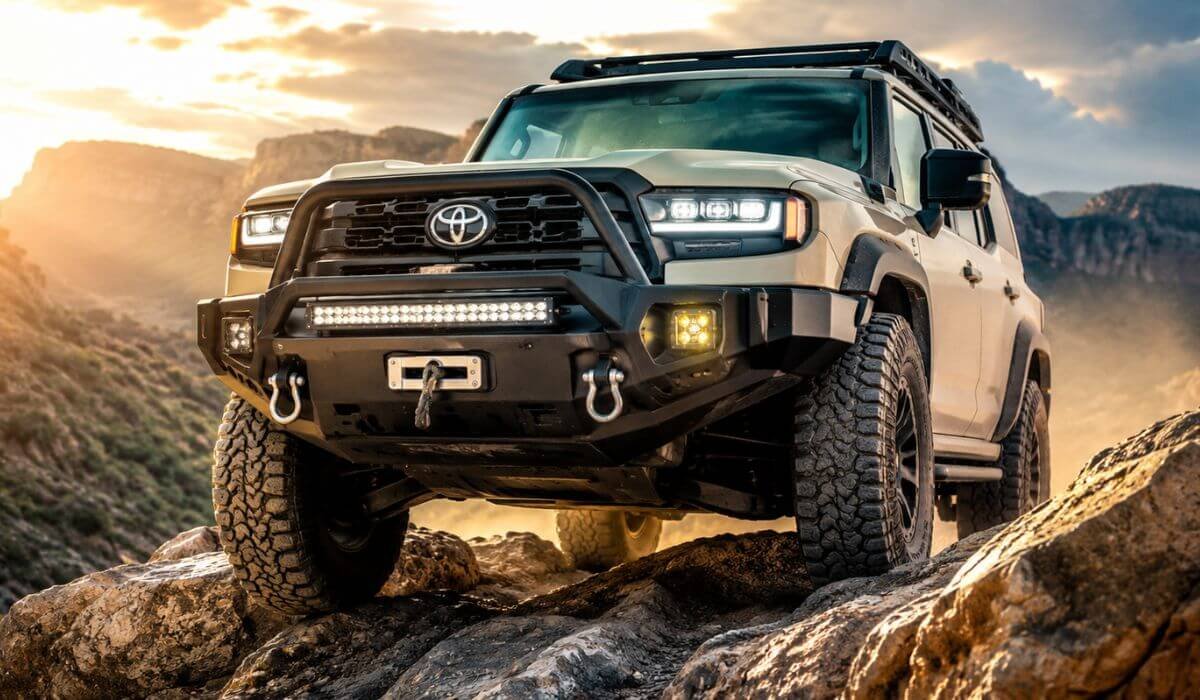
5 Best Land Cruiser Front Bumpers in 2026: Trail-Ready Armor With Smarter LC250 Fitment
The 2024–2026 Toyota Land Cruiser 250 is not a small SUV, and the factory front end is expensive enough that I would not add a bumper just for a tougher look. At roughly 196.5 inches long and 78 inches wide, the LC250 already has serious road presence, while its full-time 4WD, body-on-frame platform and 2.4L i-FORCE MAX hybrid powertrain make it a genuine off-road vehicle.
What matters here is fitment. The newer LC250 uses factory cameras, parking sensors and driver-assistance hardware, so a bumper that looks good but interferes with those systems is not a smart upgrade. I focused on the 2024, 2025 and 2026 Land Cruiser 250, including the 1958 trim, and gave priority to designs that account for factory electronics, recovery points, lighting and real trail use. DV8, for example, specifically confirms OEM camera, sensors and ACC compatibility on its current LC250 bumper.
These are also relatively new-generation products, so I would not pretend there is a decade of owner data behind every option. Instead, the ranking below is based on the construction, stated fitment, recovery hardware, lighting provisions and practical features available right now. That makes this list more useful than simply repeating marketplace ratings.
Best Toyota Land Cruiser Front Bumpers: Top 2026 Picks for Steel Protection and Recovery
#1. DV8 Heavy-Duty Steel Front Bumper
Best Front Bumper for 2024-2026 Toyota Land Cruiser 250 With Factory Camera Support, Parking Sensor Fitment and Pod Light Compatibility
#2. WOLFSTORM Heavy-Duty Steel Front Bumper
Best Heavy-Duty Front Bumper for 2024-2026 Land Cruiser 250 With Factory Camera Mounting, Parking Sensor Holes and Auxiliary Lighting
#3. HAWKLEY Mid-Width Front Bumper
Best Mid-Width Front Bumper for 2024-2026 Toyota Land Cruiser With Parking Sensor Fitment, Shackle Mounts and Trail-Friendly Clearance
#4. CPW Modular Design Front Bumper
Best Modular Front Bumper for 2024-2026 Land Cruiser 250 Owners Wanting a Customizable Off-Road Front-End Setup
#5. Nixon Offroad Bull Bar Front Bumper
Best Aftermarket Front Bumper for 2024-2026 Toyota Land Cruiser With Bull Bar Protection and a More Aggressive Off-Road Design
Expert Tip
Do not choose a Land Cruiser 250 bumper by steel thickness or appearance alone. The smarter question is what happens after installation. On this generation, the front bumper sits around cameras, parking sensors and other factory hardware, so a bumper that looks excellent in a product photo can become a frustrating upgrade if its mounting points or sensor provisions are wrong. For a daily-driven LC250, I would rather have a bumper with proper factory-system provisions and useful recovery hardware than one that simply looks the most aggressive. That is why the DV8 and WOLFSTORM options lead this list, while the HAWKLEY earns its place for owners who want a mid-width setup with practical trail hardware.
How We Choose These Land Cruiser Front Bumpers
We did not rank these five simply by marketplace ratings, star counts or how aggressive they look in photos. These are relatively new LC250-specific products, so pretending that every bumper already has years of real-world owner history would be misleading. Instead, we looked at what can actually be verified from the product design and its intended fitment.
First, fitment comes before appearance. Every bumper on this list is aimed at the 2024–2026 Toyota Land Cruiser 250, rather than mixing older 100, 200 or 80 Series products into the ranking. That matters because the newer 250 has different front-end dimensions, mounting points and factory equipment.
Second, we looked at factory electronics. This was one of the biggest separators. DV8 and WOLFSTORM specifically provide provisions for the factory camera and parking sensors, which is a meaningful advantage on a modern Land Cruiser. A bumper that forces you to sacrifice equipment you already paid for is not automatically a better off-road upgrade.
Third, we considered what you can actually use on the trail. The HAWKLEY gets attention for its shackle mounting brackets, while its mid-width construction and sensor provisions make it a practical middle ground. The DV8 and WOLFSTORM options also make more sense for owners planning auxiliary lighting or a more serious front-end build.
Fourth, we separated useful features from decoration. A bull bar can change the look dramatically, but it is not the same thing as recovery hardware. Likewise, a light-bar provision is useful only if you actually intend to run auxiliary lighting. Our ranking gives more weight to features that can solve a real problem rather than simply making the LC250 look tougher.
Finally, we considered the type of owner each bumper suits. The DV8 is the most complete all-round choice, WOLFSTORM is a strong heavy-duty alternative, HAWKLEY makes sense for a mid-width trail build, CPW is better suited to someone who values modularity, and Nixon Offroad is the straightforward choice for someone who specifically wants bull-bar protection and a more traditional off-road appearance.
That approach is intentional: we are not claiming these bumpers have identical real-world durability, because they have not all accumulated the same amount of long-term owner feedback. We are ranking them on the information that can genuinely be assessed today, so you can make a more informed decision instead of buying the bumper that simply has the loudest marketing.
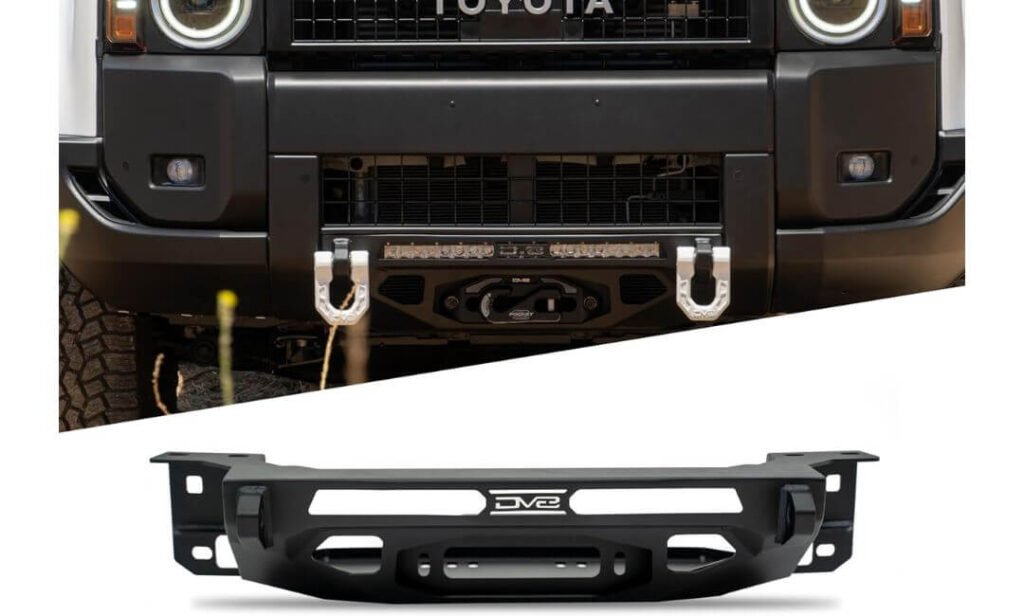
#1. DV8 Centric Front Bumper
Quick Specs:
- Fitment: 2024–2026 Toyota Land Cruiser 250 Series, all trim levels
- Build: Heavy-duty steel
- Weight: 62.9 lbs
- Finish: Micro-texture black powder coat
- Width: 38.6 inches
- Depth: 14.6 inches
- Height: 14.6 inches
- Recovery Setup: Heavy-duty winch mount with two 1-inch D-ring mounts
- Shackle Capacity: Accepts 3/4-inch shackles
- Lighting: 20-inch single-row light bar mount
- Factory Equipment: Camera, parking sensors, fog lights, skid plate and adaptive cruise control retained
- Installation: Around 4.5 hours, with minor cutting required on some components
- Included: Mounting hardware and welded wiring-management tabs
- Warranty: 1 year
A front bumper should earn its place on a Land Cruiser 250 by doing something useful, and this one has a pretty convincing argument. The 62.9-pound steel construction adds a more serious layer of protection around the nose without turning the LC250 into something that looks completely disconnected from its factory design. The center-mount layout is particularly nice if you want extra hardware up front but still like the clean shape of the original vehicle.
The recovery hardware is where this setup starts making more sense for actual trail use. You get a heavy-duty winch mount and two 1-inch-thick D-ring mounts, with the mounts accepting 3/4-inch shackles. That is much more meaningful than simply adding a bulky bumper for appearance. There is also a dedicated 20-inch single-row light-bar mount, so the front end can be built around recovery and visibility rather than decoration.
The detail I like most is that the design does not treat the LC250’s factory equipment as an afterthought. It is intended to retain the front camera, parking sensors, fog lights, skid plate and adaptive cruise control on equipped vehicles. The welded-in wiring tabs are another small but genuinely useful touch because clean winch and light-bar wiring is one of those jobs that becomes annoying when the bumper gives you nowhere sensible to route it. (In short: proper trail hardware, factory-friendly provisions and a finish that still looks at home on a modern Land Cruiser.)
What We Like
- OEM equipment retention is a major advantage on a modern LC250.
- The center-mount profile adds protection without going excessively bulky.
- Winch and recovery points make the upgrade functional, not just visual.
- The 20-inch light-bar provision gives you a straightforward way to improve trail visibility.
- Welded wiring tabs and included hardware show attention to the installation details that are easy to overlook.
What We Would Keep in Mind
- The installation is not completely bolt-and-forget; minor cutting may be required on some components, so professional installation can make sense if you want the fit and wiring finished cleanly.
Land Cruiser 250 Fitment
This is specifically built around the 2024–2026 Toyota Land Cruiser 250 Series, and the supplied fitment information states compatibility across all trim levels. That makes it a much more sensible choice than trying to adapt a bumper intended for an older Land Cruiser generation.
Because the LC250 carries factory cameras, parking sensors and available adaptive-cruise hardware in the front-end area, retaining those systems is one of the first things I would check before ordering any aftermarket bumper. Here, those factory provisions are part of the design rather than something you have to figure out after the bumper arrives.
The Insider Pro-Tip
If your LC250 is going to see rocks, brush, recovery work or night trails, this is the kind of bumper where the useful features justify the upgrade. I would decide on the winch and light bar before installation, though, because planning those mounting and wiring requirements beforehand is far cleaner than pulling the bumper apart later.
One more thing worth checking before placing the order is your exact factory equipment and the installation requirements for your particular vehicle. The bumper is designed to preserve the important OEM hardware, but proper alignment and installation still matter when cameras and sensors are involved. That small bit of preparation can be the difference between a bumper that merely fits and one that feels like it genuinely belongs on the LC250.
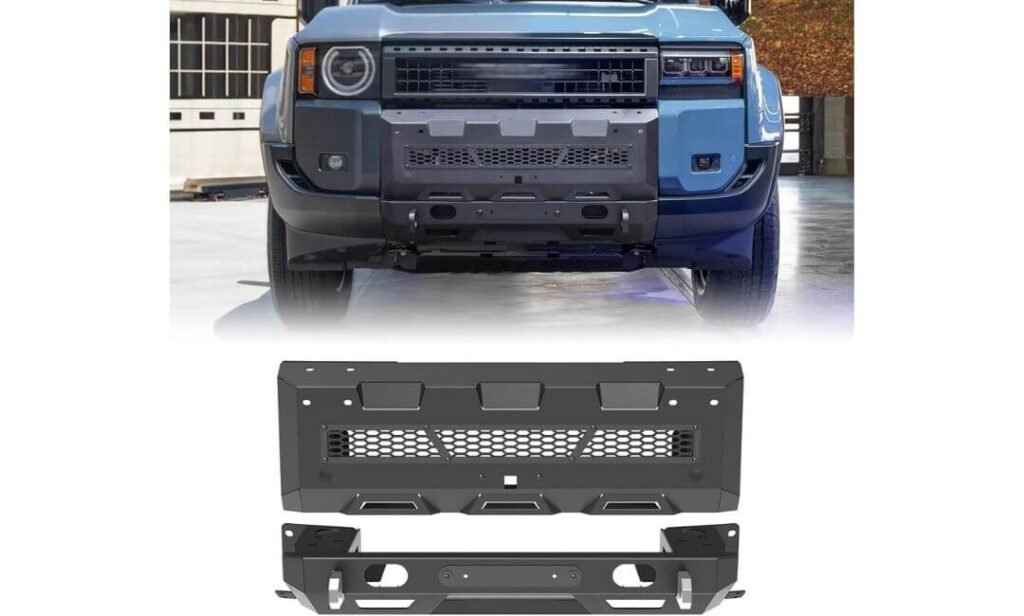
#2. WOLFSTORM Heavy-Duty Steel Front Bumper
Quick Specs:
- Fitment: 2024–2026 Toyota Land Cruiser
- Construction: Q235A steel
- Steel Thickness: 3.3mm plates with 5mm support sections
- Weight: 74.7 lbs
- Finish: Black textured powder coat
- Design: Stubby bumper with full main-body section
- Recovery: 3/4-inch D-ring mounting provisions
- Winch Provision: Clutch-switch opening and winch cable guide opening
- Lighting: 26- or 28-inch LED light-bar mount; 3- or 4-inch pod-light mounts
- Factory Hardware: OEM camera mount and factory parking-sensor openings retained
- Installation: Bolt-on design, but cutting is required
- Included: Stubby bumper, main body, mounting hardware and installation instructions
- Warranty: 1 year
At 74.7 pounds, this is not the sort of front bumper you buy because you want a slightly different look in the driveway. The Q235A steel construction, 3.3mm plates and 5mm support sections give it a noticeably more substantial purpose: adding protection and recovery hardware to a Land Cruiser that is actually going to see rougher ground.
What makes the design more interesting is how much of the front-end setup it leaves usable. The bumper retains the OEM camera mounting point and factory parking-sensor openings, while also providing openings for the winch clutch switch and cable guide. That matters because recovery equipment is only useful when you can actually operate it without turning the front of the vehicle into a workaround project.
There is plenty of room to build the lighting around how you use the vehicle, too. The main body accepts a 26- or 28-inch LED light bar, while the stubby section can take 3- or 4-inch pod lights. The 3/4-inch D-ring provisions add another practical recovery option, although the D-rings themselves are not included. (That combination makes this a particularly interesting choice for an owner who wants to build the front end around recovery and visibility rather than just add a heavy-looking shell.)
What We Like
- 74.7-pound Q235A steel construction gives the bumper a genuinely substantial feel.
- The OEM camera and parking-sensor provisions are valuable on a modern Land Cruiser.
- Having separate light-bar and pod-light mounting options gives you more freedom when planning the setup.
- Winch-access openings are a thoughtful detail for anyone running recovery equipment.
- The stubby-plus-main-body design gives the front end a tougher profile without relying entirely on a giant bull bar.
What We Would Keep in Mind
- Cutting is required during installation, so this is better treated as a proper aftermarket installation rather than a completely untouched bolt-on swap.
Toyota Land Cruiser Fitment
The supplied fitment information covers 2024–2026 Toyota Land Cruiser models, with the important installation note that cutting is necessary. The design is vehicle-specific and includes provisions for the factory camera and parking sensors, which is reassuring for owners who do not want to abandon the equipment already integrated into the LC250’s front end.
I would still verify your exact model year and factory equipment before ordering, especially if your build includes additional front-end accessories. The manufacturer also recommends professional installation, which is reasonable here given the bumper’s weight, cutting requirement and the need to keep camera and sensor locations correctly positioned.
The Insider Pro-Tip
If you already know that your Land Cruiser is heading toward a winch, recovery gear and auxiliary lighting, this bumper makes more sense than buying a basic steel replacement now and adding everything around it later. The mounting provisions are already part of the design, so you can plan the front end as one system.
Just remember that the bumper itself does not include the D-rings, winch or lights. That is not a deal-breaker; it simply means you should budget for the recovery and lighting hardware you actually want rather than assuming the complete trail setup arrives in the box.
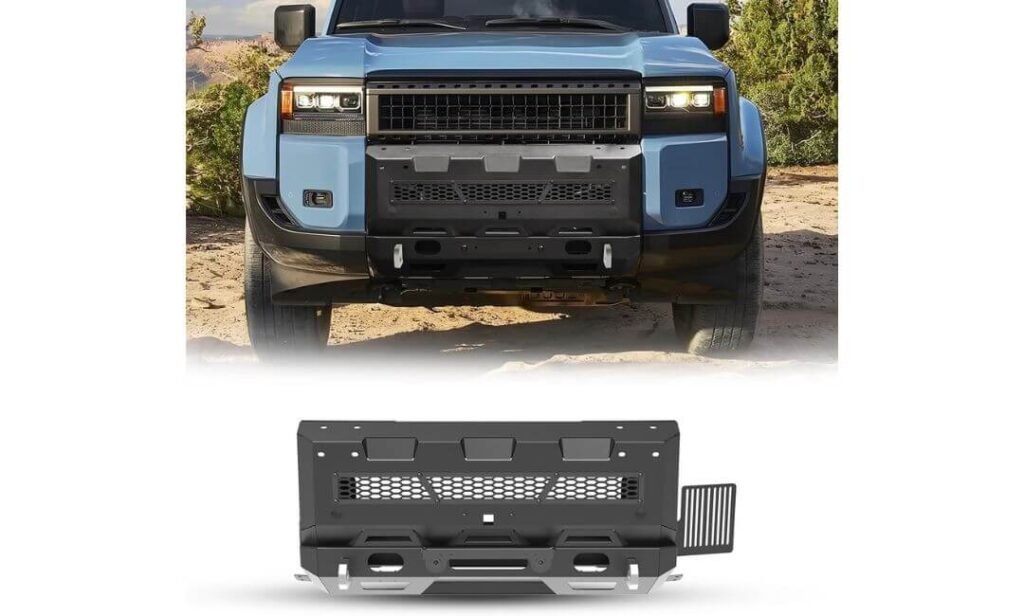
#3. HAWKLEY Mid-Width Front Bumper
Quick Specs:
- Fitment: 2024–2026 Toyota Land Cruiser
- Construction: Q235A carbon steel
- Design: Modular stubby and mid-width setup
- Finish: Black textured powder coat with protective pre-treatment
- Recovery: Two shackle/D-ring mounting brackets
- Winch Provision: Winch plate, clutch-switch opening and cable-guide opening
- Lighting: Two 3- or 4-inch pod-light mounting holes
- Factory Features: Parking-sensor openings and flip-up licence-plate bracket
- Installation: Direct bolt-on using factory mounting points
- Modification: No cutting, drilling or modification required
- Package: Stubby bumper, mid-width bumper, winch plate and mounting hardware
- Dimensions: 39.96″D × 10.78″W × 7.59″H
- Warranty: 1 year
There is something refreshing about a bumper that does not make you choose between useful trail hardware and a manageable front-end shape. The HAWKLEY takes the mid-width route, using Q235A steel with a textured powder-coated finish and a modular setup that gives the Land Cruiser more protection without immediately going for the biggest possible front profile.
The recovery side is properly thought through. You get a winch plate, a dedicated clutch-switch opening and a cable-guide opening, plus two shackle mounting brackets for recovery gear. The 3- or 4-inch pod-light provisions are another practical touch, particularly if your Land Cruiser spends time on unlit trails where a little extra forward lighting is genuinely useful.
What really separates this one from the previous two is the installation story. It is designed to use the factory mounting points without cutting, drilling or modification, which is a meaningful advantage for an owner who wants a serious bumper but does not want the vehicle turned into a fabrication project. The flip-up licence-plate bracket also solves a small problem before it becomes an annoying one once a winch or recovery setup occupies the front. (That is the kind of practical thinking I want to see in an aftermarket bumper.)
What We Like
- No-cut, no-drill installation is a major plus for a vehicle-specific upgrade.
- The modular design gives owners more flexibility when deciding how aggressive the front-end build should become.
- A supplied winch plate means the recovery setup is more than just an advertised mounting possibility.
- Shackle brackets, pod-light holes and cable-guide provisions cover several genuinely useful trail functions.
- The flip-up licence-plate bracket is a small feature, but one that becomes surprisingly useful on a winch-equipped build.
What We Would Keep in Mind
- D-rings and pod lights are separate purchases, so factor those into the final setup if you plan to use the recovery and lighting provisions.
Toyota Land Cruiser Fitment
The supplied information lists compatibility with 2024, 2025 and 2026 Toyota Land Cruiser models, including all trim levels. The direct bolt-on approach uses the factory mounting points, while the bumper provides dedicated openings for the parking sensors and a flip-up licence-plate bracket.
For an LC250 owner, that combination makes this a particularly straightforward upgrade on paper. Still, I would verify your exact trim and front-end equipment before ordering, because factory sensors and accessories are the areas where aftermarket fitment deserves a second look.
The Insider Pro-Tip
If you are building the Land Cruiser in stages, this is the option I would look at closely. The modular layout and included winch plate mean you can establish the front-end hardware first and decide later exactly how much lighting and recovery equipment you actually need.
And there is a real benefit to the no-cut installation here: you are not giving up flexibility just to get a tougher bumper. If you eventually change your lighting, recovery gear or front-end setup, having a bumper designed around factory mounting points and modular components gives you a much cleaner starting point.
#4. CPW Modular Front Bumper
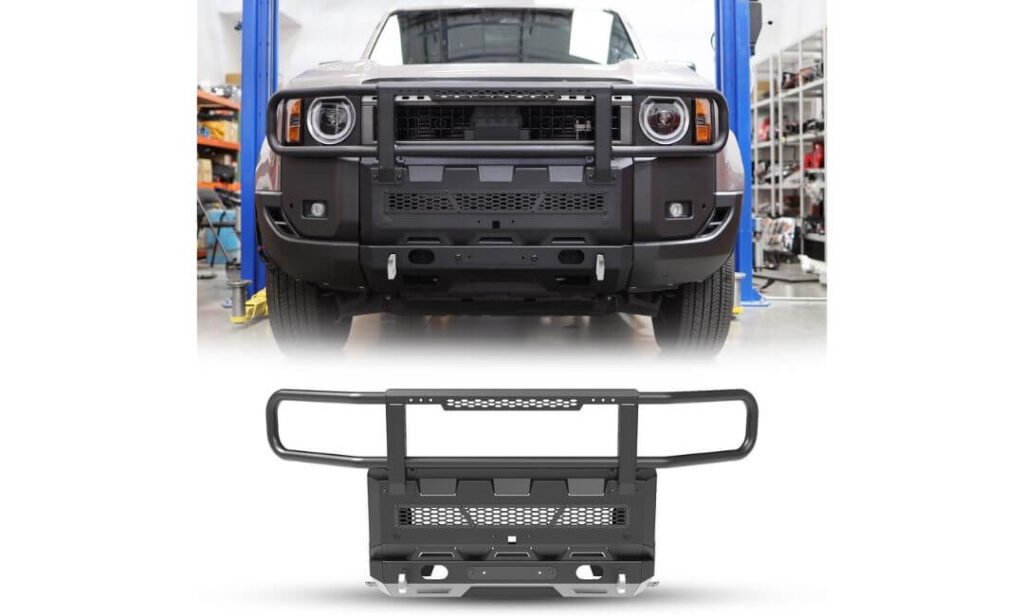
Quick Specs:
- Fitment: 2024–2026 Toyota Land Cruiser 250
- Construction: Carbon steel
- Steel Build: 3.3mm plates with 5mm beam supports
- Weight: 54 lbs
- Design: Modular bumper with bull bar and upper curved tube
- Factory Compatibility: Front parking sensors and front-facing camera retained
- Mounting: Bolted installation
- Finish: Black powder-coated coating
- Configuration: Components can be installed or removed individually
- Installation: Cutting required
- Package: Bumper, bull bar, upper curved tube and mounting hardware
- Warranty: 12 months
- Support: 24-hour technical assistance
The interesting thing about this setup is not simply that it is made from steel; it is the 54-pound modular format. Instead of treating the front bumper as one giant permanent piece, CPW builds it around separate components that can be installed or removed according to the way you want the Land Cruiser configured. That makes sense for an owner whose vehicle may evolve from a mostly stock SUV into a more serious overlanding build.
Underneath that modular approach is a 3.3mm steel plate structure with 5mm beam supports. That combination gives the bumper a substantial foundation while keeping its listed weight lower than the two heavier options above it. The black powder-coated finish also adds a practical layer of protection against the wear a front bumper inevitably sees outside pavement.
Another important detail is that the design is intended to retain the factory front parking sensors and front-facing camera. The individual components use bolted mounting rather than requiring welding, which makes the modular concept more useful when you actually want to change the configuration later. The supplied package also includes the bull bar and upper curved tube, so you are not starting with a bare bumper and building every major component separately. (It is a more adaptable approach for someone who knows the vehicle will keep changing.)
What We Like
- The 54-pound weight makes it notably lighter than the two heavier steel options above.
- Modular components give the owner more freedom to change the front-end configuration.
- The 3.3mm plates and 5mm beam supports provide a serious structural foundation.
- Factory parking sensors and front camera compatibility are specifically addressed.
- The package includes the bull bar, upper curved tube and mounting hardware, making the initial setup more complete.
What We Would Keep in Mind
- Cutting is required during installation, so the modular design does not mean the installation itself is completely modification-free.
Toyota Land Cruiser 250 Fitment
This bumper is specifically listed for the 2024–2026 Toyota Land Cruiser 250, with the factory front parking sensors and front-facing camera supported by the design. The mounting is bolted, and the modular construction allows individual sections to be removed or installed as needed.
For an LC250 that will gradually receive more off-road equipment, that flexibility can be useful. I would simply plan the cutting and final configuration before installation rather than treating the job like a quick bumper swap.
The Insider Pro-Tip
The biggest reason to consider this one is future flexibility. If you already know your Land Cruiser is going to change over time, a modular bumper gives you more room to experiment without replacing the entire front-end assembly every time your build changes.
At the same time, do not confuse “modular” with “effortless.” Cutting is still required, so I would have the final configuration decided before the first cut is made. Once installed correctly, though, the ability to work with separate bumper sections is exactly what makes this design different from a conventional one-piece setup.
#5. Nixon Offroad Modular Bull Bar Front Bumper
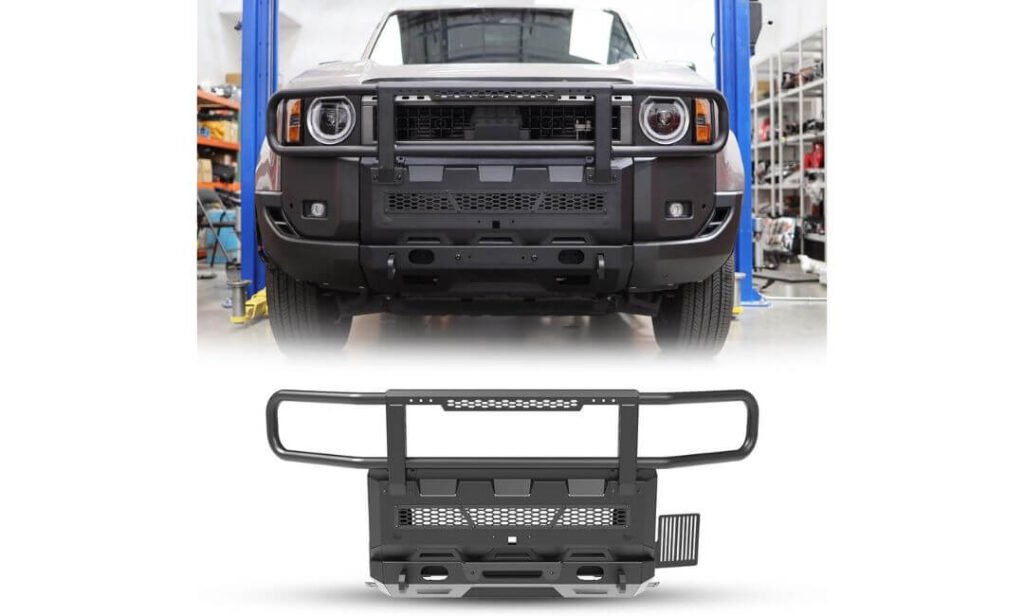
Quick Specs:
- Fitment: 2024–2026 Toyota Land Cruiser
- Construction: Q235A steel
- Weight: 132.06 lbs
- Finish: Textured black powder coat
- Design: Modular lower bumper, upper bar and bull bar
- Winch Capacity: Up to 8,000 lbs
- Recovery: Front tow hook and 3/4-inch D-ring provisions
- Winch Features: Cable-guide opening, clutch-control openings and control-box relocation bracket
- Lighting: 3- or 4-inch pod-light provisions
- Factory Hardware: OEM camera mount, parking-distance sensor holes and flip-up licence-plate bracket
- Installation: Bolt-on; no drilling or modification required
- Dimensions: 42.91″D × 13.78″W × 10.63″H
- Package: Lower bumper, upper bumper, bull bar, winch plate and mounting hardware
- Support: 24/7 technical support with stated 12-hour response time
If your idea of a Land Cruiser build is “make the front end properly ready for the trail”, this is the most comprehensive package in the group. At 132.06 pounds, it is substantially heavier than the other options here, but that weight comes with a much more built-out system: lower bumper, upper bar, bull bar, winch plate and recovery hardware provisions are all part of the package.
The recovery side is especially well covered. It is designed around a winch of up to 8,000 pounds, with a cable-guide opening, clutch-control openings and even a winch control-box relocation bracket. Add the front tow hook and 3/4-inch D-ring provisions, and this is clearly aimed at owners who expect the bumper to participate in actual recovery work rather than simply protect the paint.
Then there is the modularity. The upper bar, winch mount, tow hook and bull bar can be configured around the build you want, while the design still provides openings for the factory camera and parking-distance sensors. The supplied package also includes the mounting hardware, and the manufacturer describes the installation as bolt-on with no drilling or modification required. (That combination makes this the “build it properly once” option of the five, particularly for a dedicated off-road or expedition-style LC250.)
What We Like
- 8,000-pound winch compatibility gives the bumper a serious recovery purpose.
- The included winch control-box relocation bracket is a genuinely useful detail rather than a cosmetic extra.
- Modular front-end components let you tailor the setup around your recovery needs.
- Factory camera and parking-sensor provisions keep the modern LC250 equipment in the conversation.
- The package includes the bull bar, winch plate and mounting hardware, so there is less guesswork around the core bumper assembly.
What We Would Keep in Mind
- At 132.06 pounds, this is by far the heaviest option in this lineup, so I would treat the added front-end weight as part of the overall build plan rather than an incidental detail.
Toyota Land Cruiser Fitment
The bumper is listed specifically for the 2024–2026 Toyota Land Cruiser and uses a vehicle-specific bolt-on installation. It includes provisions for the OEM front camera, parking-distance sensors and flip-up licence-plate bracket, while the supplied winch plate and modular sections give you considerable freedom over the final configuration.
For an owner planning a serious recovery setup, the important part is that the bumper is designed as a complete system rather than just a steel shell. I would still verify your exact factory configuration before ordering and have the finished bumper installed with the vehicle’s front sensors and camera properly checked.
The Insider Pro-Tip
This is the bumper I would reserve for the Land Cruiser that is actually going to carry recovery equipment and work for it. The 8,000-pound winch provision, control-box relocation bracket, tow hardware and modular bull-bar setup make much more sense if you already have a clear trail-build plan.
If your LC250 is primarily a daily driver and only occasionally sees a dirt road, the lighter options above are easier to justify. But if you are building an expedition-style Land Cruiser with a winch as part of the plan, the extra weight here is easier to understand because you are getting a much more complete front-end system rather than simply adding mass.
Best Toyota Land Cruiser Front Bumpers for 2024–2026: Side-by-Side Specs Compared
| Front Bumper | Build & Weight | Recovery Setup | Factory Hardware | Lighting | Installation | Best For |
|---|---|---|---|---|---|---|
| DV8 Centric Front Bumper Best Overall |
62.9 lbs Heavy-duty steel Micro-texture black powder coat |
Heavy-duty winch mount Two 1-inch D-ring mounts Accepts 3/4-inch shackles |
OEM front camera Parking sensors Fog lights Skid plate Adaptive cruise control |
20-inch single-row light-bar mount |
Around 4.5 hours Minor cutting may be required Hardware included |
Owners wanting a balanced mix of protection, recovery capability and factory-friendly fitment. |
| WOLFSTORM Heavy-Duty Steel Front Bumper Heavy-Duty Pick |
74.7 lbs Q235A steel 3.3mm plates + 5mm supports |
Winch-access provisions 3/4-inch D-ring mounting Cable-guide opening |
OEM camera mount Factory parking-sensor openings Winch clutch-switch opening |
26- or 28-inch LED light bar 3- or 4-inch pod lights |
Bolt-on design Cutting required Professional installation recommended |
Builds prioritising steel protection, winch preparation and multiple lighting options. |
| HAWKLEY Mid-Width Front Bumper Best Mid-Width Setup |
Q235A steel Mid-width modular design Textured powder-coated finish |
Included winch plate Two shackle mounting brackets Cable-guide & clutch-switch openings |
Parking-sensor holes Flip-up licence-plate bracket |
Two mounting holes Supports 3- or 4-inch pod lights |
Direct bolt-on Uses factory mounting points No cutting or drilling |
Owners who want trail hardware without committing to a heavy fabrication-style installation. |
| CPW Modular Front Bumper Most Adaptable |
54 lbs Carbon steel 3.3mm plates + 5mm beam supports |
Modular front-end configuration Bull-bar setup included |
Factory parking sensors Front-facing camera |
Modular front-end design allows configuration changes |
Bolted mounting Cutting required |
Owners who value future customisation and a lighter modular build. |
| Nixon Offroad Modular Bull Bar Front Bumper Expedition-Style Build |
132.06 lbs Q235A steel Textured powder coat |
Up to 8,000-lb winch Winch plate Tow hook + 3/4-inch D-ring provisions Control-box relocation bracket |
OEM camera mount Parking-distance sensor holes Flip-up licence-plate bracket |
3- or 4-inch pod-light provisions |
Direct bolt-on No drilling or modification required Hardware included |
Serious recovery-focused and expedition-style builds where a heavier complete system makes sense. |
Land Cruiser 250 Front Bumper Buying Guide: What Actually Matters Before You Order
A good bumper should solve a problem your Land Cruiser actually has. For one owner, that means recovery points and winch access; for another, it may simply mean better protection from rocks and brush without adding unnecessary weight to the nose. The right choice depends less on how aggressive the bumper looks and more on how well its design works with your vehicle, equipment and driving habits.
Start With Exact LC250 Fitment, Not Just the Year
For this generation, make sure the bumper is specifically intended for the 2024–2026 Land Cruiser 250 rather than an older 100 or 200 Series. The front-end architecture, sensor locations and mounting arrangement are different.
Pay particular attention to:
- Factory camera position — make sure the bumper provides a proper mounting location if your vehicle has the front camera.
- Parking sensors — sensor holes need to be positioned correctly; simply having holes does not guarantee that every factory sensor will perform perfectly after installation.
- Adaptive cruise and driver-assistance hardware — if your vehicle is equipped with these systems, do not assume every aftermarket bumper preserves them.
- Factory mounting points — a vehicle-specific bolt-on design is generally preferable to improvising brackets or drilling into areas that were never intended for the bumper.
- Trim-specific equipment — verify your exact trim before ordering, especially if you have factory fog lights, cameras, sensors or other front-end accessories.
A small fitment mistake is not worth saving a few dollars on the bumper. Measure and verify first, then buy.
Steel vs Aluminum: Choose Weight With a Reason
The products in this comparison are steel designs, but weight still varies dramatically. That difference matters more than many buyers realise.
A lighter bumper can be easier on the front suspension and less noticeable in everyday driving. A heavier steel setup can make more sense when the vehicle is being built around winch recovery, substantial trail protection and additional front-end equipment.
The key is not simply choosing the lightest option.
Think about the complete front-end load:
Bumper + winch + fairlead + recovery gear + light bar + skid protection + accessories
That total matters more than the bumper’s advertised weight by itself. If you are adding a heavy winch to an already substantial bumper, consider the effect on the vehicle’s front suspension and ride height as part of the build.
Protection Should Not Ruin Your Approach Angle
A bumper can be extremely strong and still be a poor off-road choice if it hangs too low or extends too far forward.
For trail driving, look at:
- Lower bumper clearance
- Corner profile
- Approach angle
- Tyre clearance
- Recovery-point position
- Bull-bar or hoop placement
A compact or mid-width design can sometimes make more sense on tight trails because it leaves less hardware exposed ahead of the tyres. A larger full-width setup may provide broader protection but can also change the vehicle’s front profile.
This is one reason I would not automatically call the biggest bumper the best bumper. Protection needs to work with the terrain, not against it.
Winch Compatibility Is More Than Saying “Winch Ready”
“Winch-ready” is a phrase worth looking at carefully.
Before purchasing, confirm:
- What winch capacity the bumper is designed to support.
- Whether the winch plate is included or sold separately.
- Whether there is an opening for the winch clutch control.
- Whether the fairlead or cable-guide position matches your planned winch.
- Where the winch control box will sit.
- Whether the bumper leaves enough access for maintenance and cable handling.
The Nixon option, for example, is specified for an up-to-8,000-lb winch and includes provisions for the control box, clutch operation and cable guide. That is much more useful information than simply seeing “winch compatible” in a product title.
Recovery Points Should Be Properly Planned
If recovery is one of your reasons for changing the bumper, look beyond the appearance of the D-rings.
Check whether the bumper provides:
- Dedicated recovery mounts
- Suitable shackle sizing
- Adequate access around the mounting points
- A design that transfers recovery loads into the vehicle structure appropriately
- Compatibility with your chosen shackles and recovery equipment
Also remember that D-rings are not automatically included just because mounting brackets are present. Several options here provide the mounting provisions while leaving the actual recovery hardware to the buyer.
Lighting: Plan the Hardware Before Installation
Lighting mounts are useful when they match the lights you actually intend to run.
The options in this lineup provide different approaches, including 20-inch light-bar mounting and 3- or 4-inch pod-light provisions. Before ordering lights, check the available mounting area, wiring route and clearance around the bumper.
A clean installation matters. Welded-in wiring tabs or dedicated cable-management provisions can save a surprising amount of frustration later, especially when the bumper also carries a winch.
Installation Difficulty Can Change the Real Cost
Do not judge installation by the words “bolt-on” alone.
There is a meaningful difference between:
- Bolt-on using factory mounting points with no modification
- Bolt-on hardware with minor cutting
- A design requiring fabrication, drilling or substantial modification
For example, the HAWKLEY is described as using factory mounting points without cutting or drilling, while the DV8, WOLFSTORM and CPW designs have installation requirements that include some cutting.
That affects your real budget. A bumper that looks cheaper online may cost more once you add professional installation, cutting, wiring, winch fitting and sensor/camera checks.
Check Sensor and Camera Operation After Installation
This deserves its own step because it is easy to overlook.
After the bumper is fitted, check the front camera view, parking sensors and any affected driver-assistance features before heading onto the road. If something looks misaligned, obstructed or behaves differently from before, stop and have the installation checked.
Do not assume that because the bumper physically bolts into place, every electronic system is automatically fine.
Finish, Corrosion Protection and Long-Term Use
A textured powder coat looks good, but its real value is in protecting the steel from moisture, scratches and everyday trail abuse.
If you regularly drive through:
- Mud
- Salt-treated roads
- Standing water
- Wet trails
- Rocky terrain
inspect exposed edges and damaged areas periodically. A deep scrape that reaches the underlying steel should not simply be ignored.
Good coating helps, but it does not make steel maintenance-free.
Warranty and Returns Matter More With Vehicle-Specific Parts
A bumper is a large, heavy component, and returning one is considerably more complicated than returning a small accessory.
Before ordering, check:
- Warranty period
- What the warranty actually covers
- Whether mounting hardware is included
- Whether replacement parts are available
- Return conditions for opened or installed products
- Whether shipping damage must be reported within a specific timeframe
Most importantly, confirm fitment before cutting or modifying anything. Once an aftermarket part has been altered, your return options can become much more complicated.
Match the Bumper to How You Actually Use the Land Cruiser
| Your LC250 Use | What To Prioritise |
|---|---|
| Daily driving with occasional trails | Moderate weight, clean profile, factory sensor compatibility |
| Weekend off-roading | Recovery mounts, sensible clearance, lighting provisions |
| Overlanding | Winch compatibility, recovery hardware, modularity, accessory capacity |
| Serious trail use | Structural protection, recovery points, winch system, approach-angle considerations |
| Expedition-style build | Complete recovery system, heavier construction, modular accessories |
The biggest mistake is buying a bumper for the truck you imagine building someday instead of the Land Cruiser you actually drive today.
A sensible bumper leaves room for future upgrades without forcing you to pay for equipment you may never use.
Land Cruiser 250 Front Bumper Installation and Setup Guide
A front bumper can be marketed as “bolt-on,” but that does not mean the installation is a five-minute job. On the Land Cruiser 250, you are working around cameras, parking sensors, factory mounting points and, depending on the bumper, winch and lighting hardware. The cleanest installation is the one where the bumper sits correctly, the factory equipment remains usable and nothing is forced into position just to make the last bolt line up.
Before You Touch the Factory Bumper
Start by checking the bumper against the vehicle and laying out every component before removing anything.
Confirm:
- The bumper is specified for your Land Cruiser 250 model year and trim.
- The supplied mounting hardware matches the installation instructions.
- Factory camera and parking-sensor provisions are present where required.
- You know whether the particular design requires cutting, drilling or no modification.
- Your winch, fairlead, recovery points and lights have been selected if they will be installed at the same time.
- You have enough workspace to safely handle a heavy bumper.
Take a few photos of the factory front-end wiring and sensor locations before disassembly. It sounds unnecessary until you are standing behind an aftermarket bumper wondering which connector originally routed where.
Step-by-Step Installation Flow
1. Remove and Label the Factory Components
Disconnect the battery if the manufacturer’s installation instructions call for it, particularly when working around electrical connectors and front-end electronics.
Remove the factory bumper and associated trim carefully. Do not pull on camera or sensor wiring simply because the bumper appears ready to come off.
Label connectors as you remove them. This is especially useful when several plugs look almost identical.
2. Transfer the Hardware You Actually Need
Some factory components may need to be transferred to the aftermarket assembly, depending on the bumper design.
Check the instructions for:
- Camera mounting hardware
- Parking sensors
- Fog-light components
- Licence-plate hardware
- Wiring clips
- Factory brackets
Do not assume every factory bracket should be reused. Vehicle-specific aftermarket bumpers are often supplied with their own mounting hardware.
3. Test-Fit the Main Bumper
This is where patience saves time.
Before fully tightening anything, loosely install the main bumper and check:
left-side alignment → right-side alignment → centre position → body gaps → sensor openings → camera position → wheel and trim clearance
Keep the hardware slightly loose until the bumper is sitting naturally. If you tighten one side completely before the other side is aligned, you can create unnecessary tension and make the remaining holes appear incorrectly positioned.
4. Deal With Cutting Only Where the Instructions Require It
This is an important difference between the products in this comparison.
Some are described as direct bolt-on installations using factory mounting points, while others specifically require cutting.
If your bumper requires cutting, measure twice before making the first cut. Remove only the material specified by the installation instructions.
A clean cut is much easier to protect and finish than an oversized opening made in a hurry.
5. Install the Winch and Recovery Hardware
If you are installing a winch at the same time, position the winch, fairlead and cable path before completely tightening the bumper.
Check:
- Winch clutch access
- Cable-guide alignment
- Fairlead position
- Control-box location
- Cable clearance
- Recovery-point access
This is particularly important with heavier bumper systems because access becomes harder once everything is fully tightened and wired.
6. Route Lighting and Winch Wiring Properly
Do not leave wiring hanging behind the bumper.
Use the supplied wiring tabs where available, secure cables away from:
- Sharp steel edges
- Exhaust heat
- Moving suspension components
- Steering components
- Winch drum and cable
- Areas likely to collect mud and water
Leave enough slack for service, but not enough for the wiring to rub against anything.
Bolt-On Does Not Always Mean Modification-Free
This distinction matters with the five options reviewed here.
| Installation Type | What It Means In Practice |
|---|---|
| Direct bolt-on | Uses supplied hardware and existing mounting points |
| Bolt-on with cutting | Main attachment is bolted, but some factory material must be trimmed |
| No drilling | Existing mounting points are used without creating new holes |
| Modular installation | Multiple bumper sections are assembled according to the chosen configuration |
The HAWKLEY is the clearest no-cut/no-drill option in this lineup based on its supplied installation information. The DV8, WOLFSTORM and CPW designs have cutting requirements noted in their supplied specifications. The Nixon setup is described as bolt-on without drilling or modification.
That difference should influence your installation budget.
Tools Checklist
The exact tool size depends on the manufacturer’s supplied hardware, so use the included instructions rather than guessing bolt sizes.
For a typical installation, have:
- Metric socket set
- Ratchet and extensions
- Combination spanners
- Torque wrench
- Trim-removal tools
- Screwdrivers
- Pliers
- Wire cutters and crimping tools for auxiliary wiring
- Measuring tape
- Marker
- Protective gloves
- Eye protection
- Jack or suitable support equipment where required
- Cutting equipment only if the installation instructions specifically call for it
For a heavy steel bumper, having a second person available is not just convenient. It makes alignment safer and reduces the temptation to hold a heavy assembly in place while trying to start hardware one-handed.
Torque Specs: Do Not Guess
There is no single torque value that applies to every bumper in this comparison.
Use the manufacturer’s specified torque values for each mounting bolt. The correct torque depends on the bolt diameter, grade, mounting location and hardware supplied with the particular bumper.
The safest approach is:
- Hand-start every major mounting bolt.
- Align the bumper.
- Snug the hardware gradually and evenly.
- Use a calibrated torque wrench.
- Follow the supplied installation instructions for the final torque.
- Recheck critical hardware after the initial drive or trail shakedown if the manufacturer recommends it.
Avoid using an impact wrench for the final tightening simply because it is faster. Speed is useful during removal; controlled torque is what you want during final assembly.
Camera and Parking Sensor Check
Before calling the installation finished, test the factory equipment.
Check that:
- The front camera view is unobstructed.
- The camera is sitting securely in its intended mount.
- Parking sensors are correctly positioned in their openings.
- Sensor wiring is not pinched.
- The licence plate does not obstruct the camera or sensor area.
- Any affected driver-assistance functions behave normally.
If a sensor suddenly becomes unreliable after installation, do not automatically blame the electronics. Check the physical installation first for misalignment, obstruction, wiring damage or incorrect sensor positioning.
First Drive: Keep It Short and Deliberate
Do not make the first drive a long highway trip.
Start with a short, low-speed check and listen for:
- Rattling
- Metal contact
- Loose hardware
- Wiring movement
- Unusual suspension noise
Check the bumper visually again after the first drive. If everything remains secure, you can move on to the normal use of the vehicle.
Steel Bumper Aftercare
A powder-coated steel bumper needs less attention than bare steel, but it is not maintenance-free.
After muddy or salty driving, rinse the bumper and pay attention to seams, mounting areas, lower edges and recovery points where dirt and moisture can remain trapped.
If the coating gets chipped by a rock, clean and touch up the damaged area rather than leaving exposed steel untreated.
For vehicles that regularly see water, mud or road salt, occasionally inspect:
- Mounting bolts
- Welded areas
- Recovery mounts
- Winch plate
- Cable-guide opening
- Powder-coat damage
- Areas behind the bumper where mud accumulates
One Setup Detail Worth Doing Right
Before heading onto a serious trail, perform a complete front-end shakedown.
Check the bumper hardware, recovery points, winch mounting, fairlead, lighting brackets, wiring and sensor operation together. A bumper installation is not truly finished when the last bolt is tightened; it is finished when the entire front-end system works together without rubbing, rattling or interfering with the vehicle’s factory equipment.
That final check takes little time, but it is one of the easiest ways to turn an expensive aftermarket installation into a properly finished Land Cruiser build.
Land Cruiser 250 Installation Alternatives and Upgrades: Where Professional Help Makes Sense
A bumper installation can look straightforward on paper, but the Land Cruiser 250 is not a vehicle where I would treat every installation the same way. A lighter, factory-mounting-point design may be manageable for an experienced home mechanic, while a 70- to 130-pound steel bumper combined with a winch, lighting and recovery equipment can quickly become a much bigger job.
The right approach is not about proving you can install it yourself. It is about getting the final fit, wiring, sensor position and recovery hardware right.
When Professional Installation Is the Smarter Choice
I would seriously consider professional installation if your bumper requires cutting, if you are fitting a winch at the same time, or if you are unfamiliar with front-camera and parking-sensor systems.
Professional installation becomes especially worthwhile when:
- The bumper is heavy enough to require multiple people for safe positioning.
- Factory trim or components need to be cut.
- A winch and fairlead are being installed simultaneously.
- Auxiliary lighting requires new wiring and relays.
- Camera or parking-sensor alignment needs to be checked.
- You want the final bumper gaps and body alignment to look factory-clean.
- You do not have a suitable torque wrench or safe lifting equipment.
There is also a practical difference between installing a bumper and finishing a bumper build. Getting the steel mounted is only part of the job. The winch, electrical connections, recovery points and factory electronics all need to work properly afterward.
Choose Lighting That Matches the Way You Drive
The lighting provisions vary between these bumpers, so choose the lights around the bumper rather than buying lights first and trying to make them fit later.
The lineup includes provisions for 20-inch light bars as well as 3- and 4-inch pod lights, while some designs accept larger 26- or 28-inch bars.
For most owners, the sensible setup is simple:
- Pod lights work well when you want compact, targeted illumination.
- A single-row light bar makes more sense when you want broader forward coverage.
- Multiple lighting positions are useful for owners who regularly drive unlit trails.
- Keep wiring protected from heat, water and moving components.
Do not install more lighting simply because the bumper provides more mounting points. A clean electrical installation with the right amount of usable light is better than a front end covered in accessories that rarely get switched on.
Adding a Winch: Plan the Whole System
If recovery is a serious reason for buying the bumper, select the winch before installation rather than treating it as an afterthought.
Check the relationship between:
winch capacity → mounting plate → fairlead → cable path → clutch access → control-box location → recovery points
The Nixon option, for example, is specified around an up-to-8,000-pound winch and provides openings for the cable guide and clutch controls. The WOLFSTORM design also provides winch-related openings, while the HAWKLEY includes a dedicated winch plate.
That does not mean every winch will be equally convenient on every bumper. Check the manufacturer’s compatibility information for the exact winch and mounting configuration you intend to use.
Skid Plate Integration Deserves Attention
A stronger bumper does not automatically mean the entire front underside is protected.
If your Land Cruiser regularly travels over rocks, deep ruts or uneven ground, look at the relationship between the bumper and the vehicle’s existing skid protection.
Ask:
- Does the bumper retain the factory skid plate?
- Does the aftermarket bumper provide additional lower protection?
- Is there a gap between the bumper and skid plate?
- Could mud or debris collect behind the new structure?
- Does the new bumper reduce ground clearance at the front?
The DV8 design specifically lists retention of the factory skid plate, which is a useful detail for an owner who wants to improve front-end protection without immediately rebuilding the entire underside.
Recovery Hardware Should Be Treated as Safety Equipment
D-rings, tow hooks and winch mounts are not decorative accessories.
Before using any recovery point, confirm that the mounting hardware is properly installed and torqued, the recovery equipment is rated appropriately, and the recovery point is actually designed for the intended use.
Also remember that some products in this lineup provide mounting provisions while D-rings are sold separately.
Do not assume that because a shackle fits physically, it is automatically suitable for every recovery situation.
What to Check Before Driving Away
After installation, take a few minutes to inspect the complete front end.
Physical Fit
Look for:
- Even bumper gaps
- Secure mounting hardware
- No contact with body panels
- No interference with tyres or steering components
- Adequate clearance around recovery equipment
- Secure bull-bar and modular sections
Electrical System
Check:
- Camera wiring
- Parking-sensor wiring
- Fog-light connections
- Winch wiring
- Auxiliary-light wiring
- Control-box connections
Every cable should be secured away from sharp edges, heat sources and moving components.
Factory Systems
Test the:
- Front camera
- Parking sensors
- Fog lights
- Adaptive-cruise-related equipment where applicable
- Licence-plate position and visibility
If something behaves differently after the bumper installation, investigate it before driving normally.
Give the New Bumper a Proper Shakedown
The first trail drive should not be the first time the bumper experiences real load.
Start with normal road driving and listen for movement or rattles. Then inspect the mounting points again.
Once you are confident everything is secure, gradually introduce the vehicle to the type of terrain the bumper was installed for.
This is especially important with heavier setups because the bumper, winch and lighting equipment can change the front-end weight distribution of the vehicle.
One Upgrade I Would Not Rush
It is tempting to install the bumper, winch, light bar, pod lights, recovery boards and every other accessory at once.
I would not.
Get the bumper properly fitted first, make sure the factory systems work, then add equipment based on what you actually find yourself needing. That approach keeps the front end cleaner, makes troubleshooting easier and prevents spending money on accessories that look impressive but never become useful.
For an LC250, the best upgrade is not necessarily the most heavily equipped one. It is the setup where protection, recovery, visibility, weight and factory functionality all make sense together.
Land Cruiser 250 Front Bumper Maintenance Guide: Keep Steel Protection Ready for the Next Trail
A good steel bumper does not need constant attention, but it does need basic inspection and cleaning if you actually use the Land Cruiser off-road. Mud, road salt, standing water and small rock impacts are far more important to watch than normal dust. The goal is simple: keep the coating intact, keep the mounting hardware tight and catch small problems before they become expensive ones.
Rinse Off Mud and Road Salt After Hard Use
After muddy trails, beach driving or roads treated with salt, give the bumper a proper rinse rather than letting the dirt dry into the seams.
Pay particular attention to:
- Lower edges and corners
- Recovery-point areas
- Winch plate and fairlead opening
- Bolt and mounting locations
- Behind modular sections
- Areas around skid-plate connections
A pressure washer can help, but do not blast electrical connectors or sensor areas from extremely close range. Clean water and sensible pressure are usually enough.
Inspect the Powder Coat After Trail Damage
The textured powder coat is there to protect the steel, but rocks can still chip it.
After serious off-road driving, look for:
- Deep scratches
- Stone chips
- Exposed metal
- Peeling coating
- Rust beginning around damaged areas
A small coating chip is easy to deal with. Leaving exposed steel wet and dirty for months is what turns a cosmetic mark into a corrosion problem.
Check Mounting Hardware Periodically
The bumper should not be treated as “installed forever.”
After the first few drives, and periodically afterward, inspect the main mounting bolts, recovery mounts, winch hardware and modular connections.
Look for anything that appears loose, shifted or damaged. Follow the manufacturer’s torque specifications rather than applying a generic torque value.
This is particularly important after hard recovery work because the forces involved can be considerably greater than normal road driving.
Give Recovery Points Extra Attention
If you use the bumper for vehicle recovery, inspect the recovery points after every serious recovery event.
Look for:
- Deformation
- Cracks
- Damaged welds
- Bent hardware
- Unusual movement
- Damage around the mounting structure
If a recovery point shows obvious structural damage, do not keep using it until it has been properly inspected.
Recovery hardware deserves more attention than cosmetic bumper damage because it is carrying real load.
Keep the Winch Area Clean
If your setup includes a winch, do not forget the area hidden behind the bumper.
Mud and debris can accumulate around:
- Winch mounting hardware
- Cable or synthetic rope
- Fairlead
- Clutch mechanism
- Control-box wiring
- Cable-guide opening
Follow the winch manufacturer’s maintenance procedure for rope, cable, lubrication and electrical connections. The bumper itself cannot compensate for a winch that has been neglected.
Watch the Camera and Parking Sensors
A bumper can remain physically perfect while a sensor becomes obstructed by dirt or gets slightly disturbed.
If you notice:
- Parking sensors behaving unusually
- A different camera view
- Warning messages
- Inconsistent sensor detection
stop and inspect the installation rather than assuming the bumper itself has failed.
Clean the camera and sensor areas gently, and check that nothing has moved or become damaged.
Inspect Lighting and Wiring
Auxiliary lights deserve a quick inspection after off-road use.
Check that:
- Light mounts remain tight
- Wiring has not rubbed against steel
- Connectors are secure
- Protective sleeves are intact
- No cable is hanging near moving parts
- No moisture has entered vulnerable connections
The small wiring-management provisions found on some of these designs are useful, but they only work when the wiring is actually secured correctly.
Watch for Changes in Front-End Ride Height
A bumper can add meaningful weight, especially once you combine it with a winch, light bar and recovery equipment.
If the Land Cruiser begins sitting noticeably lower at the front, or you notice a change in steering or ride quality, consider the total front-end load, not just the bumper itself.
That does not automatically mean something is wrong. It simply means the suspension is now carrying more weight than it did in factory form.
A Simple Maintenance Routine
| When | What to Check |
|---|---|
| After muddy driving | Rinse bumper, recovery points and lower sections |
| After rocky trails | Inspect coating, welds and exposed edges |
| After a recovery | Check recovery mounts, hardware and visible deformation |
| After the first few drives | Reinspect mounting hardware |
| Every few months | Check coating, bolts, wiring and sensor areas |
| Before a major trip | Inspect bumper, winch, lights, recovery hardware and factory sensors |
When a Small Problem Should Not Be Ignored
A scratch is one thing. A cracked weld, bent recovery mount, loose mounting point or damaged winch hardware is something else entirely.
If the bumper has taken a significant impact or recovery load, inspect it carefully before the next trip. Steel is forgiving in some situations, but visible structural damage should never be treated as merely cosmetic.
The Long-Term Reality
The best way to keep an aftermarket bumper looking good is not complicated: wash it, inspect it and repair coating damage early.
For a Land Cruiser that spends most of its time on pavement, this may only take a few minutes every so often. For one that regularly sees mud, rocks and recovery work, make the inspection part of the normal trail routine. That small habit will do far more for the bumper’s long-term condition than simply buying the heaviest steel option available.
FAQs About Toyota Land Cruiser Front Bumper
Will an aftermarket front bumper affect the Land Cruiser 250’s factory camera, parking sensors, or adaptive-cruise hardware?
It can, but the bigger issue is how the bumper is designed and installed. A vehicle-specific bumper with properly positioned camera and sensor provisions is a much safer starting point than adapting a generic steel bumper.
For the Land Cruiser 250, I would specifically verify the following before buying:
- Factory front-camera mounting position
- Parking-sensor openings and sensor depth
- Clearance around driver-assistance hardware
- Whether the manufacturer explicitly states that those systems are retained
Even when a product claims factory compatibility, the final installation still matters. A slightly misplaced sensor, obstructed camera or poorly routed connector can create problems that have nothing to do with the bumper’s steel construction.
Is a heavier steel bumper actually better for a Land Cruiser 250 used for serious off-roading?
Not automatically. More weight does not equal more useful protection. That is one of the easiest mistakes to make when comparing aftermarket bumpers.
The five options in this guide range from roughly 54 pounds to 132 pounds before you add equipment such as a winch or auxiliary lights. That difference becomes significant once the complete front-end setup is installed.
For a serious trail build, I would look at:
- Total front-end weight
- Approach-angle changes
- Recovery-point design
- Winch compatibility
- Suspension capacity
- How much additional equipment you actually intend to carry
A 130-pound bumper can make perfect sense for an expedition-style recovery build, while a lighter setup may be the smarter choice for someone who drives the Land Cruiser every day and only occasionally leaves the pavement.
If I plan to add a winch later, should I buy a winch-ready Land Cruiser 250 bumper now?
Yes, if recovery is genuinely part of your future build. Retrofitting around a bumper that was never designed for a winch can create unnecessary expense and compromises.
Look beyond the words “winch ready.” Check whether the design provides the things you will actually need, such as:
- Winch mounting structure
- Fairlead or cable-guide access
- Clutch-control access
- Control-box placement
- Adequate recovery points
There is also a practical reason to decide early: the winch changes the total front-end weight and installation plan. If you know you will add one, planning the bumper, winch, wiring and suspension considerations together usually produces a cleaner result than adding each component independently months apart.
Is a mid-width bumper better than a full-width design for a Land Cruiser 250 that regularly sees narrow trails?
It can be, but this is really a terrain and driving-style decision, not a universal upgrade.
A mid-width design can leave the front corners feeling less bulky on narrow trails and may make the vehicle easier to place around rocks, trees and tight obstacles. A wider bumper can provide more coverage and may suit an owner who prioritises front-end protection over compact trail clearance.
The HAWKLEY-style approach in this comparison is interesting because it combines a mid-width profile with shackle mounts, a winch plate, parking-sensor provisions and pod-light mounting points. That is a more useful combination than choosing a bumper simply because the word “mid-width” sounds off-road focused.
What should I check after installing a Land Cruiser 250 front bumper before taking it on a serious trail?
I would not make the first serious trail run the installation test. Give the complete front end a proper shakedown first.
Start with the physical installation:
- Check the main mounting hardware.
- Inspect recovery-point and winch hardware.
- Look for contact with bodywork or tyres.
- Check modular sections and bull-bar mounts.
- Make sure auxiliary wiring is secured.
Then test the front camera, parking sensors and other affected factory equipment. Drive a short distance, listen for rattles or movement, and inspect the bumper again.
If the bumper has been installed with a winch, also check the fairlead, cable path, clutch access and control-box wiring before using the recovery system.
The final truth is simple: an aftermarket bumper is not really “done” when the last bolt is tightened. It is done when the steel, recovery equipment, wiring and factory electronics all work together exactly as they should.
Final Thoughts
A front bumper is one of those upgrades that can completely change how a Land Cruiser 250 feels and looks, but the smartest choice is not necessarily the heaviest or most aggressive one. After looking closely at these five designs, the real difference comes down to how each bumper solves a different problem.
If you want the most balanced combination of steel protection, recovery capability and factory-equipment retention, the DV8 is the easiest all-round recommendation. The WOLFSTORM makes more sense when heavier construction and multiple lighting options are higher on your list. The HAWKLEY stands out for its mid-width layout and straightforward installation, while the CPW is the more interesting route for someone who expects the build to evolve. The Nixon Offroad is the serious expedition-style choice, particularly when an 8,000-pound winch and a more substantial front-end system are genuinely part of the plan.
What I would not do is buy one simply because it looks tougher in a marketplace photograph. Check the exact fitment, total weight, factory sensor provisions, recovery hardware, installation requirements and your intended use first. Those details matter far more once the bumper is actually bolted onto the vehicle.
And because these are relatively new LC250-specific products, there is still a limit to how much long-term owner history exists for every option. That is why this comparison focuses on verifiable construction, stated compatibility, practical hardware and installation realities, rather than pretending every bumper has years of proven trail abuse behind it.
If your Land Cruiser is going to see real trails, recovery work and rough terrain, choose the bumper that supports that job. If it is primarily a daily driver with occasional adventures, there is no prize for carrying unnecessary weight.
The best bumper is the one that makes your particular Land Cruiser more capable without creating problems you never needed in the first place.
Also Check:


