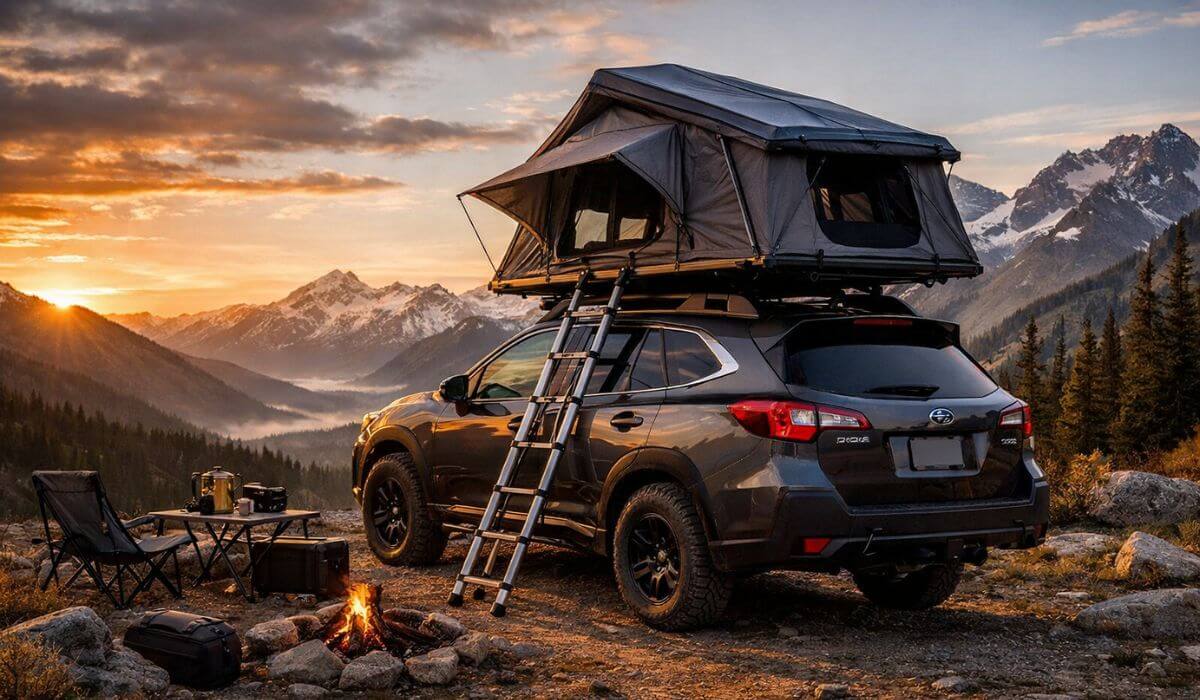
6 Best Rooftop Tents for Subaru Outback in 2026: Low Weight, Safe Fit, Fast Setup & Durable Designs
If you own a Subaru Outback, you already know it’s built for getting out of the city—but rooftop tents are where things get tricky. Not every tent that looks good online actually works well on an Outback. Weight limits, crossbar strength, wind noise, and setup time all matter way more than most “top 10” lists admit.
We put together this list after digging into real-world specs, early user feedback, and what actually makes sense for an Outback—not a full-size truck. The focus here is simple: low weight, stable fit, quick setup, and durability that won’t turn your road trip into a headache. Some of these are newer models with limited long-term reviews, so instead of hype, you’ll get straight-up practical insight—what fits, what feels overbuilt, and what’s actually worth trusting on your roof.
If you’re trying to avoid the usual trial-and-error (and expensive mistakes), this is the shortlist that gets you there faster.
Best Subaru Outback Rooftop Tents: Top 2026 Picks for Stable Fit, Comfort & Road Trips
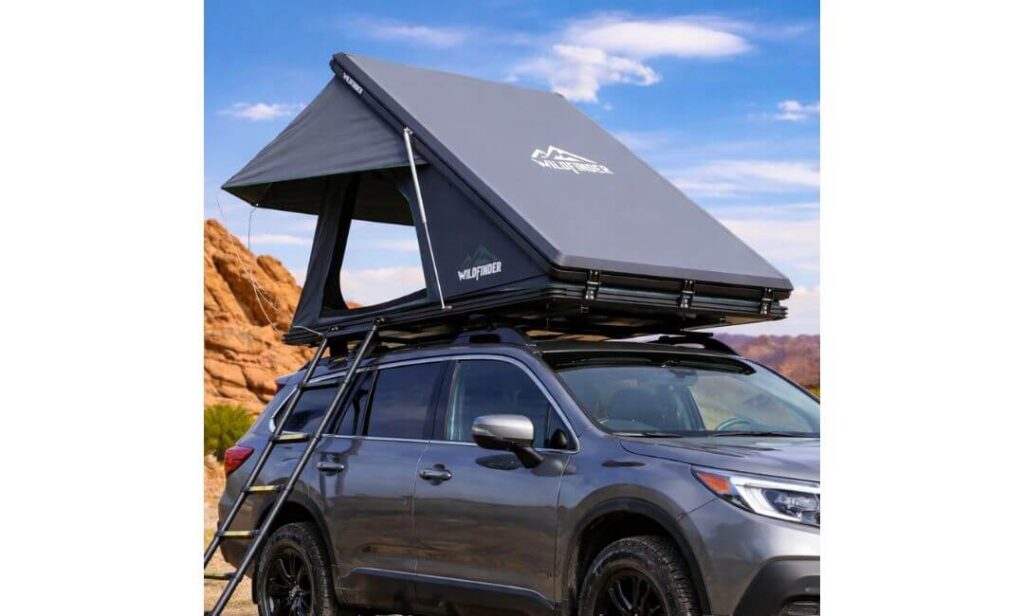
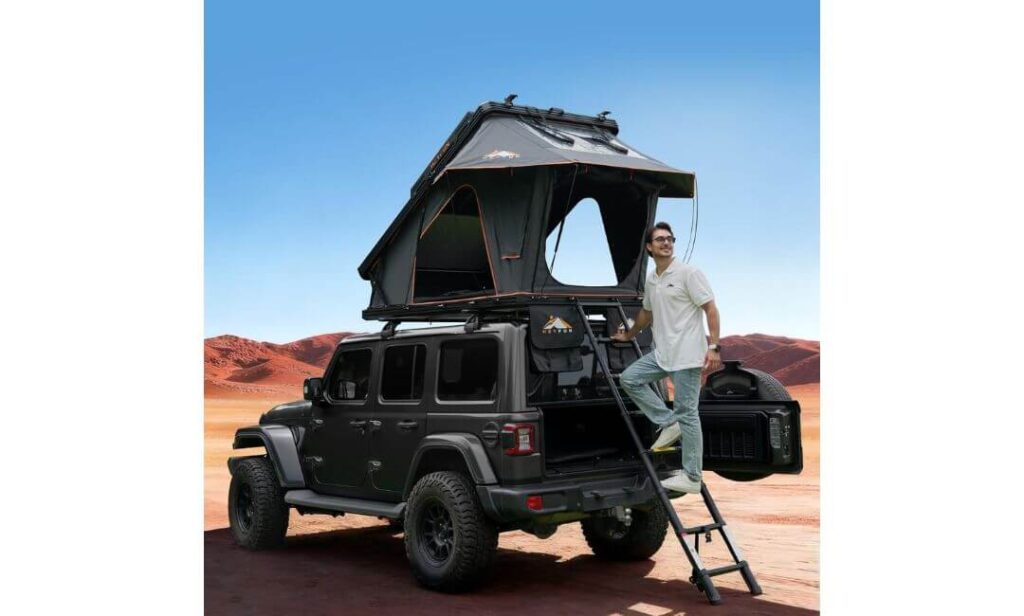
#1. WildFinder Hard Shell Rooftop Tent
Lightweight Subaru Outback rooftop tent with hard shell, compact build & stable 2–3 person setup
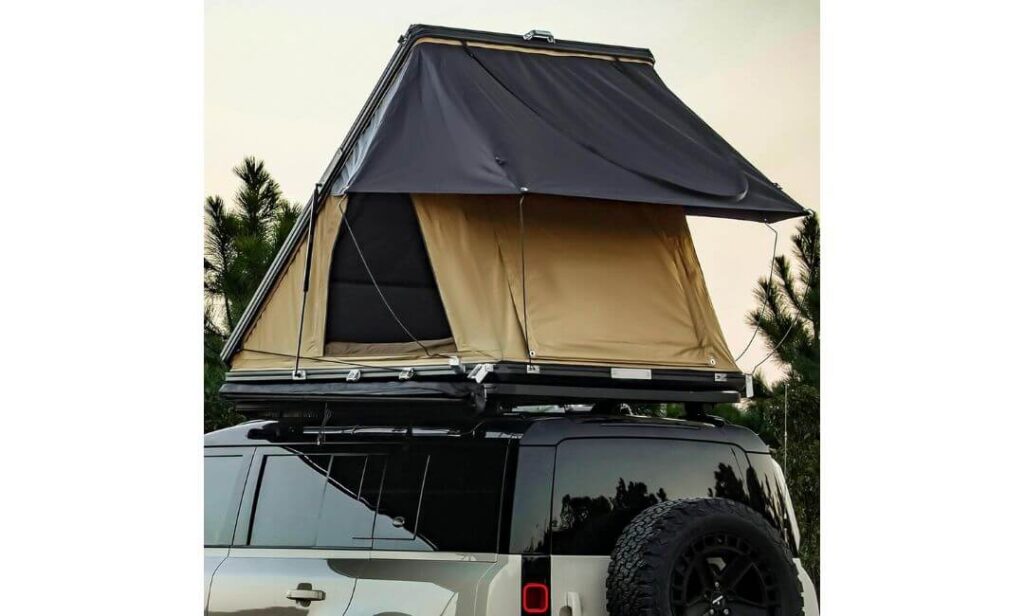
#2. Sanhima Hotham Lite Aluminium Rooftop Tent
Slim-profile Subaru Outback roof tent with low weight design, fast setup & built-in LED lighting
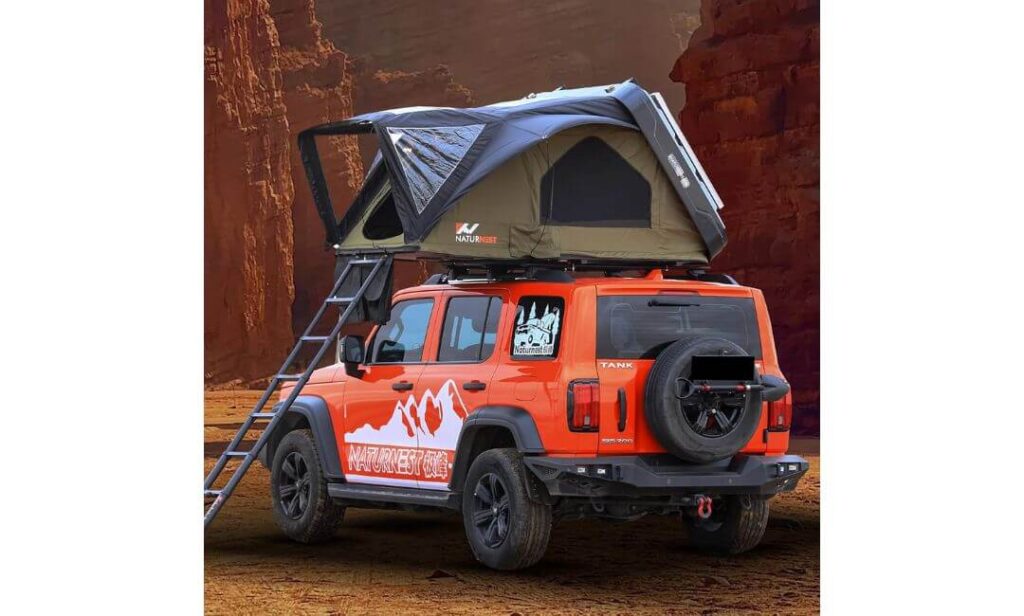
#3. Bayati Naturnest Sirius 1 Plus Hard Shell Tent
Easy setup Subaru Outback rooftop tent with waterproof blackout fabric & true 4-season usability
#4. HEYFUN Innovator Pro 3-in-1 Rooftop Tent
Feature-packed Subaru Outback roof tent with skyview window, USB power & multi-mode setup
#5. ROVEROLL Hardshell Rooftop Tent
Durable Subaru Outback rooftop tent for 2–4 users with strong ladder system & quick deploy design
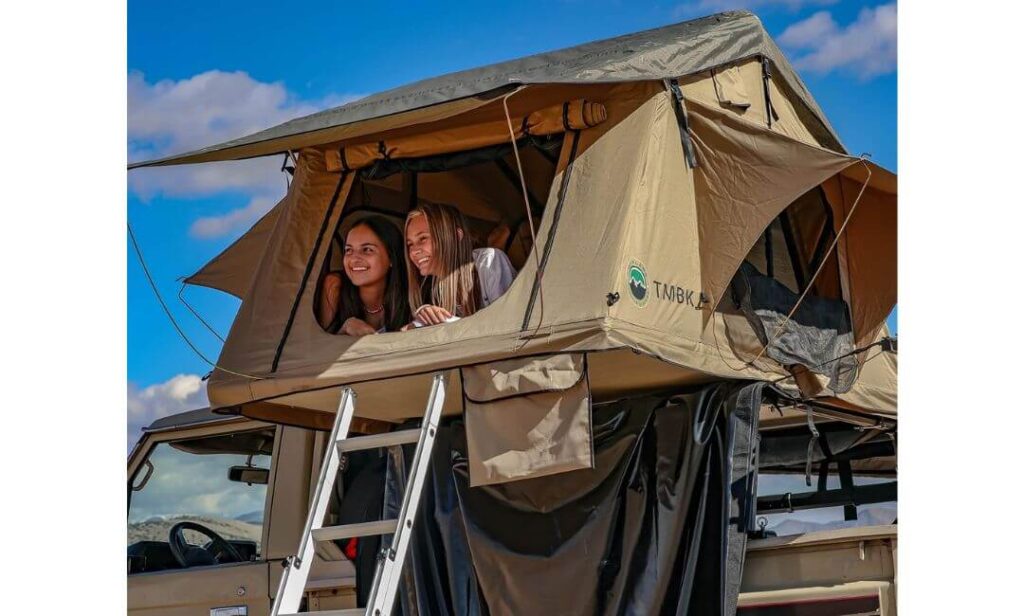
#6. Overland Vehicle Systems TMBK Soft Shell Tent
Budget-friendly Subaru Outback rooftop tent with soft shell design, universal fit & roomy 3-person space
Expert Tip (From Real Outback Use)
If you’re running a Subaru Outback with factory crossbars, don’t chase the biggest tent—you’ll regret it on the highway. The sweet spot is a lightweight hard shell under control, not just for safety but for daily drivability. A slightly smaller, low-profile tent that opens fast will get used way more than a bulky one you hesitate to mount. Most people overestimate how much space they need and underestimate how much weight and wind drag affect the Outback. Keep it balanced, simple, and quick to deploy—that’s what actually works trip after trip.
How We Chose These Rooftop Tents for Subaru Outback
We didn’t just pull popular names or copy spec sheets. These picks are filtered specifically for what works on an Outback in real conditions—long drives, changing weather, and limited roof capacity. Here’s exactly what mattered in the selection:
First, weight vs real usability. On paper, many tents look “compatible,” but once you factor in crossbars, mounting hardware, and gear, things get tight fast. We prioritized models that stay within a realistic range for the Outback without pushing limits. That’s why you’ll see more slim hard shells and controlled soft shell options, not oversized setups meant for trucks.
Second, setup time in actual use. A rooftop tent that takes effort every single stop ends up being used less. We leaned toward tents that open cleanly in one motion or minimal steps. Models like the Sanhima and HEYFUN stand out here—not because of marketing claims, but because their design actually reduces friction when you’re tired, it’s dark, or weather turns.
Third, profile and aerodynamics. The Outback isn’t a lifted rig—it’s a daily driver for most owners. So we filtered out bulky designs that kill mileage and create noise. Low-profile builds like Hotham Lite or similar compact shells make a noticeable difference on highways, and that matters more than most guides admit.
Fourth, material quality where it counts. Instead of chasing brand names, we looked at construction—aluminum shells, hinge strength, fabric thickness, and weather sealing. Newer brands like Naturnest or WildFinder are included not because they’re hyped, but because their builds show real intent toward durability, especially in their shell structure and weather resistance.
Fifth, realistic capacity claims. “3-person” or “4-person” labels are often optimistic. We evaluated these based on actual usable space, not just manufacturer claims. The goal was to recommend tents that feel comfortable for 2–3 people on an Outback, without forcing compromises.
Finally, we kept the list honest. These are newer products, and long-term data is still building. So instead of pretending otherwise, we focused on what can be verified now—design logic, materials, weight, and usability. That’s what gives you a reliable starting point without overpromising.
This isn’t a list built for clicks. It’s built so you don’t end up with a tent that looks good online but feels wrong the moment it’s on your roof.
#1. WildFinder Hard Shell Rooftop Tent
Quick Specs:
- Real Roof Load Reality: ~169 lbs class build (works only with strong crossbars, not weak factory setups)
- Footprint Fit: 83″ x 52″ — ideal for 2 adults + 1 tight extra
- Shell Build: Full aircraft-grade aluminum (no plastic fatigue issues)
- Weather Rating: 5000mm rainproof, Level 6 wind resistance, 4-season ready
- Sleep System: 5cm non-deforming mattress + condensation control layer
- Setup Style: Gas-strut pop-up (true quick deploy design)
You don’t realize how much a full aluminum shell changes the experience until you’ve dealt with cheaper plastic tops that start flexing after a season. This one feels solid the moment it’s mounted—no weird creaks, no flex under wind pressure. On a Subaru Outback, that kind of rigidity matters more than people think, especially on highways where lighter crossovers start to feel every bit of drag.
Inside, it’s surprisingly well thought out. The condensation pad + marine base layer combo actually solves a real issue—waking up to damp bedding in changing temperatures. Add to that the blackout polyester fabric and you get proper sleep, not that early-morning light leak most tents struggle with. The included LED strip and storage organizers aren’t gimmicks either—they genuinely make night use easier without scrambling for gear.
Where it stands out is deployment. Once mounted, the gas struts do most of the work—open, lock, done. No fighting fabric, no awkward folding. It’s one of those setups that feels smooth after just a couple of uses, which is exactly what you want when you’re stopping after a long drive.
(It’s one of those setups that feels overbuilt in the right areas—and that’s exactly what you want sitting on your roof.)
What Stands Out in Real Use
- All-aluminum shell that doesn’t age like plastic tops
- Condensation + marine pad system (rare but actually useful)
- Stable in wind compared to softer builds
- Clean, quick deployment with gas struts
- Complete kit included — ladder, organizers, lighting, no extra spend
Where It Falls Short
- On the heavier side, so weak factory crossbars aren’t enough
Subaru Outback Fit Reality
This setup works on the Outback—but only if you respect the limits. At this weight, you’re not just “adding a tent,” you’re committing to a proper crossbar system that can handle ~170 lbs static load confidently. With the right setup, it sits stable and low enough (around 7-inch closed height) to avoid excessive drag.
What matters here is balance. Once mounted correctly, it feels planted, not top-heavy. But skip proper bars, and you’ll feel the difference immediately—especially on uneven roads or at speed.
Installation Notes
This is not a solo install. You’ll need 2–3 people to lift and position it safely onto the roof. The mounting hardware is straightforward and works with standard crossbars, but alignment matters—take your time getting the rail spacing right (~28 inches works best).
Once installed, though, everything becomes easy. Opening and closing is quick, and you won’t find yourself avoiding setup after a long day—which, honestly, is what separates a good rooftop tent from one that just looks good online.
#2. Sanhima Hotham Lite Aluminium Rooftop Tent
Quick Specs:
- True Lightweight Build: ~134 lbs (noticeably easier on Subaru Outback roof limits)
- Ultra Slim Profile: Just 4.57″ closed height (garage-friendly, low drag)
- Fabric & Protection: 420D ripstop Oxford + poly-cotton, 5000mm waterproof, UV 50+
- Sleep System: 1.97″ high-density foam + anti-condensation mat
- Setup Speed: Gas strut-assisted — real 30-second deploy
- Load Strength: ~330 lbs supported when open
The first thing you notice isn’t the features—it’s how light and low it sits on a Subaru Outback. This is where most rooftop tents get it wrong. They look great on paper but feel bulky once mounted. This one doesn’t. At around 134 lbs with a 4.57-inch slimline profile, it actually respects the Outback’s design instead of overpowering it. You feel the difference immediately on highways—less drag, less noise, more confidence behind the wheel.
Inside, it’s properly dialed for real use. The silver-lined blackout interior gives you privacy without that suffocating feel, and the airflow setup—dual side windows plus a ceiling vent—keeps things breathable even in humid conditions. The mattress isn’t just there to tick a box either; the 1.97-inch foam paired with the anti-condensation layer handles temperature shifts well, so you’re not waking up damp when the weather flips overnight.
Where it really separates itself is usability. The gas struts do their job cleanly—unlock, slight push, and it opens in seconds. No struggle, no adjustment phase. Add the tri-color LED (including amber for bug control), and it starts to feel like something designed by people who actually camp, not just manufacture tents.
(It’s the kind of setup that quietly makes every trip smoother without demanding attention.)
What Stands Out in Real Use
- Genuinely lightweight — makes a real difference on Outback roof handling
- Ultra-slim closed profile — better fuel efficiency and less wind noise
- Fastest setup in this list — true one-motion deploy
- Well-thought interior airflow + blackout combo
- Tri-color LED system that actually improves night usability
Where It Falls Short
- Interior width is slightly tighter, so 3 adults can feel cramped on longer trips
Subaru Outback Fit Reality
This is one of the few tents that actually feels made for the Outback. The lower weight and slim profile keep things within a safe, comfortable range—even closer to factory limits compared to heavier builds. With proper crossbars rated above 150 lbs, it sits balanced without stressing the roof.
Because of the low packed height, it also avoids the usual headaches—garage clearance issues, excessive drag, or that top-heavy feeling at speed. It just integrates better with the vehicle overall.
Installation Notes
You’ll still need two people to mount it safely, but compared to heavier tents, this one is far easier to handle during installation. It uses standard mounting hardware—no drilling, no custom setup.
Positioning matters: keep it slightly forward for better weight distribution, and always re-check bolt torque after your first drive. Once it’s on, though, daily usability is where it pays off—you won’t hesitate to open it, even on quick stops.
#3. Bayati Naturnest Sirius 1 Plus Hard Shell Rooftop Tent
Quick Specs:
- Balanced Weight Build: ~160 lbs (mid-range for Outback with proper bars)
- Expanded Living Space: 82.6″ x 63″ open footprint (noticeably wider than most)
- Shell Type: ABS hard shell + aluminum frame (lighter than full metal builds)
- Fabric Protection: 420D Oxford, UV 50+, ~5000mm waterproof capability
- Sleep System: Dual-layer mattress (comfort foam + condensation pad)
- Setup Mechanism: Gas strut + folding ladder-assisted design
Space is the first thing you notice here. On a Subaru Outback, most rooftop tents feel like a compromise—either compact or heavy. This one leans toward usable space without going oversized, and that extra width (63 inches) genuinely changes comfort, especially if you’re not camping solo.
The ABS shell paired with an aluminum frame hits a different balance compared to full-metal builds. It keeps the structure solid while shaving off unnecessary weight, which matters more than people admit when mounting on a crossover. On the road, it doesn’t feel overly bulky, and fuel impact stays reasonable compared to thicker hard shells.
Inside, the setup is straightforward but effective. The blackout fabric blocks almost all light, and the dual-layer mattress system does its job—no cold base feeling, no moisture buildup overnight. The ladder-assisted folding design also makes deployment smooth. It’s not just “quick on paper”—it actually opens cleanly once you get the motion right.
(It’s one of those tents where the extra space feels earned, not forced onto the roof.)
What Stands Out in Real Use
- Wider sleeping area than most 2–3 person rooftop tents
- ABS + aluminum combo reduces unnecessary roof load
- Reliable gas strut system with long-term durability (rated cycles)
- Blackout + UV protection that actually improves sleep quality
- Smooth YKK zippers and hardware — small detail, big difference over time
Where It Falls Short
- Slightly bulkier footprint, so positioning on smaller crossbars needs attention
Subaru Outback Fit Reality
This sits right in the middle ground for the Outback. At ~160 lbs, it’s not ultra-light, but it’s still within a workable range if you’re using proper crossbars rated above 160 lbs. The wider design means it may extend slightly beyond the roofline, which is normal—but you’ll want balanced placement.
Once mounted correctly, it feels stable. The ABS shell helps keep overall weight manageable compared to full aluminum builds, making it a more realistic option for Outback owners who want space without going extreme.
Installation Notes
Installation is simpler than expected—1–2 people can manage it, especially compared to heavier units. All mounting hardware is included, and it works with standard crossbar systems without drilling.
Take time to align it properly between crossbars and distribute weight evenly. After the first drive, recheck everything. Once set, deployment becomes second nature—and that’s where this tent starts to make sense for regular use.
#4. HEYFUN Innovator Pro 3-in-1 Elevated Rooftop Tent
Quick Specs:
- Heavy-Duty Build: ~215 lbs (not for stock setups — requires serious crossbars)
- Expanded Interior: 40% more usable space with elevated design
- Shell & Frame: Aircraft-grade aluminum + reinforced structure
- Sleep System: 3-layer mattress + moisture control base
- Setup Speed: STABILUS gas struts — ~5-second pop-up
- Load Capacity: Up to ~660 lbs when deployed
This is not your typical rooftop tent—and you feel that immediately. On a Subaru Outback, most setups aim to stay light and simple. This one goes the opposite direction—it’s built to feel like a fully equipped elevated camp system, not just a sleeping space.
The moment it opens, the difference is obvious. The elevated 3-in-1 design + skyview window creates a much more open, airy feel than standard clamshell tents. You’re not boxed in. Add the TPU rain fly option and you can literally switch between full protection and panoramic views depending on conditions. It’s one of those setups where you actually want to spend time inside, not just crash and sleep.
Then come the extras—and here, they’re not filler. The full-circle LED strip, built-in USB outlet, storage pouches everywhere, luggage racks on top—this isn’t minimal camping, it’s convenience-focused. The 3-layer mattress setup also stands out. It handles comfort and insulation properly, especially in colder conditions where thinner setups start failing.
(It feels less like a tent and more like a compact rooftop basecamp built for longer stays.)
What Stands Out in Real Use
- Massive interior feel thanks to elevated structure + skyview
- 5-second deploy system — one of the fastest setups available
- Full feature integration (USB, LED, storage, racks) actually usable
- Strong aluminum shell + frame built for long-term use
- High load capacity — handles real multi-user weight without compromise
Where It Falls Short
- Too heavy for stock Subaru Outback setups, needs upgraded crossbars
Subaru Outback Fit Reality
Let’s be clear—this is not a plug-and-play option for the Outback. At ~215 lbs, it pushes beyond what factory crossbars are designed to handle. If you’re serious about using it, you’ll need a proper aftermarket roof rack system rated well above 165 lbs.
That said, once mounted correctly, it transforms the Outback into something else entirely. The added height and structure don’t feel unstable, but you will notice the weight while driving—this is more of a dedicated overland-style setup, not a casual weekend add-on.
Installation Notes
This is a multi-person install, no exceptions. The weight alone demands careful lifting and positioning. The included mounting hardware works with standard systems, but your crossbars must be upgraded before you even think about installing.
Setup after installation is effortless—that’s where it shines. But getting it onto the vehicle is the real step you need to plan properly. Once done, though, it delivers a completely different level of rooftop camping experience.
#5. ROVEROLL Hardshell Rooftop Tent
Quick Specs:
- Weight Class: ~170 lbs (right at the edge for Subaru Outback setups)
- Sleeping Space: 89″ length with ~50.5″ width (true 2-person comfort zone)
- Frame Build: CNC aluminum + honeycomb panels (rigid but not overly bulky)
- Fabric Protection: 280G polycotton + 600D Oxford, 3000mm waterproof, UV 50+
- Sleep System: Memory foam mattress + condensation control layer
- Setup Mechanism: Hydraulic strut-assisted — fast, no manual effort
This one sits in that middle ground where things start to feel serious, but still manageable on a Subaru Outback. It’s not ultra-light, but it doesn’t cross into overbuilt territory either. Once mounted, the structure feels planted—thanks to the CNC aluminum frame and honeycomb panels, there’s a noticeable stiffness that holds up well in wind and uneven terrain.
Inside, it leans more toward comfort than complexity. The memory foam mattress paired with blackout fabric gives you a proper sleep setup, not just a basic pad. The four-window layout improves airflow, and unlike cheaper tents, it doesn’t feel stuffy when everything is zipped down. Small details like the roof vent and condensation layer actually show up in real use—especially on colder nights where moisture becomes a problem.
Deployment is where it earns its place. The hydraulic struts take over instantly—you lift slightly, and it opens cleanly without fighting the structure. No awkward folding, no second attempts. It’s simple in a way that makes you use it more often, which is what most buyers underestimate.
(It’s a setup that focuses on doing the basics right—structure, comfort, and ease—without overcomplicating things.)
What Stands Out in Real Use
- Strong aluminum frame that feels stable even in wind
- Hydraulic setup system — quick and consistent every time
- Comfort-focused interior with real mattress quality
- Balanced build — not too bulky, not too minimal
- Good airflow design with multiple windows + vent
Where It Falls Short
- Sits right on the weight limit, so setup depends heavily on your crossbars
Subaru Outback Fit Reality
This is where you need to be honest with your setup. At ~170 lbs, it’s at the upper edge of what an Outback can safely handle dynamically. Factory crossbars might technically support it, but it’s not the most comfortable margin—you’re better off with upgraded bars for peace of mind.
Once installed properly, though, it doesn’t feel unstable. The structure distributes weight evenly, and because it’s not oversized in width, it sits cleanly on the roof without awkward overhang.
Installation Notes
You’ll need at least 2–3 people to mount it safely—not because it’s complicated, but because of the weight and size. The hardware is solid and mounts directly to standard crossbars without extra setup.
Take your time aligning it evenly, and double-check all bolts after your first drive. Once it’s on, everything else becomes simple—the kind of setup that doesn’t slow you down when you actually want to camp.
#6. Overland Vehicle Systems TMBK Soft Shell Rooftop Tent
Quick Specs:
- True Lightweight Setup: ~108 lbs (one of the safest fits for Subaru Outback)
- Sleeping Space: ~55″ width — comfortable 2, workable 3
- Build Material: Poly-cotton ripstop canvas + aluminum base
- Weather Protection: Rainfly included + all-season capable fabric
- Sleep System: High-density foam mattress with cotton cover
- Setup Style: Fold-out soft shell — simple, no mechanism dependency
This is where things start to feel easy again. On a Subaru Outback, not everyone wants to deal with heavy shells, complex installs, or pushing roof limits—and this setup respects that from the start. At just over 100 lbs, it sits naturally on the roof without changing how the car feels on daily drives.
The soft shell design isn’t flashy, but it works. You unfold it, extend the ladder, and the structure opens up without resistance. No gas struts, no mechanisms to worry about long-term. It’s the kind of setup that feels reliable because there’s less that can go wrong. The ripstop poly-cotton fabric also holds up better than expected—breathable in heat, protected under the rainfly when weather turns.
Inside, it’s straightforward but comfortable. The foam mattress + skylight view combination makes it feel open rather than cramped, especially at night. You’re not dealing with tight headroom or boxed-in walls. It’s simple camping—but done right enough that you don’t feel like you’re compromising.
(It’s the kind of tent you actually use often because nothing about it feels like extra effort.)
What Stands Out in Real Use
- Lightweight build — perfect match for Outback roof limits
- Simple fold-out setup — no mechanical dependency
- Breathable ripstop fabric that handles different climates well
- Spacious feel with skylight + open design
- Best value option without cutting essential features
Where It Falls Short
- Setup takes slightly longer compared to hard shell pop-up tents
Subaru Outback Fit Reality
This is the easiest fit in the entire list. The weight sits well within safe limits, and multiple real-world installs confirm it works even with factory crossbars on the Outback. No stress on the roof, no balancing issues—it just fits the way most buyers expect.
Because it’s lighter and folds compactly, it also avoids common problems like drag, noise, or clearance issues. It feels like a natural extension of the vehicle rather than an added burden.
Installation Notes
You can mount this with basic tools and 1–2 people—no heavy lifting stress like hard shells. It clamps directly onto standard crossbars, and everything needed comes in the box.
Once installed, setup becomes routine. Open, extend, secure—that’s it. No learning curve, no adjustments. It’s one of those setups that just works every time you need it.
Best Subaru Outback Rooftop Tents Compared: Weight, Setup Speed & Real-World Fit
Buying Guide: How to Choose the Right Rooftop Tent for Your Subaru Outback
Choosing a rooftop tent for a Subaru Outback isn’t just about picking the “best” model—it’s about picking what actually works with this vehicle. The Outback sits in a very specific space: capable, but not built like a truck. That means every decision—weight, size, setup—has a direct impact on how it drives, how safe it feels, and whether you’ll actually enjoy using the tent long term.
This guide breaks it down the way experienced users look at it—no marketing angles, just what matters when the tent is on your roof and you’re miles away from home.
Weight and Payload Compatibility
This is where most buyers go wrong. The Outback has a limited dynamic roof load (while driving), and many rooftop tents push right up against that number—or exceed it once you include crossbars and gear.
A lighter tent doesn’t just make installation easier—it changes how the car behaves. You’ll notice it in:
- Highway stability
- Braking confidence
- Wind resistance and fuel economy
Heavier tents (160–215 lbs range) can work, but only with upgraded crossbars and careful installation. If you’re sticking with factory bars, staying closer to 100–140 lbs is the safer, more realistic choice.
This isn’t about “can it fit”—it’s about whether it still feels right after 5 hours on the road.
Size vs. Sleeping Capacity
On paper, most tents claim “2–3 person” or even “4 person,” but real-world use is different. The Outback’s roof width limits how large your footprint can be before things start overhanging awkwardly.
A wider tent (like 60+ inches) gives better sleeping comfort, but:
- It may extend beyond the roofline
- It adds wind drag
- It makes mounting more sensitive
For most Outback setups, the sweet spot is:
- 2 adults comfortably
- 3 people only if you’re okay with tighter space
Bigger isn’t always better here. A slightly smaller tent that fits cleanly will always feel more usable.
Setup Speed vs. Durability
There’s a clear trade-off between fast setup and long-term simplicity.
Hard shell tents:
- Open in seconds (gas struts)
- Better for frequent stops
- More rigid in bad weather
Soft shell tents:
- Take a bit longer to set up
- Fewer mechanical parts (less to fail)
- Easier to maintain over time
If you’re doing quick overnight stops or road trips, faster setup matters more than you think. But if you’re planning slower trips or budget builds, simplicity can be the smarter choice.
Weather Resistance and Insulation
Not all “4-season” claims are equal. What actually matters is how the tent handles:
- Rain pressure (3000mm vs 5000mm rating)
- Wind stability (frame + shell strength)
- Condensation control (pads, airflow design)
In real use, condensation becomes a bigger issue than rain. Tents with anti-condensation layers and proper ventilation make a noticeable difference after a full night.
Material also matters:
- Polycotton → more breathable
- Oxford/polyester → more waterproof but less breathable
The best setups balance both, especially for mixed climates.
Rack Compatibility and Required Accessories
A rooftop tent is only as good as the system holding it. The Outback requires:
- Proper crossbars (factory or upgraded)
- Correct weight rating
- Stable mounting points
Beyond that, small accessories shape your experience:
- Ladder length and stability
- Storage organizers
- Lighting (built-in LED vs external)
- Optional annex or add-ons
Don’t treat these as extras—they directly affect usability. A poorly designed ladder or weak mounting system will ruin an otherwise good tent.
Budget vs. Long-Term Value and Warranties
There’s a wide price range in rooftop tents, but cheaper doesn’t always mean better value.
What actually matters long term:
- Frame material (aluminum vs plastic)
- Fabric durability
- Hardware quality (zippers, struts, hinges)
- Warranty support
Some newer brands offer strong value with solid builds, but long-term durability is still something to watch. A slightly higher upfront cost for better materials often saves you from replacing the tent after a couple of seasons.
Maintenance Tips to Extend Tent Life
This part gets ignored—and it shouldn’t.
Simple habits make a huge difference:
- Always dry the tent before closing after rain
- Air it out regularly to prevent moisture buildup
- Check mounting bolts after long drives
- Clean fabric and seals to avoid long-term wear
Hard shell or soft shell—doesn’t matter. Maintenance is what keeps the tent reliable over time, not just the brand name.
What Most Buyers Miss (But Matters the Most)
The best rooftop tent for your Outback isn’t the one with the most features—it’s the one you’ll actually use without hesitation.
If it’s too heavy, too complicated, or feels unstable, you’ll avoid setting it up. And that’s where most setups fail—not in specs, but in real-life usability.
Pick something that fits your car and your habits, not just your expectations.
Subaru Outback Rooftop Tent Setup: Fitment, Stability & Real-World Optimization
Mounting a rooftop tent on a Subaru Outback isn’t just about getting it to “fit”—it’s about making sure the entire setup works as one system. The Outback rewards balanced, thoughtful setups and quickly exposes anything rushed or mismatched. These are the details that separate a setup that feels solid on every drive from one that constantly feels slightly off.
Rack Compatibility That Actually Holds Up
Not all crossbars are equal, and this is where your entire setup either starts right—or fails later. Factory Subaru crossbars can handle lighter tents, but once you move into mid or heavy builds, you need something more reliable.
Aftermarket systems from Thule or Yakima are built with better load distribution and stronger mounting points. They don’t just carry the weight—they manage how that weight behaves under braking, cornering, and uneven terrain.
What matters more than brand is:
- Proper dynamic load rating (not just static claims)
- Solid mounting connection to the roof rails
- Minimal flex under pressure
A good rack setup doesn’t just support the tent—it removes that slight movement or vibration you feel at speed. That’s the difference between something that “works” and something that feels right.
Weight Distribution and Center of Gravity
The Outback sits lower than most overland builds, which helps—but it also means roof weight has a more noticeable effect on handling.
Where you place the tent matters more than people think. It should sit:
- Centered between the crossbars
- Slightly forward of the midpoint (not hanging too far back)
This keeps the center of gravity balanced, especially during braking and turns. If the weight shifts too far back, the rear starts to feel heavier and less stable on uneven roads.
A well-positioned tent won’t just sit correctly—it will feel invisible while driving. A poorly placed one constantly reminds you it’s there.
Managing Wind Impact and Real Driving Feel
Wind resistance isn’t just about fuel economy—it directly affects comfort and confidence behind the wheel.
Lower-profile tents (like slim hard shells) naturally reduce drag, but setup choices also matter:
- Keep the tent mounted as low and flush as possible
- Avoid unnecessary add-ons on top (unless needed)
- Ensure all mounts are tight to prevent micro-movements
On highways, even small differences in height and shape become noticeable. A well-mounted tent should not create excessive noise or steering resistance. If it does, something in the setup isn’t optimized.
Fast Setup Without Creating Hassle
Quick deployment isn’t just about saving time—it’s about reducing friction at the end of a long drive.
Gas-strut tents are naturally faster, but even then:
- Park on level ground for smooth opening
- Open into the wind direction when possible
- Keep your ladder angle correct to support the structure
Soft shell setups take slightly longer, but they reward you with simplicity. The key is repetition—once you understand your tent’s motion, setup becomes automatic.
The goal is to reach a point where opening your tent feels effortless, not something you think twice about.
Storage and Organization Inside the Tent
Space inside a rooftop tent is limited, but how you use it changes everything.
Built-in organizers, shoe bags, and pockets aren’t just add-ons—they’re what keep your setup functional. Without them, small items quickly turn into clutter.
Practical habits that make a difference:
- Keep only essential gear inside overnight
- Use side pockets for frequently used items
- Store shoes and wet gear outside or in dedicated bags
A clean interior setup improves not just comfort, but also setup and pack-down speed the next day.
What Makes an Outback Setup Feel “Right”
The best rooftop tent setup on an Outback doesn’t feel oversized, complicated, or forced. It feels balanced—like it belongs there.
That comes down to three things:
- Weight that doesn’t push limits
- Placement that keeps the car stable
- Simplicity in daily use
Get those right, and everything else—comfort, convenience, confidence—follows naturally.
Durability & Safety Deep Dive for Subaru Outback Rooftop Tents
When a rooftop tent sits on a Subaru Outback, durability and safety aren’t just about how long it lasts—they directly affect how confident you feel every time you drive or camp. Unlike ground tents, this setup is exposed to constant movement, wind pressure, and changing temperatures. If the materials or construction are even slightly off, you’ll notice it faster than expected.
This is where real-world durability matters more than brand names or marketing claims.
Material Quality That Actually Holds Up Over Time
The first layer of durability starts with materials—but not all materials perform the same once you put them through real use.
Hard shell tents built with aircraft-grade aluminum hold their shape over time. They don’t warp under heat, and they resist long-term fatigue from repeated opening and closing. In comparison, ABS shells reduce weight, which helps on the Outback, but they can show wear sooner if constantly exposed to extreme conditions.
Fabric is where things get more noticeable.
- Poly-cotton blends feel better inside and handle condensation well, but they need proper drying to avoid long-term wear
- Oxford/polyester fabrics are stronger against rain and UV, but they trap more moisture if ventilation isn’t designed properly
Seams and stitching are often overlooked, but they’re the first failure point in most tents. Reinforced stitching and sealed seams make a difference not in the first trip—but after months of use when weather starts testing the build.
Zippers, hinges, and struts also define durability. Smooth hardware (like YKK zippers or quality gas struts) doesn’t just feel better—it prevents small failures that turn into bigger issues later.
Weather Handling in Real Conditions
Weather resistance isn’t about surviving one rainy night—it’s about consistency across different environments.
Rain protection depends on both fabric rating and structure. A 3000mm rating works for light to moderate rain, but 5000mm setups handle sustained downpours without seepage. More importantly, the tent design must channel water away instead of letting it sit on fabric or seams.
Wind resistance is where hard shell tents usually pull ahead. Their rigid structure holds shape under pressure, while soft shells rely more on proper tensioning. On an Outback, which already sits lower than larger rigs, wind impact becomes noticeable faster—so stability matters.
Cold weather reveals another layer of performance. Without proper insulation or condensation control, moisture builds up inside, making the tent feel colder than it should. That’s why features like condensation pads, thicker mattresses, and airflow vents aren’t optional—they directly affect comfort.
Structural Safety on the Roof
Durability isn’t just about the tent—it’s about how it interacts with the vehicle.
A rooftop tent must:
- Distribute weight evenly across crossbars
- Stay rigid under movement (no flex or shifting)
- Maintain secure mounting under vibration and road impact
On the Outback, this becomes even more critical because the vehicle isn’t designed for extreme roof loads. A poorly balanced or loosely mounted tent doesn’t just reduce comfort—it compromises safety during braking, cornering, or uneven terrain.
This is why proper mounting hardware and periodic checks matter just as much as the tent itself.
Maintenance Habits That Actually Extend Lifespan
Most rooftop tents don’t fail because of bad design—they fail because of neglect.
Simple habits make the biggest difference:
- Always dry the tent fully before closing, especially after rain
- Air it out regularly to prevent trapped moisture
- Clean dust and debris from zippers and seals
- Recheck mounting bolts after long drives or rough roads
Fabric longevity, zipper performance, and even frame durability depend on these small actions. Skip them, and even a high-end tent will start showing wear earlier than expected.
What Real Durability Feels Like
A durable rooftop tent isn’t something you think about—it’s something you stop worrying about.
You don’t hear unusual noise at speed.
You don’t second-guess it in bad weather.
You don’t hesitate to open it after a long drive.
That confidence comes from the combination of material quality, structural integrity, and consistent maintenance—not just specs on a product page.
On an Outback, where balance and limits matter more, that difference becomes even more noticeable over time.
Real-World Scenarios: How Rooftop Tents Actually Perform on a Subaru Outback
Specs tell you what a rooftop tent can do. Real use shows you what it actually feels like on a Subaru Outback—after long drives, quick stops, bad weather, and limited space. The difference between a good setup and a frustrating one usually comes down to how well it fits your type of trip.
Here’s how these tents behave when you’re actually out there—not just reading specs at home.
Solo Minimalist Trips
When you’re traveling solo, everything shifts toward simplicity. You don’t need maximum space—you need something that opens fast, feels stable, and doesn’t make daily driving worse.
This is where lightweight setups like Sanhima or OVS TMBK make the most sense. They sit lower, create less drag, and don’t change how the Outback handles. After a long drive, being able to stop, open the tent in seconds, and settle in without effort becomes the biggest advantage.
Heavier or feature-packed tents can still work, but they start to feel unnecessary in this scenario. You’re carrying more weight, using more fuel, and dealing with more setup than you actually need.
For solo use, the best setup is the one that disappears into your routine—no hesitation, no extra effort.
Two-Person or Small Family Trips
This is the most common use case—and also where most buyers make mistakes.
On paper, many tents say “3-person,” but in reality, comfort depends on width and layout. Tents like Naturnest or similar wider designs make a noticeable difference here. That extra space means better sleep, less movement disturbance, and a more relaxed setup overall.
At the same time, weight becomes more important. A wider, heavier tent needs proper crossbars and balanced mounting. If that part isn’t done right, you’ll feel it every time you drive.
For couples or small families, the ideal setup balances:
- Enough space to sleep comfortably
- Weight that doesn’t stress the vehicle
- Quick setup for repeated use
Get that balance right, and the tent becomes part of the trip—not something you manage around it.
Off-Road and Overlanding Scenarios
Once you move beyond highways and smooth roads, everything changes. Stability, structure, and durability start to matter more than weight alone.
Hard shell tents with strong frames—like WildFinder or heavier builds—handle wind, uneven ground, and repeated use better. They don’t flap, shift, or lose shape under pressure. That becomes important when you’re setting up in exposed areas or dealing with unpredictable conditions.
However, the Outback itself isn’t a heavy-duty overland rig. That means you still need to respect limits. Extremely heavy setups (like full-feature elevated systems) can work, but only if you’ve upgraded your rack system and are comfortable managing the added weight.
In these conditions, the best setups are the ones that feel solid without overloading the vehicle.
Daily Road Trips and Mixed Use
This is where most people actually use their rooftop tents—weekend getaways, short road trips, and occasional longer journeys.
In this scenario, balance matters more than anything:
- Too heavy → affects daily driving
- Too basic → lacks comfort over time
- Too complex → becomes a hassle to use regularly
Tents like Sanhima or ROVEROLL sit right in this middle ground. They offer quick setup, decent comfort, and manageable weight without turning your Outback into something it’s not.
You want a setup that feels just as normal driving to work as it does heading out for a trip. That’s the real test.
What “Best” Actually Means in Real Use
There isn’t a single “best rooftop tent” for the Outback—there’s only what fits your usage.
- Solo trips reward lightweight and simplicity
- Couples need space without pushing limits
- Overlanding demands structure and durability
- Daily use requires balance above everything else
The tents in this list perform well because they each fit one of these roles without forcing compromises that the Outback can’t handle.
And that’s the difference—choosing based on how you travel, not just what looks good on paper.
Quick-Start System: Setup, Daily Use & Pack-Down for Subaru Outback Rooftop Tents
Running a rooftop tent on a Subaru Outback should feel smooth, not like a process you have to think about every time. The difference between a setup you enjoy and one you avoid usually comes down to how quickly and safely you can deploy it, use it, and pack it back down—especially after long drives or in changing weather.
This isn’t about “how it works in perfect conditions.” This is how to handle it when you’re tired, it’s getting dark, or the weather isn’t ideal.
Step-by-Step Quick-Start Setup (1–2 Minute Real Sequence)
A proper setup starts before you even touch the tent. The ground matters more than most people realize.
Park on a surface that’s as level as possible. Even a slight tilt can affect how the tent opens and how you sleep. Once parked, check your surroundings—wind direction, overhead clearance, and space for the ladder.
Unlock the tent latches slowly and with control. On gas-strut systems, don’t force anything—just guide the initial lift and let the mechanism do the work. The tent should rise smoothly. If it doesn’t, something is either misaligned or under tension.
Extend the ladder fully and place it at a stable angle. This isn’t just for climbing—it acts as structural support for many tents. If the ladder isn’t positioned correctly, the entire setup can feel unstable.
Once open, adjust windows and ventilation immediately. This prevents condensation buildup later and makes the space comfortable from the start. Small steps like this make a big difference over a full night.
A proper setup doesn’t feel rushed—it feels controlled and predictable every time.
Safe Break-Down and Packing Without Damage
Packing down is where most long-term damage happens, not during use.
Start by clearing the interior completely. Even small items left inside can create pressure points when closing the shell. Fold bedding neatly so it sits within the tent’s natural closing space—forcing it shut is what damages seals and hinges over time.
Before closing, check for moisture. If the tent is even slightly damp, wipe down key areas or let it air out for a few minutes. Closing a wet tent repeatedly is the fastest way to shorten its lifespan.
When pulling the tent down, guide the fabric inward. Don’t let it bunch or get caught between edges. This is especially important for soft shell designs, where fabric management determines how cleanly it closes.
Lock all latches firmly, but don’t overtighten. The goal is secure closure, not pressure. A properly packed tent should sit flush without gaps or strain.
Done right, pack-down should feel just as smooth as setup—not something you struggle through at the end of the day.
Pre-Trip Checklist for a Safe Outback Setup
Before every trip, a quick check saves you from bigger problems later.
Start with the mounting system. Check that all bolts and clamps are tight and properly seated. Even slight loosening can become noticeable after highway driving or rough roads.
Look at your crossbars and ensure they’re rated for the tent you’re using. This isn’t something you check once and forget—load and stress build over time.
Test the ladder before leaving. Make sure it extends smoothly and locks securely. It’s a small detail, but it directly affects safety every time you climb in or out.
Check zippers, seals, and fabric for any early signs of wear. Catching small issues early prevents bigger failures during a trip.
Finally, think about weight distribution inside the vehicle. A roof tent already raises the center of gravity—keeping heavier gear lower in the car helps balance everything out.
What Makes the Whole System Work
A rooftop tent setup isn’t just about the tent—it’s about how everything works together.
When setup is quick, pack-down is clean, and your checks are consistent, the entire experience becomes effortless. You stop thinking about the process and start focusing on the trip itself.
That’s when you know your setup is right—not because it looks good, but because it works every single time without hesitation.
FAQs About Subaru Outback Rooftop Tents
Is a rooftop tent actually worth it on a Subaru Outback, or is it pushing the car too far?
It depends on how honest you are with your setup. A Subaru Outback can handle rooftop tents—but only within a certain range. Lightweight and mid-weight tents feel natural on it. Once you move into heavier builds, the car starts reminding you it wasn’t designed like a truck.
The real question isn’t “can it carry it?”—it’s “does it still feel like an Outback when driving?” If the answer is yes, you’ve chosen right. If you notice extra sway, braking hesitation, or wind drag, you’ve gone too far.
Can I run a rooftop tent on Subaru Outback factory crossbars without upgrading?
You can—but only if you stay in the safer weight zone. Factory crossbars are fine for lighter setups (around 100–130 lbs range). The moment you step into 150+ lbs territory, you’re technically within limits but practically on the edge.
That’s where most people get it wrong. The setup might “hold,” but it won’t feel stable long-term. If you’re planning regular trips, upgrading crossbars isn’t optional—it’s what makes the whole system feel secure instead of borderline.
Does a rooftop tent actually affect fuel economy and driving feel on an Outback?
Yes—and more than most buyers expect. The Outback is sensitive to roof load because of its height and design.
A slim, lightweight tent might reduce mileage slightly and add minimal noise. A bulky or heavy tent changes the entire driving experience—more drag, more wind noise, and a subtle shift in handling.
The difference isn’t dramatic at first, but over long drives, you feel it. That’s why low-profile designs matter more on this car than on larger SUVs.
Hard shell vs soft shell on an Outback—which one actually makes more sense long term?
Hard shell tents feel better day-to-day—faster setup, better aerodynamics, cleaner design. But they come with weight, and that’s where you need to be careful.
Soft shell tents are simpler and lighter, which fits the Outback’s nature better. They take a bit more time to set up, but they don’t stress the vehicle as much.
If you camp often and want convenience, go hard shell—but keep it lightweight. If you want flexibility and less stress on the car, soft shell is the safer long-term choice.
What’s the biggest mistake people make with rooftop tents on an Outback?
They chase features instead of balance.
People see more space, more features, bigger builds—and assume that’s better. But on an Outback, every extra pound and inch matters. Oversized setups look impressive but feel wrong once installed.
The best setups aren’t the biggest or most expensive—they’re the ones that feel natural on the car. When everything is balanced, you stop noticing the tent—and that’s exactly how it should be.
Final Take: What Actually Works on a Subaru Outback
At this point, it should be clear—there’s no single “perfect” rooftop tent for a Subaru Outback. There’s only what fits the way this car is built and the way you actually travel.
The Outback rewards balance. Go too heavy, and it starts feeling strained. Go too basic, and you miss out on comfort. The sweet spot sits right in the middle—light enough to drive confidently, solid enough to trust in real conditions, and simple enough that you’ll actually use it every time you stop.
That’s why the tents in this list aren’t just popular—they make sense on this vehicle.
- If you want the cleanest daily experience → go lightweight and low-profile
- If you need more space → stay controlled, don’t overshoot weight
- If you’re chasing features → make sure your setup can support it first
Because in real use, the best setup isn’t the one with the most specs—it’s the one that feels right on every drive and opens without hesitation at the end of the day.
And once you get that combination right, everything changes. You stop thinking about the tent, the setup, or the process. You just drive, stop, open, and rest.
That’s when a rooftop tent actually becomes part of the journey—not something you’re managing around it.
Also Check: