
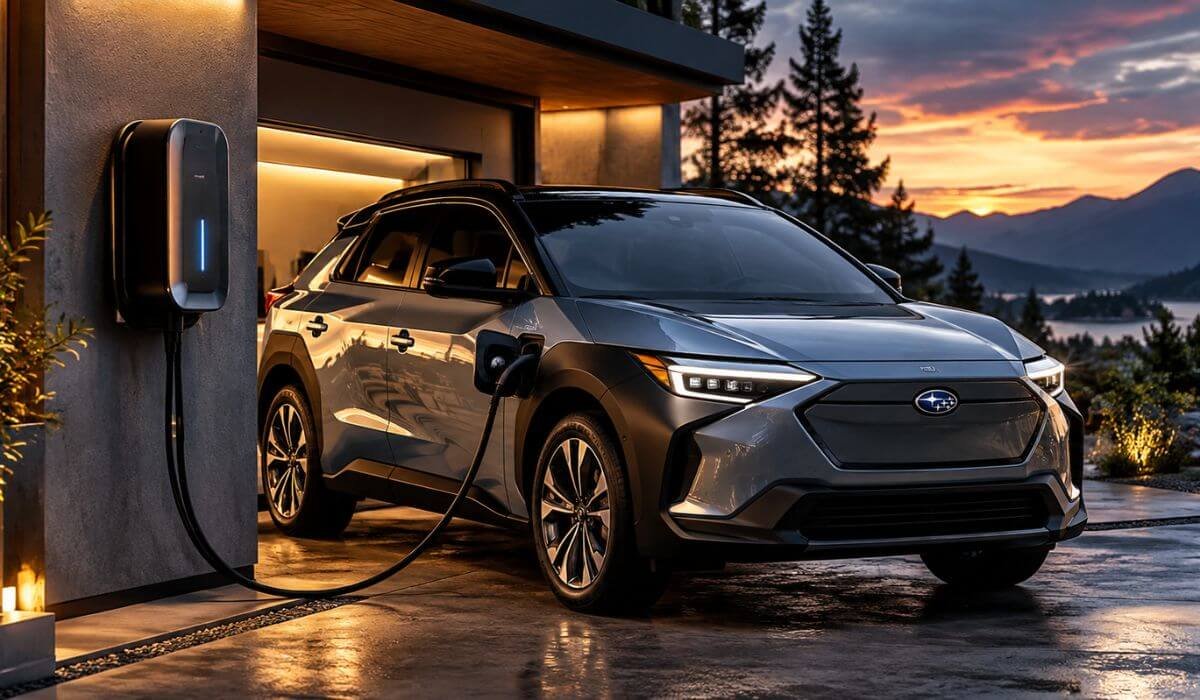
Best Level 2 Home Chargers for Subaru Solterra in 2026: Smart, Rugged & Flexible J1772 Picks
If you own a Subaru Solterra, choosing a home charger is not really about buying the unit with the biggest amp number on the front. It is about matching the charger to what your Solterra can actually accept, how your home is wired, and how you plan to use the car. That becomes especially important when comparing model years: the 2025 Solterra is rated for up to 6.6 kW on Level 2, while the redesigned 2026 model can accept up to 11 kW and switches to a NACS charging port.
That is why I did not build this list around charging output alone. I looked at connector compatibility, usable power, installation flexibility, cable reach, weather protection, smart controls and everyday ownership. The five chargers below use J1772 connections, making them relevant for compatible Solterra setups; owners of the 2026 NACS-equipped model will need the appropriate J1772-to-NACS solution. Subaru also supplies the 2026 Solterra with a portable dual-voltage charging kit and J1772 and CCS adapters.
The result is a deliberately mixed lineup. Some chargers are built for smart control and energy tracking, some focus on rugged simplicity, and others make more sense when installation flexibility or cable length matters. That is far more useful than simply calling every 40A or 48A charger “fast.”
Best Level 2 Charger for Subaru Solterra: Top 2026 Picks for 240V Charging & Flexible Installation
Each charger below uses the J1772 connection standard, with different choices for charging output, smart controls, cable length and installation; 2026 NACS Solterra owners should add a compatible J1772-to-NACS adapter.
#1. Emporia Level 2 EV Charger — 48A, 240V, J1772
Best Level 2 Charger for Subaru Solterra with Smart WiFi Control, Real-Time Energy Tracking, 48A Output and Flexible Home Installation
#2. icapia Sapphire Pro Level 2 EV Charger — 40A/48A, 240V, J1772
Best Subaru Solterra Home Charger for WiFi Scheduling, Adjustable 40A/48A Charging, RFID Access and a Long 25-Foot Cable
#3. Grizzl-E Level 2 EV Charger — 40A, 240V, J1772
Rugged 240V Level 2 Charger for Subaru Solterra with 40A Output, Weather-Ready Protection, NEMA 14-50 Plug and Simple Charging
#4. ChargePoint Home Flex Level 2 EV Charger — J1772, NEMA 6-50
Smart Level 2 Home Charger for Subaru Solterra with Adjustable Charging Current, WiFi Scheduling, Energy Tracking and Flexible 240V Installation
#5. WOLFBOX E48 Level 2 EV Charger — 48A, 240V, J1772
48A Subaru Solterra Level 2 Home Charger with Hardwired Installation, WiFi Monitoring, Adjustable Output, RFID Access and a 25-Foot Cable
Expert Tip: Buy for Your Solterra, Not for the Number on the Charger
One thing I would keep in mind before buying: a 48A charger does not automatically make an older Solterra charge faster than a 40A charger. Your vehicle’s onboard charger decides how much AC power it can actually use.
That is why I would not spend extra simply because a charger says 48A on the front. For a 2023–2025 Solterra, the practical choice is often the charger that gives you the right installation, cable length, reliability and controls for your garage. With the 2026 Solterra, the higher 11 kW Level 2 capability makes the extra electrical headroom more relevant.
And there is another small detail that is easy to miss: all five chargers in this list use J1772. If you have the 2026 Solterra with its NACS port, make sure you have the correct adapter before ordering. Getting the connector right is more important than chasing another few amps.
How We Choose the Best Level 2 Home Chargers for Subaru Solterra
We did not choose these chargers simply by looking at their advertised amperage. That would make this kind of list almost meaningless.
The Solterra has changed, the chargers are not identical, and the best setup for one owner can be completely wrong for another. So we looked at the things that actually affect daily home charging.
We Started With Solterra Compatibility
First, the charger has to make practical sense with the Solterra’s charging system.
All five selections use J1772, which makes them relevant to earlier Solterra models without requiring a connector change. For the 2026 Solterra, we account for the move to NACS and the need for the appropriate adapter rather than quietly treating every model year as identical.
That distinction matters because a charger can be perfectly good and still be the wrong purchase if the owner has not considered the vehicle’s connector.
We Looked Beyond 40A and 48A
Amperage is useful, but it is not the whole story.
The Emporia and Sapphire Pro give you higher-current capability and flexible installation options, which can make sense if you want smart controls or are planning for another EV later.
The Grizzl-E takes the opposite route. Its 40A output, adjustable current settings and simple plug-and-charge design make it appealing for someone who would rather have a charger doing its job than another app to manage. Its current can be adjusted between 16A, 24A, 32A and 40A to suit the electrical setup.
That is exactly the kind of difference we wanted this list to preserve instead of pretending there is one perfect specification for everyone.
Cable Length Was Not Treated as a Minor Detail
A charger can have excellent electronics and still become annoying if the cable barely reaches the Solterra’s charge port.
That is why 25-foot cables on the Emporia and Sapphire Pro, along with the 24-foot Grizzl-E cable, matter in this comparison. They give you more freedom when the vehicle is not parked perfectly close to the wall.
For a real garage, driveway or two-car parking space, that can be more useful than a headline specification that you may never notice after installation.
We Considered How You Actually Want to Live With the Charger
This is where the five products separate themselves.
If you want energy monitoring, charging schedules and app control, Emporia makes sense.
If you want smart control plus RFID access and flexible installation, Sapphire Pro brings a different set of benefits.
If you want simple, rugged charging without WiFi, Grizzl-E is deliberately included for that reason.
If you prefer a familiar connected charging ecosystem, ChargePoint Home Flex brings adjustable charging control and its established app experience.
And if your priority is a permanent hardwired 48A setup, WOLFBOX E48 gives the list another installation path.
We did not make those differences disappear just to create a cleaner ranking. They are the reason these five chargers are here.
Weather Protection Matters More Than Most Buying Guides Admit
A Level 2 charger may spend years mounted in a garage, beside a garage door or outside near a driveway. So we paid attention to weather resistance and enclosure design, not just charging speed.
The Grizzl-E, for example, carries NEMA 4/IP67 weather protection and a heavy-duty enclosure, which is a meaningful advantage for owners who need an outdoor-capable setup.
That is also why we avoided treating “indoor/outdoor” as a throwaway feature. Where you mount the charger changes what matters.
We Also Looked at the Things You Notice After the Purchase
The little details become the big ones after a few months.
Cable reach. Amperage adjustment. Installation type. Weather protection. App dependence. Warranty coverage.
Those are the things you interact with repeatedly—not the marketing sentence you read once before clicking Buy.
For example, Grizzl-E’s five-year warranty, detachable wall-mounted design and no-app operation give it a very different ownership proposition from a connected smart charger.
The Final Selection Was About Fit, Not Hype
Ultimately, we wanted this list to answer a more useful question than “Which charger has the biggest number?”
Which charger makes the most sense for the way you use your Subaru Solterra?
That is why the list includes both smart and simple chargers, plug-in and hardwired options, and different cable and control approaches.
If your priority is smart energy management, one choice may stand out. If you care more about rugged construction and no WiFi dependency, another may make more sense. And if you are preparing for a newer 2026 Solterra or another EV down the road, higher-current hardware and installation flexibility become more relevant.
There is no benefit in paying for a feature your Solterra cannot use. The right charger is the one that matches your car, your electrical setup and the way you actually charge at home. That is the standard we used for every product in this list.
#1. Emporia Level 2 EV Charger — 48A, 240V, J1772
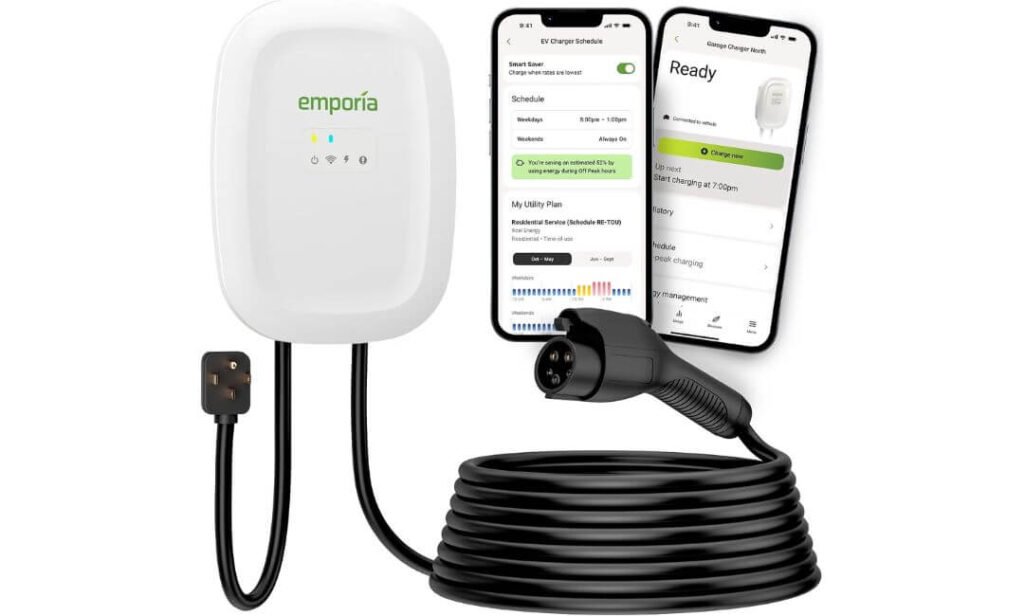
Quick Specs:
- Connector: SAE J1772
- Output: Up to 48A / 11.5 kW hardwired; up to 40A / 9.6 kW with NEMA 14-50
- Installation: NEMA 14-50 plug-in or hardwired
- Cable: 25 feet
- Smart features: 2.4 GHz WiFi, charging schedules, energy monitoring
- Safety: UL listed and ENERGY STAR certified
- Enclosure: NEMA Type 4 weather-resistant
- Warranty: 3 years
- Solterra fit: Direct J1772 connection for compatible earlier models; 2026 Solterra requires the appropriate J1772-to-NACS adapter
The first thing I like about this charger is that it doesn’t force you into one installation style. If your garage already has a suitable NEMA 14-50 setup, you can use the plug-in configuration at up to 40A. If you’re building a more permanent charging setup, hardwiring unlocks the 48A setting. That’s a genuinely useful difference—not just another specification added to the product page.
For a Solterra owner, the 25-foot cable is also more important than it sounds. You don’t always park in exactly the same position, and a short cable can turn an otherwise good charger into an everyday annoyance. Here, there’s enough reach to give you some breathing room around the garage or driveway. The wall mount and cable holster also keep the setup from becoming a pile of cable beside the car.
Then there is the part you will appreciate after the novelty wears off: WiFi is useful here for a reason. The app can show charging and energy information, while scheduled charging lets you move sessions to cheaper utility periods where time-of-use rates apply. You can also adjust the charging current through the app. And if your WiFi happens to disappear, the charger doesn’t suddenly become useless—you can still charge the car normally. That combination of connected features with ordinary plug-and-charge operation is one of the reasons this model fits the Solterra so naturally.
(A smart charger is most useful when its intelligence saves you time or electricity—not when it simply gives you another app to open.)
What We Like About It
- Two installation paths: Start with NEMA 14-50 or hardwire it later if your electrical setup allows.
- 25-foot reach: Particularly handy when the Solterra is not parked directly beside the wall.
- Useful WiFi controls: Energy information and charging schedules are practical rather than purely decorative.
- Strong certification package: UL listing and ENERGY STAR certification add meaningful reassurance for a permanent home installation.
- Room to grow: The higher-current hardwired configuration can make more sense if this charger eventually serves another EV with a higher AC charging capability.
One Thing to Know Before Buying
The 48A capability is not a promise that every Solterra will charge at 48A. Your vehicle’s onboard AC charging limit still determines what it can actually take. Think of the higher rating as installation and future-EV flexibility rather than a guaranteed speed increase for an older Solterra.
Why We Put It First for Subaru Solterra Level 2 Home Charging
What pushed this one toward the top of our list was its balance. It is not dependent on one standout gimmick. You get smart controls, a long cable, flexible installation, solid certification and a simple J1772 connection in one package.
For an owner who wants one charger that can comfortably live in the garage for years, that balance matters. A 2023–2025 Solterra owner can use the charging capability the vehicle supports, while someone with a newer Solterra can use the appropriate adapter and have a charger that leaves more electrical headroom available.
The Insider Pro-Tip
If you’re choosing between the plug-in and hardwired setup, don’t make the decision based only on the 48A headline. Look at your actual electrical panel, the outlet you already have and how you expect to use the charger. If a proper NEMA 14-50 circuit is already there, the plug-in configuration can be the wonderfully boring option—plug it in, mount it, and get on with your life.
If you’re starting from scratch, however, this is where I’d have the electrician look at the complete installation rather than just the charger. A well-planned circuit, correct breaker sizing and a sensible cable route matter far more to your daily charging experience than squeezing a few extra amps out of the hardware.
And for the 2026 Solterra, remember the connector change: this is still a J1772 charger, so the correct J1772-to-NACS adapter is part of the equation. Once that is sorted, the combination of long reach, smart scheduling and flexible installation makes considerably more sense than simply shopping by the biggest amp number on the box.
#2. icapia Sapphire Pro Level 2 EV Charger — 40A/48A, J1772
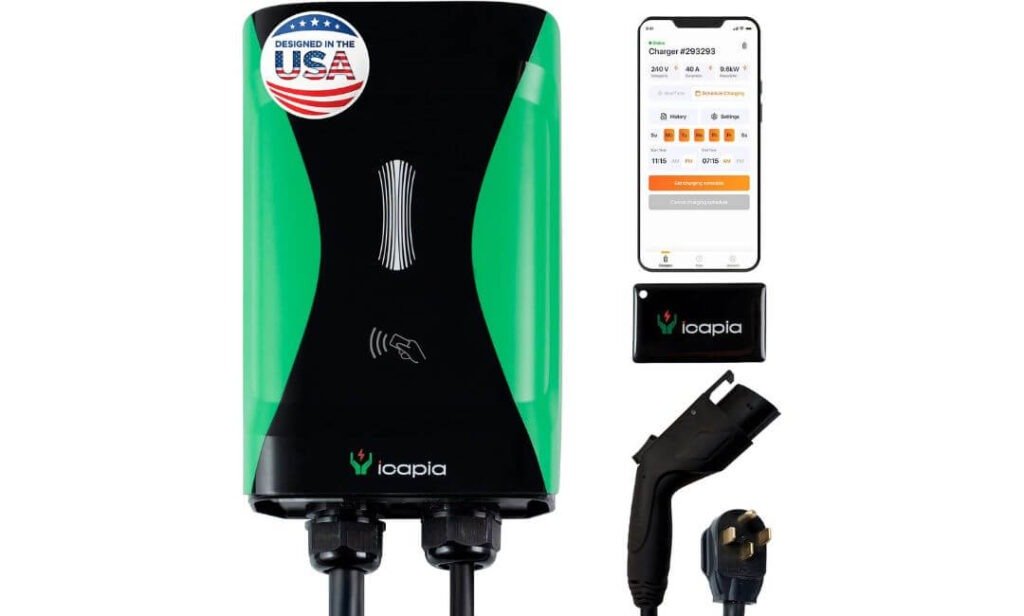
Quick Specs:
- Connector: J1772
- Output: Up to 40A / 9.6 kW plug-in or 48A / 11.5 kW hardwired
- Installation: NEMA 14-50 plug-in or hardwired
- Cable: 25 feet
- Smart features: WiFi app, scheduling, energy tracking, adjustable 6A–48A current
- Connectivity: OCPP 1.6 and OTA firmware updates
- Access: RFID cards with offline charging
- Protection: NEMA 4 weatherproof enclosure, 8-layer safety protection
- Certifications: ETL, ENERGY STAR and FCC
- Warranty: 3 years
- Solterra fit: J1772 connection for earlier models; 2026 Solterra requires the appropriate J1772-to-NACS adapter
What caught my attention here is the way the Sapphire Pro combines flexibility without making the everyday setup complicated. You can run it from a NEMA 14-50 outlet at up to 40A, or have it hardwired for up to 48A. For a Solterra owner, that gives you room to choose the installation that actually fits your home instead of changing your electrical setup around the charger.
The 25-foot cable is another detail that sounds ordinary until you have a charger mounted in the wrong place. With a long driveway, a two-car garage or a charging port that doesn’t line up neatly with the wall, that extra reach can save you from parking perfectly every night. The NEMA 4 enclosure also means this isn’t limited to a carefully protected indoor location; the unit is designed for weather exposure across a wide temperature range.
Then there is the smart side, and this is where it separates itself from a basic plug-and-charge unit. The ICAPIA app lets you schedule charging, monitor energy use and adjust current from 6A to 48A. OCPP 1.6 and OTA updates add some useful long-term flexibility, while the included RFID cards give you another way to start charging without depending entirely on the app or WiFi. That last part is genuinely useful: smart features are nice, but having a simple fallback when the network isn’t cooperating is even better.
(The best smart charger is not the one with the longest feature list; it is the one that still feels simple when you just want to plug in and leave.)
What We Like About It
- Flexible installation: Use the 40A NEMA 14-50 setup or choose 48A hardwiring for a permanent installation.
- 25-foot cable: Gives the Solterra considerably more parking flexibility than a short lead.
- Useful smart controls: Scheduling, energy tracking and adjustable current all have practical reasons to exist.
- RFID backup: You can still start charging without making the app the center of your routine.
- Strong weather protection: NEMA 4 construction makes it a practical option for garages and suitable outdoor installations.
One Thing to Keep in Mind
The plug-in version should be operated at its 40A setting on the appropriate 50A circuit. If you want the full 48A capability, the hardwired configuration and a properly designed electrical installation are the route to take.
Why It Earns a Place Among Our Subaru Solterra Level 2 Home Charger Picks
This one earns its place because it covers a lot of real-world situations without relying on one headline feature. You get smart charging, long cable reach, flexible installation, RFID access and substantial weather protection in the same unit.
It is especially appealing if you want your home charging setup to feel a little more sophisticated than a basic wall box. You can schedule charging around your electricity rates, see what you’re using and still have a straightforward way to charge when WiFi is unavailable. That is a useful combination for a daily-driver Solterra.
The Insider Pro-Tip
Before ordering, decide whether you genuinely need 48A hardwired charging or whether the 40A NEMA 14-50 configuration already fits the way you use your Solterra. For an earlier Solterra, buying the higher-current configuration purely for faster charging does not automatically translate into faster vehicle charging—the car’s onboard AC limit remains the deciding factor.
The bigger advantage of the hardwired version is the installation flexibility and future headroom. If you’re having an electrician work on the garage anyway, it can make sense to plan the circuit properly from the beginning. If your NEMA 14-50 outlet is already in the right place, however, the plug-in version gives you a much simpler path to getting home charging running.
And if you have the 2026 Solterra, remember that this is a J1772 charger. The correct J1772-to-NACS adapter is therefore part of the setup. Once that small detail is handled, the combination of 25-foot reach, smart scheduling and offline RFID charging makes this a particularly versatile home-charging option.
#3. Grizzl-E Level 2 EV Charger — 40A, 240V, J1772
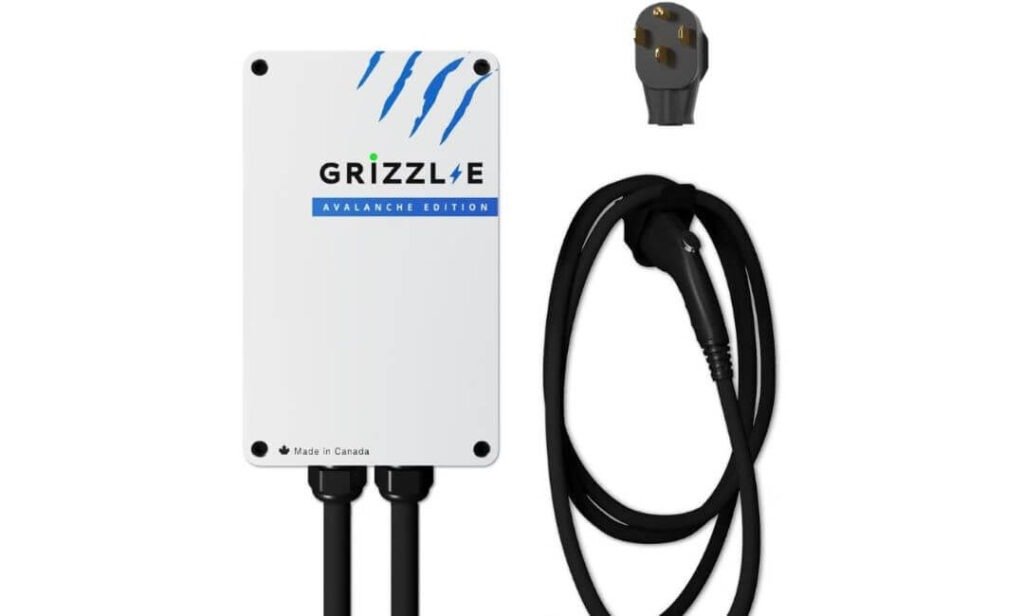
Quick Specs:
- Connector: J1772
- Output: Up to 40A / 10 kW
- Installation: NEMA 14-50 plug-in
- Cable: 24 feet
- Current settings: 16A, 24A, 32A or 40A
- 40A charging rate: About 28–30 miles of range per hour
- Protection: Built-in GFCI, overcurrent, overvoltage, ground-fault and over-temperature protection
- Weather protection: IP67 / NEMA 4 enclosure
- Operation: Plug-and-charge with no WiFi or app required
- Warranty: 5 years
- Construction: Heavy-duty aluminum enclosure, made in Canada
- Solterra fit: J1772 charging setup; 2026 Solterra requires the appropriate J1772-to-NACS adapter
Some home chargers try to turn charging into another smart-home project. This one takes the opposite approach. You plug it into the appropriate NEMA 14-50 outlet, connect the J1772 plug to your Solterra, and that’s basically the experience. There is no WiFi account to create, no phone app to configure and no cloud service standing between you and the electricity.
That simplicity is not the same as being basic. You still get 40A maximum output with four selectable current levels—16A, 24A, 32A and 40A. That gives you a practical way to match the charger to the circuit available at your home. At 40A, the stated charging rate is around 28–30 miles of range per hour, while dropping to 32A, 24A or 16A lets you work with smaller dedicated circuits when the electrical setup calls for it.
Then there is the part I would pay particular attention to if your charger will live outside. The IP67 weather protection, NEMA 4 enclosure, built-in GFCI and multiple electrical protections give this unit a very different character from a lightweight indoor wall box. The 24-foot cable is long enough for awkward parking positions, and the detachable wall mount means you can take the charger with you rather than treating it as permanently fixed property.
(There is something refreshing about a charger that does not need your attention once you have set it up correctly.)
What We Like About It
- No app dependency: Plug in and charge without WiFi, Bluetooth or cloud connectivity.
- Four current settings: 16A–40A gives you useful control over different electrical setups.
- 24-foot cable: Enough reach for many garage and driveway layouts without constantly repositioning the car.
- Serious weather protection: IP67/NEMA 4 construction makes outdoor placement much more practical.
- Five-year warranty: Longer coverage gives this simple charger a reassuring ownership advantage.
One Thing to Keep in Mind
The NEMA 14-50 outlet needs to be on the appropriate dedicated circuit for the selected amperage. If you already have the correct outlet and circuit, installation is straightforward; if you need a new circuit or outlet, an electrician should handle that part.
Why It Makes Sense as a Subaru Solterra Level 2 Home Charger
The reason we included this one is simple: not every Solterra owner wants smart features. Some people want to park at night, plug the car in and know that the charger will still be there doing the same job tomorrow morning.
The combination of 40A output, adjustable current, long cable, heavy-duty construction and weather protection makes it particularly easy to understand. You are not paying for a collection of features you may never use; you are getting a charger built around straightforward daily charging.
The Insider Pro-Tip
If your garage already has a properly installed NEMA 14-50 circuit, this is one of those situations where keeping things simple can actually be the smarter ownership choice. Set the amperage correctly for the circuit, mount the unit where the 24-foot cable can reach comfortably, and there is very little else to think about.
One detail I would not overlook is the adjustable amperage. If your electrical situation changes later, you are not necessarily stuck with the original setting. The charger can be configured from 16A through 40A, giving you some breathing room without replacing the hardware. The trade-off is that the setting is handled through the unit’s internal DIP switches rather than an app, so it is something you configure deliberately rather than change every night.
For the 2026 Solterra, the same connector rule applies as with the other J1772 selections here: the appropriate J1772-to-NACS adapter is needed. Once that is accounted for, the real appeal of this charger is not a flashy feature list—it is the quiet, predictable ownership experience.
#4. ChargePoint Home Flex Level 2 EV Charger — J1772, NEMA 6-50
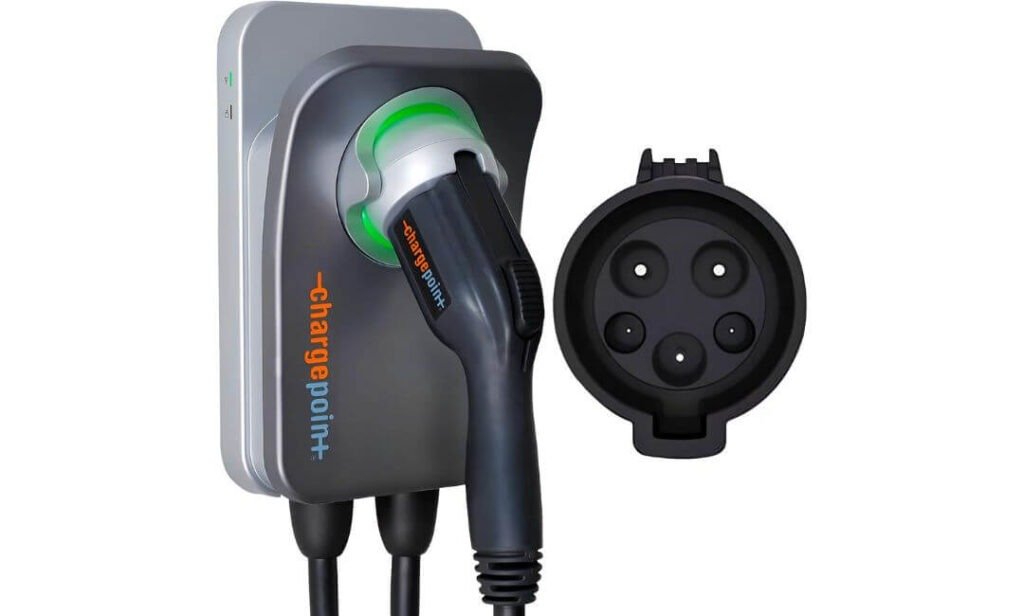
Quick Specs:
- Connector: J1772
- Output: Up to 50A / 12 kW
- Installation: NEMA 6-50 plug-in; hardwired version also available
- Cable: 23 feet
- Current adjustment: 16A–50A through the ChargePoint app
- Smart features: WiFi app, scheduling, utility-rate integration, energy and cost tracking
- Network: ChargePoint charging network and roaming access
- Weather protection: Indoor/outdoor capable, cold-resistant cable
- Safety: UL and ENERGY STAR certified
- Warranty: 3 years
- Solterra fit: J1772 for compatible earlier models; newer NACS Solterra models require the appropriate adapter
ChargePoint’s biggest advantage here is not simply the 50A rating. It is the ecosystem around the charger. Once installed, the same ChargePoint app can handle charging controls, schedules, energy information and reminders, while also helping you find public charging stations when you’re away from home. For someone who uses the Solterra as an everyday car, having the home and road-trip side connected in one place can be genuinely convenient.
The NEMA 6-50 plug also gives this particular version a straightforward installation path if you already have the right 240V outlet. The charger can deliver up to 50A, with the app allowing current adjustment from 16A to 50A in one-amp increments. That is useful when your home’s electrical capacity or charging needs change—you can lower the setting without replacing the charger.
Another detail worth appreciating is the 23-foot cable. It is long enough for many garage layouts where the wall and charging port are not perfectly aligned, and the cold-resistant construction makes it more practical in colder climates. You also don’t lose basic charging functionality just because the WiFi is unavailable; the source information confirms that plug-and-charge operation remains available without an internet connection.
(The appeal here is convenience that follows you beyond the garage—the same ecosystem can be useful when your Solterra is away from home.)
What We Like About It
- Established charging ecosystem: Home charging and public-station access are tied into the same ChargePoint experience.
- Adjustable 16A–50A output: Gives you useful control over the available electrical capacity.
- 23-foot cable: Plenty of reach for many garages and driveway layouts.
- Useful scheduling: Utility-rate integration makes scheduled overnight or off-peak charging practical.
- Plug-and-charge fallback: Basic charging does not depend entirely on having WiFi.
One Thing to Keep in Mind
The NEMA 6-50 version needs a suitable 240V circuit, so check the outlet and circuit before ordering. If you are starting without the correct electrical setup, the cost and work involved can be more than simply mounting the charger.
Why It Earns a Place Among Our Subaru Solterra Level 2 Home Charger Picks
This one makes sense for owners who want home charging plus a mature public-charging ecosystem. The adjustable current, app scheduling, long cable and utility-rate features give it enough flexibility for daily home use, while the wider ChargePoint network becomes useful whenever a road trip takes the Solterra away from the garage.
There is also something reassuring about having the basics covered without needing to overthink them. Plug in at home, schedule charging if you want to, adjust the current when necessary, and use the same ecosystem when you need a public charger later.
The Insider Pro-Tip
Before buying this version, look at the electrical setup first, not the charger first. If you already have a properly installed NEMA 6-50 circuit, the plug-in configuration can be a very clean solution. If you are having new electrical work done, tell the electrician exactly which charging configuration you intend to use so the circuit is designed correctly from the start.
And don’t choose this simply because it says 50A. The Solterra can only draw what its onboard charging hardware permits, so the extra capacity is better viewed as electrical headroom and flexibility rather than a guarantee of 50A charging into the battery.
For newer Solterra models with NACS, remember the connector difference before ordering. This unit uses J1772, so the correct adapter is required. Once that is accounted for, the combination of app control, adjustable current, 23-foot reach and ChargePoint’s broader charging network is what gives this charger its real-world appeal.
#5. WOLFBOX E48 Level 2 EV Charger — 48A, 240V, Hardwired J1772
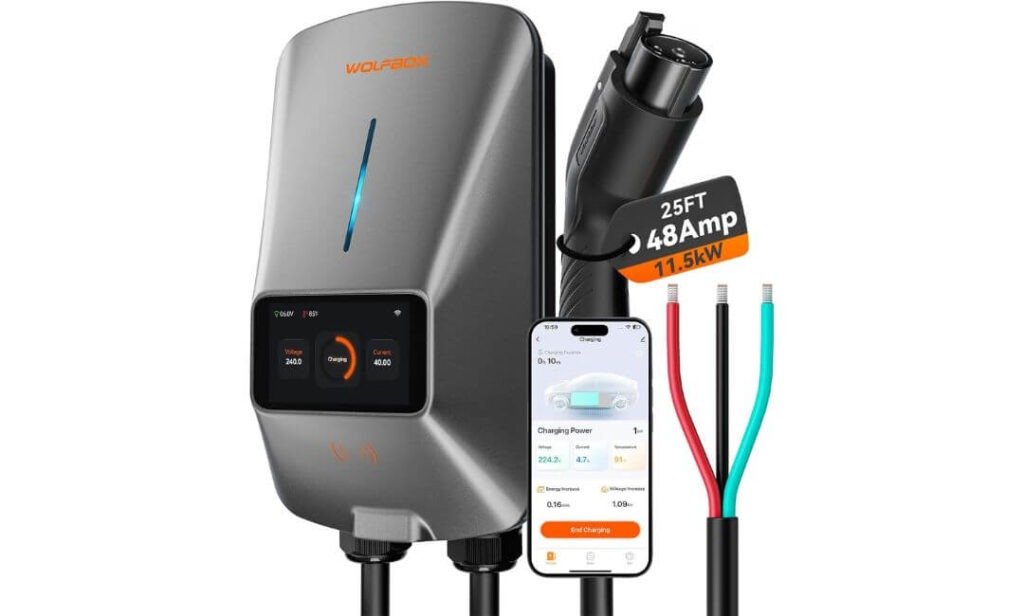
Quick Specs:
- Connector: SAE J1772
- Output: Up to 48A / 11.5 kW
- Installation: Hardwired
- Recommended circuit: 60A or greater
- Cable: 25 feet
- Smart features: WiFi app, scheduling, real-time charging data
- Controls: Alexa and Google Assistant, RFID access
- Display: 4.3-inch LCD
- Weather protection: NEMA 4X
- Safety: CSA certified, UL 2594 standard
- Solterra fit: J1772 connection; newer NACS Solterra models require the appropriate J1772-to-NACS adapter
If your priority is a permanent home charging setup with plenty of cable reach, the WOLFBOX E48 takes a slightly different approach from the simpler plug-in chargers on this list. It is designed around a hardwired 48A installation, giving it the electrical capacity to deliver up to 11.5 kW while keeping the charger permanently mounted and ready to use.
The 25-foot cable is one of the most useful details in everyday ownership. It gives you more freedom when the charging port does not line up neatly with the wall-mounted unit, particularly in a larger garage or when you occasionally need to park at a different angle. The NEMA 4X enclosure also makes the unit suitable for indoor or outdoor installation when installed correctly.
Then there is the interface. The 4.3-inch LCD gives you charging information directly on the unit instead of making you open an app every time you want to check what’s happening. WiFi adds scheduling, current adjustment and charging-data monitoring, while Alexa and Google Assistant support gives households another way to control it.
What We Like About It
- 25-foot cable: Excellent reach for larger garages and less convenient parking positions.
- 48A hardwired output: Gives the installation plenty of available charging capacity.
- 4.3-inch LCD: Important charging information is visible directly on the charger.
- Smart control options: App scheduling, current adjustment and voice-control support add useful flexibility.
- NEMA 4X enclosure: Makes it a practical option for a properly installed outdoor charging location.
One Thing to Keep in Mind
The hardwired configuration means this is a professional-installation charger, rather than something you simply plug into an existing outlet. WOLFBOX recommends a 60A-or-greater circuit for the 48A model, so it is worth having an electrician confirm your panel and wiring capacity before installation.
Why It Makes Sense as a Subaru Solterra Level 2 Home Charger
The E48 is particularly appealing if you are setting up a dedicated charging point and want more than a basic wall-mounted box. The long cable, built-in display, WiFi scheduling and adjustable current give you useful control without making the everyday charging process complicated.
It is also a good example of why a higher-rated charger should be viewed as available capacity rather than guaranteed charging speed. The Solterra’s onboard AC charging hardware ultimately determines how much power reaches the battery, so the 48A capability is more about giving the installation headroom than forcing the vehicle to accept 48A.
The Insider Pro-Tip
For a hardwired charger like this, spend a little more time on where the unit will actually be mounted than you might with a plug-in model. The 25-foot cable gives you considerable flexibility, so position the charger where the cable can reach the Solterra comfortably without sitting across a walking path or being stretched tightly around the vehicle.
Also, take advantage of the adjustable current rather than automatically running the maximum setting. If your household electrical demand changes, being able to reduce the charging current through the app can give you useful flexibility without changing the charger itself. The E48 supports current adjustment through its smart controls, alongside scheduling and real-time charging information.
For newer Solterra models using NACS, remember that this charger has a J1772 connector, so you’ll need the appropriate J1772-to-NACS adapter. For owners who want a hardwired, weather-protected charger with a very long cable, built-in display and smart controls, that’s where the E48’s feature set becomes particularly useful.
Subaru Solterra Charging Landscape: What Actually Matters
Choosing a home charger for the Subaru Solterra becomes much easier once you separate the charger’s capability from the vehicle’s actual charging limit. A 48A or 50A EVSE may look dramatically faster on paper than a 32A unit, but the Solterra’s onboard AC charging system ultimately controls how much power the battery can accept.
That distinction matters across model years. The 2024 Solterra, for example, is rated for 6.6 kW maximum Level 2 charging, with Subaru quoting about 9.5 hours using a 240V/32A connection. The redesigned 2026 Solterra raises its Level 2 capability to 11 kW and adopts NACS, while Subaru says the vehicle can use a 240V Level 2 charger at home for overnight charging.
So, when comparing the five chargers in this guide, the useful question is not simply, “Which one has the highest amperage?” It is which charger gives your particular Solterra the right combination of charging capacity, installation flexibility, cable reach, protection, controls and long-term convenience.
The four things I would prioritise
1. Charging speed that matches the Solterra
A Level 2 charger operates from a 240V circuit and is substantially more useful for regular home charging than a standard 120V Level 1 outlet. Subaru itself recommends considering a 240V Level 2 installation for owners who want faster home charging.
For the earlier Solterra generation, buying a 48A charger does not turn the vehicle into a 48A-charging EV. The vehicle remains the limiting factor. With the newer Solterra, however, the increased 11 kW Level 2 capability makes a higher-capacity home EVSE more meaningful because there is less unused charging capacity.
That is why I would look at charger amperage in context:
- 32A: Plenty for the earlier Solterra’s 6.6 kW Level 2 capability when the electrical installation is appropriately configured.
- 40A: A useful middle ground, particularly for owners who want additional electrical headroom.
- 48A–50A: More capacity for the installation and a better fit for the newer Solterra’s higher AC charging capability, provided the home’s electrical system supports it.
- Actual charging speed: Always depends on the vehicle, electrical circuit, charger configuration and conditions.
This is also why the Grizzl-E’s 40A output can make perfect sense beside an 48A or 50A model. More amperage is not automatically more useful for every Solterra owner.
Reliability matters more than a big number on the box
Home charging is different from occasional public charging. Your charger may sit outside in winter, operate for hours overnight and be used almost every day. That makes build quality, weather protection, electrical protection and installation quality just as important as the headline amperage.
For this guide, the chargers cover very different ownership styles. Emporia and icapia put more emphasis on connected controls and energy management. Grizzl-E takes a simpler, rugged approach without requiring an app. ChargePoint combines smart home charging with its wider charging ecosystem, while WOLFBOX adds a long cable, display and smart controls around a permanent hardwired installation.
That difference is intentional. A good charger is not necessarily the one with the longest specification sheet. It is the one whose features you will actually use.
Weather resilience is a real consideration for a Solterra
The Solterra is an all-weather SUV, so the charging setup should be planned with the same practical mindset. If the charger will be mounted outside, look beyond the word “weatherproof” and check the enclosure rating, cable construction, installation location and manufacturer’s instructions.
Among the chargers covered here, several use substantial weather protection:
- Emporia uses a NEMA Type 4 enclosure.
- icapia Sapphire Pro uses NEMA 4 protection.
- Grizzl-E uses IP67/NEMA 4-level protection and is designed for indoor or outdoor use.
- WOLFBOX E48 uses a NEMA 4X enclosure.
- ChargePoint’s supplied configuration is designed for indoor/outdoor use, with a weather-resistant design.
The rating is useful, but it does not mean an installation can ignore common sense. Keep the connection point positioned so water cannot collect around the receptacle or plug, route the cable where vehicles cannot run over it, and follow the installation instructions rather than treating the enclosure rating as permission to place the equipment anywhere.
Compatibility Snapshot: 240V Chargers, J1772 and NACS
The connector is the first thing to check
The five chargers in this article use SAE J1772 connectors. That makes them a straightforward match for Solterra versions equipped with a J1772 AC charging inlet.
The important change comes with the redesigned 2026 Solterra. Subaru states that the 2026 model uses NACS compatibility and that its Level 2 charging capability increases to 11 kW. Subaru also says the 2026 Solterra comes with adapters as part of its portable charging setup, allowing greater flexibility between connector standards.
That means a buyer should not simply see “J1772” and assume every Solterra requires exactly the same setup.
For a newer NACS-equipped Solterra, the relevant question is whether you have the appropriate J1772-to-NACS adapter for using one of these J1772 home chargers. Check the adapter supplied with your vehicle and Subaru’s current instructions rather than purchasing a random third-party adapter simply because the connector physically fits.
Why 240V matters for home charging
A 240V Level 2 installation is the natural step up from Level 1 for an owner who wants dependable overnight charging. Subaru describes Level 2 charging as operating at 240V and recommends consulting a qualified electrician when preparing a home for this type of installation.
The five chargers therefore differ more in how they use that 240V supply than in the basic idea of charging the Solterra:
| Charger type | What matters in practice |
|---|---|
| 40A plug-in | Good balance between charging capacity and simpler installation |
| 40A/48A flexible | Useful if you want to choose between plug-in and hardwired installation |
| 40A rugged plug-in | Attractive when durability and simple operation matter most |
| 50A NEMA 6-50 | Convenient if the correct 240V outlet and circuit already exist |
| 48A hardwired | Better suited to a permanent, dedicated charging installation |
The electrical installation has to match the EVSE. A charger should never be treated like an ordinary appliance that can simply be connected to whatever outlet happens to be nearby.
Don’t confuse EVSE output with battery charging speed
This is one of the most important points in the entire buying guide.
A charger advertised as 48A or 50A does not mean the Solterra will necessarily pull that amount continuously. The EVSE makes power available; the vehicle’s onboard charging system determines how much AC power it actually accepts.
For example, Subaru lists the 2024 Solterra’s maximum Level 2 charging speed at 6.6 kW. The 2026 model raises that to 11 kW.
So if you already own an earlier Solterra, spending considerably more purely to chase a 48A or 50A number may not produce a proportional reduction in charging time. A higher-rated charger can still make sense for installation flexibility, future EV use or electrical headroom, but that is a different benefit from making the current Solterra charge faster.
Safety and Code Basics: What Matters Before Installation
This is where professional installation becomes more than a recommendation.
EV charging can continue for several hours, often overnight, so the electrical circuit needs to be designed for the continuous load created by the EVSE. U.S. electrical guidance based on NEC Article 625 treats EV charging loads as continuous loads and requires EVSE to have sufficient rating for the load served.
In practical terms, that means you should not choose the breaker, wire size or receptacle based only on the charger’s product-page headline. The complete installation needs to be matched to the charger’s configuration and local electrical requirements.
Plug-in and hardwired chargers are not interchangeable installations
A plug-in charger such as the NEMA 14-50 or NEMA 6-50 versions still needs the correct dedicated circuit and receptacle. Having an unused 240V outlet does not automatically mean it is suitable for the EVSE’s maximum current.
Hardwired chargers take a different route, with the EVSE permanently connected to the home’s electrical system. That can create a cleaner installation and, depending on the charger, allow higher available output, but it also makes correct electrical design even more important.
For either configuration, I would have an electrician verify:
- Available capacity in the home’s electrical panel
- Correct breaker rating
- Appropriate conductor size and wiring method
- Proper grounding
- Correct receptacle rating for plug-in installations
- EVSE installation requirements
- Local permit and inspection requirements
- Indoor or outdoor mounting requirements
- Cable routing and protection
Subaru’s own charging guidance recommends consulting a qualified electrician when preparing a home for Level 2 charging.
IP and NEMA ratings tell you something useful, but not everything
When you see IP67, NEMA 4, NEMA 4X or NEMA 3R, these are not interchangeable marketing terms.
They describe different aspects of enclosure protection, so compare the manufacturer’s stated rating rather than assuming a larger-looking number automatically means a better charger for your particular location.
For an outdoor Solterra setup, I would pay attention to three things together:
The charger enclosure: Is it appropriately rated for the intended environment?
The cable and connector: Are they designed for the temperature and conditions where you will actually use them?
The electrical connection: Is the receptacle or hardwired connection properly installed and protected?
A highly rated enclosure cannot compensate for a poorly installed receptacle or an exposed connection.
UL, CSA and other certifications deserve attention
Certification marks are another useful filter when comparing EVSE products. A charger carrying an appropriate recognized certification has gone through testing against the relevant safety requirements represented by that listing.
The five products in this guide include different certification credentials, including UL, ENERGY STAR, ETL and CSA depending on the model. Those markings are more meaningful than vague claims such as “premium safety” or “advanced protection.”
Still, certification should be viewed as one part of the buying decision. The installation must also follow the manufacturer’s instructions and applicable electrical requirements.
Outdoor charging needs a little more planning
If your Solterra will charge outside, think about the entire charging path rather than just where the wall box sits.
A sensible setup keeps the charger securely mounted, gives the cable enough reach without leaving excess cable where it can be driven over, protects the electrical connection from unnecessary water exposure, and leaves enough clearance to operate the connector comfortably.
This is particularly important in areas with snow, freezing temperatures, heavy rain or strong sunlight. The Solterra itself is designed as an all-weather SUV, but the home charging equipment still needs to be installed according to its environmental rating and manufacturer instructions.
The Real Buying Decision for a Subaru Solterra
The best way to choose among these five is to start with your home and your charging routine, not the product ranking.
If you want energy monitoring and connected charging, Emporia or icapia gives you more to work with. If you prefer a rugged charger that simply charges without depending on an app, Grizzl-E takes a much simpler route. ChargePoint makes more sense when its app ecosystem and public charging network are useful to you, while WOLFBOX E48 is aimed at owners who want a permanent hardwired installation with a long cable, display and smart controls.
There is also no reason to feel that a 40A charger is automatically an inferior choice to a 48A or 50A charger. The Solterra decides how much AC power it can actually use. The charger’s extra capacity becomes valuable when it gives you installation flexibility, supports a newer Solterra’s higher charging capability, or leaves room for a future EV.
That is the real charging landscape: match the EVSE to the vehicle, match the circuit to the EVSE, and then choose the features that genuinely improve the way you charge at home.
Subaru Solterra Level 2 Charger Buying Guide: How to Choose the Right Home Setup
Buying a Level 2 charger for the Subaru Solterra is not really about finding the charger with the biggest amperage number. The better approach is to work backwards from your Solterra, your electrical system, where you park, and how you actually charge.
That matters because the five chargers in this guide are not interchangeable in the way they feel to own. One gives you energy monitoring, another focuses on flexible installation, another deliberately avoids WiFi, while another gives you a long cable and a built-in display. They can all charge a Solterra, but they solve different problems.
Before choosing one, I would look at these six things in this order:
- Your Solterra’s AC charging capability
- Connector type and whether an adapter is required
- Available electrical capacity at home
- Plug-in versus hardwired installation
- Cable length and mounting location
- Smart features you will actually use
The goal is simple: install the charger once, have enough reach to plug in comfortably, and make sure the electrical setup is properly matched to the vehicle and EVSE.
Start With Amps, But Do Not Buy on Amps Alone
Amperage is one of the first numbers people notice when comparing EV chargers, but it is also one of the easiest numbers to misunderstand.
A 48A charger can make considerably more power available than a 32A charger, but the Solterra does not automatically draw everything the charger can provide. The vehicle’s onboard AC charger determines how much electricity it can accept.
That is why a higher-rated charger can still be useful without making your current Solterra charge at that exact amperage. You may be paying for greater electrical headroom, a different installation configuration, or compatibility with a future EV rather than a dramatic increase in today’s charging speed.
For the chargers covered in this article, the practical breakdown looks like this:
| Charger capacity | What it means for a Solterra owner |
|---|---|
| 32A | A sensible Level 2 capacity for owners whose vehicle and electrical setup do not require more |
| 40A | A useful middle ground with more available charging capacity |
| 48A | More electrical headroom and particularly relevant when higher-capacity home charging is desired |
| 50A | Similar idea, with the charger capable of supplying substantial Level 2 power when the vehicle can use it |
| 11–12 kW charger rating | Describes what the EVSE can make available, not necessarily what the Solterra will continuously pull |
The electrical circuit matters just as much as the charger’s advertised output. A charger should be installed according to its required circuit, breaker, conductor and installation specifications rather than simply connected to whatever 240V source happens to be available.
Cable Length Is More Important Than It Looks
Cable length is one of those specifications that seems minor until you park the car and realise the connector does not quite reach.
For a garage where the charger is mounted close to the driver’s-side charging area, a shorter cable can be perfectly comfortable. But if you park at different angles, have two vehicles sharing the garage, or mount the charger farther from the normal parking position, a 23- or 25-foot cable can make daily charging considerably easier.
The five options here range from roughly 23 to 25 feet, with Grizzl-E using a 24-foot cable. That is a useful range for many residential layouts.
Before deciding, physically think about the route:
- Where will the charger be mounted?
- Where does the Solterra normally park?
- How far is the charging port from that wall?
- Will the cable need to pass around the front or rear of the vehicle?
- Can you store the excess cable without leaving it on the floor?
- Could another vehicle occupy the usual parking position?
A longer cable is useful, but longer is not automatically better if it creates a pile of unused cable on the ground. The right length is the one that comfortably reaches the vehicle while remaining easy to store.
Connector Type Should Be Checked Before Everything Else
The chargers in this guide use J1772 for AC Level 2 charging. That is an important part of their compatibility story because Solterra charging hardware differs by model year.
Earlier Solterra models use the J1772-style AC connection, while the redesigned model moves to NACS. That means owners of a newer NACS-equipped Solterra need to account for the appropriate J1772-to-NACS adapter when using one of these chargers.
This is not a reason to automatically reject a J1772 charger. It simply means the connector should be checked before purchasing.
The practical rule is:
Look at the charging port on your vehicle first, then look at the connector on the charger.
Do not rely solely on an online product title saying “compatible with Subaru Solterra.” Connector standards and model-year equipment can change, and the exact adapter supplied with your vehicle should be confirmed before ordering another one.
Smart Features: Buy the Ones You Will Actually Use
Smart charging has become one of the biggest differences between modern home EV chargers.
A connected charger can let you schedule charging, adjust current, monitor energy use, review charging sessions and, depending on the model, connect with smart-home systems. That can be genuinely useful if your electricity rates vary throughout the day.
But there is a real-world distinction between useful smart control and a long feature list.
If you normally plug the Solterra in every night and simply want it to charge, an app with dozens of settings may not change your life. If you want to schedule charging around cheaper electricity periods or monitor household energy consumption, those features become much more valuable.
Here is how I would think about the main smart features:
| Feature | When it is genuinely useful |
|---|---|
| Charging schedules | You want charging to start during preferred or lower-cost hours |
| Current adjustment | Your electrical capacity or charging needs change |
| Energy monitoring | You want to understand how much electricity the vehicle uses |
| Cost tracking | You want a clearer picture of charging expenses |
| WiFi control | You want to manage charging remotely |
| Voice control | Multiple people in the home use the charger |
| RFID access | You want physical access control without relying entirely on an app |
| Offline charging | You want the vehicle to keep charging even if internet service is unavailable |
One of the more interesting differences in this group is Grizzl-E. It deliberately keeps things simple, with no WiFi or app dependency. That is not a missing feature for every buyer; for some owners, it is exactly the point.
Load Management Deserves More Attention
Load management is often overlooked when people shop for a home EV charger.
Your house already has an electrical load from appliances, heating or cooling equipment, water heaters, cooking equipment and other devices. Adding a high-current EV charger means the home’s electrical system needs to be evaluated as a complete installation.
This is particularly relevant when considering a 48A or 50A charger.
The important question is not only, “Can this charger deliver 48A?” It is also, “Can my home’s electrical system safely support the required circuit while the rest of the house is operating?”
An electrician can assess the panel, available capacity, breaker configuration, wiring requirements and local electrical rules. In some homes, a lower-current setting may be perfectly sensible. In others, a higher-capacity installation may be appropriate.
That is why adjustable chargers are useful. Being able to reduce the charging current can give you more flexibility when your electrical circumstances change.
NEMA 14-50 vs Hardwired: Which Installation Makes More Sense?
NEMA 14-50 Plug-In Installation
A NEMA 14-50 charger connects to a properly installed 240V NEMA 14-50 receptacle.
The biggest attraction is flexibility. The charger can be disconnected if you move, replace the equipment or need to service the installation. This configuration can also make sense for renters or homeowners who do not want the EVSE permanently connected to the electrical panel.
But “plug-in” does not mean “plug it into any NEMA 14-50 outlet.”
The receptacle and circuit still need to be correctly installed for EV charging, with the appropriate breaker, wiring and protection. If the outlet does not already exist, an electrician will generally be needed to install the circuit.
In this guide, the Grizzl-E is a good example of the straightforward plug-in approach, while the Emporia and icapia options provide additional flexibility depending on the configuration selected.
Hardwired Installation
Hardwiring connects the charger directly to the home’s electrical system rather than using a removable plug.
The advantages are easy to understand:
- Cleaner permanent installation
- No large wall-mounted plug and receptacle connection
- Suitable for chargers designed around higher-current installations
- Can work particularly well when the charger will stay in one location for years
- Often a good fit for a dedicated outdoor installation
The trade-off is that professional electrical installation becomes part of the project. The electrician needs to size and configure the circuit correctly for the charger’s specified current.
The WOLFBOX E48 is the clearest example in this guide because its 48A hardwired configuration is designed around a dedicated installation.
Wall-Mounted vs Pedestal Installation
Most homeowners will naturally think about mounting the charger on the garage wall, and for many Solterra owners that is the simplest solution.
A wall mount works particularly well when:
- The vehicle normally parks close to the house.
- The electrical panel is reasonably nearby.
- The charger can be mounted at a comfortable operating height.
- The cable can reach the vehicle without crossing a walking area.
- There is enough wall structure to support the equipment securely.
A pedestal mount becomes more interesting when the vehicle parks away from the house or when there is no suitable wall close to the charging position.
For example, a detached driveway may make a pedestal much cleaner than running a long cable from the garage wall. The downside is additional installation work, because the electrical supply has to reach the pedestal location and the mounting structure needs to be properly installed.
For most residential Solterra owners, I would start with a wall mount and only consider a pedestal when the parking layout genuinely calls for it.
How to Match the Charger to Your Solterra Setup
If You Want the Simplest Daily Charging Routine
Look for a charger that lets you plug in, start charging and leave it alone.
This is where a straightforward unit without app dependence can actually be attractive. You are not paying for smart functions you may never use, and there are fewer settings to manage.
The Grizzl-E approach fits this style particularly well.
If You Want Charging Data and Smart Scheduling
If you care about charging times, energy consumption and scheduling, then a connected charger becomes much more interesting.
Emporia, icapia, ChargePoint and WOLFBOX all offer different versions of smart control, so the decision becomes less about whether they are “smart” and more about which smart features fit your routine.
For example, someone interested in energy monitoring may value a different experience from someone who mainly wants remote start/stop control.
If You Have a Large Garage or Difficult Parking Position
Prioritise cable length before decorative features.
A 25-foot cable can be much more useful every day than an extra app function you open twice a year. Measure the actual distance from the proposed charger position to the Solterra’s charging port and allow enough room for the cable to curve naturally.
If You Are Installing Outside
Start with:
Weather rating → electrical connection → mounting location → cable management → everyday accessibility.
Do not start with the app.
A charger that has excellent software but is poorly positioned outside is not a good home charging solution. The enclosure rating, cable construction and electrical connection all need to suit the environment.
If You May Own Another EV Later
This is where buying a little extra capacity can make sense.
A higher-rated EVSE may give you more flexibility when another vehicle eventually replaces the Solterra. That does not mean you should overspend blindly. It simply means that the charger can potentially remain useful even after your current vehicle changes.
This is one of the strongest practical arguments for considering a 40A, 48A or 50A unit even when your present Solterra may not use the charger’s entire available capacity.
A Real-World Checklist Before You Buy
Before clicking the purchase button, I would check these points:
- Vehicle connector: Confirm whether your Solterra uses J1772 or NACS.
- Adapter requirement: If the vehicle uses NACS and the charger is J1772, confirm that you have the correct adapter.
- Charging capability: Check your specific Solterra model year’s maximum AC charging rate.
- Electrical panel: Make sure there is sufficient capacity for the proposed EV charging circuit.
- Circuit requirement: Match the breaker and wiring to the exact charger configuration.
- Installation type: Decide whether NEMA 14-50, NEMA 6-50 or hardwired makes the most sense.
- Cable length: Measure the real distance between the charger mounting point and charging port.
- Weather exposure: Check the enclosure and cable ratings if installing outdoors.
- Smart controls: Pay for the features you will genuinely use.
- Cable storage: Make sure there is a practical place to hang or coil the cable.
- Future EV use: Consider whether additional charging capacity could be useful later.
- Professional installation: Have the electrical work evaluated and completed according to local requirements.
The biggest mistake is buying the charger first and figuring out the electrical installation afterward. Do the electrical and parking-layout homework first. Once those two pieces are clear, choosing between a 40A plug-in charger, a smart 48A unit or a permanent hardwired system becomes much easier.
The Bottom Line When Choosing a Solterra Home Charger
There is no single specification that makes a Level 2 charger right for every Solterra owner.
For one driver, a rugged 40A charger with no app may be exactly what makes ownership easier. Another owner may genuinely benefit from WiFi scheduling and energy monitoring. Someone with a large garage may care most about a 25-foot cable, while a homeowner building a permanent outdoor charging station may prefer a hardwired installation with substantial weather protection.
The best choice is therefore the one that fits the vehicle’s charging capability, your home’s electrical system and the way you actually park and charge.
And one final piece of real-world advice: do not let a product page’s biggest number make the decision for you. A well-installed 40A charger that reaches your Solterra easily and works every night can be far more useful than a higher-rated charger that requires an unnecessarily complicated installation or features you never use.
Subaru Solterra Level 2 Charger Installation: What to Plan Before You Plug In
Installing a Level 2 charger for the Subaru Solterra is not simply a matter of buying a 240V charger and finding a convenient wall. The charger, circuit, breaker, wiring, mounting location and vehicle connector all need to work together as one system.
Subaru itself recommends using a qualified electrician when preparing a home for Level 2 charging, because a dedicated 240V circuit may need to be installed.
The good news is that once the electrical side is planned correctly, home charging is fairly straightforward. The Solterra can then be plugged in at the end of the day and left to charge overnight, which is exactly where Level 2 charging makes the most sense for most owners.
Start With a Site Assessment, Not the Charger
Before buying the charger, walk through the installation with an electrician and look at the entire route from the electrical panel to the vehicle.
The electrician should establish:
- Where the main electrical panel is located.
- How much capacity is available in the panel.
- Whether a dedicated EV charging circuit can be added.
- What breaker rating the selected charger requires.
- What conductor size and wiring method are appropriate.
- Whether the charger will be plug-in or hardwired.
- Where the charger can be mounted safely.
- How far the cable needs to reach the Solterra.
- Whether the installation is indoors or outdoors.
- Whether local permits, inspections or other requirements apply.
This step can prevent a very common mistake: choosing a 48A charger first and discovering afterward that the planned installation needs electrical work that was never considered.
For example, the WOLFBOX E48 in this guide is a 48A hardwired unit, while the Grizzl-E is designed around a NEMA 14-50 plug-in installation. Those are very different electrical projects even though both are Level 2 chargers.
Check Your Solterra Model Before Installation
The vehicle itself should be part of the installation plan.
The 2025 Solterra is rated for a maximum 6.6 kW Level 2 charging speed, with Subaru specifying a 240V/32A Level 2 charging time of about 9.5 hours.
The 2026 Solterra has a substantially upgraded Level 2 system rated at 11 kW and uses NACS. Subaru also supplies a portable charging cable and adapters with the 2026 model.
That means the installation should be planned around the actual Solterra you own rather than assuming every model year has the same charging requirements.
If your selected home charger has a J1772 connector and your Solterra uses NACS, make sure the correct J1772-to-NACS adapter is available and appropriate for AC Level 2 charging before completing the installation.
NEMA 14-50 vs Hardwired Installation: Which Is Better for Your Solterra?
NEMA 14-50 Plug-In Setup
A NEMA 14-50 installation uses a dedicated 240V receptacle into which the EV charger plugs.
The attraction is flexibility. If you move house, replace the charger or need to remove the EVSE for service, the charger can be disconnected without removing a permanent hardwired connection.
This setup can be particularly appealing when:
- You already have a properly installed NEMA 14-50 circuit.
- You want the ability to remove or replace the charger more easily.
- You may move the charger later.
- You prefer a plug-in installation.
- Your selected EVSE specifically supports NEMA 14-50 operation.
Several chargers in this guide use this approach, including the Grizzl-E, while the Emporia and icapia models also offer configurations that provide installation flexibility.
But there is one important real-world point: NEMA 14-50 does not mean “plug it into any 14-50 outlet.”
An EV charger can operate for hours at a substantial continuous load. The receptacle, breaker, conductors and overall circuit need to be appropriately installed for the EVSE. The electrician should verify the complete circuit rather than treating the receptacle as an ordinary household outlet.
Hardwired Setup
A hardwired charger is permanently connected to the electrical system.
For a dedicated home charging location, this can create a cleaner installation because there is no plug and receptacle connection hanging behind the charger. It can also be particularly appropriate for chargers designed for higher-current operation.
The trade-offs are straightforward:
- Installation requires electrical work.
- The charger is less convenient to remove.
- The electrical circuit needs to be designed specifically around the EVSE.
- Future charger replacement may require another electrical connection.
- The initial installation can cost more than using an existing suitable receptacle.
The WOLFBOX E48 is a good example from this guide because it is designed around a 48A hardwired setup.
Which Configuration Would I Choose?
There is no universal answer.
If you already have a properly installed circuit and want flexibility, NEMA 14-50 plug-in charging can be an excellent residential solution.
If you are building a dedicated charging point from scratch and expect the charger to remain in the same location for years, hardwiring can provide a cleaner permanent installation.
I would not choose between them based only on the idea that one is automatically “faster.” The vehicle, charger configuration and electrical circuit determine the actual charging performance.
Garage vs Outdoor Installation: Plan the Location Around the Car
Garage Installation
For many Solterra owners, the garage is the easiest location.
A garage-mounted charger is naturally protected from direct rain and snow, the cable is easier to store, and the charging equipment is generally closer to the home’s electrical panel.
The best wall position is not necessarily the wall closest to the panel. Think about where the Solterra actually parks.
A good location should allow you to:
- Reach the charging port without stretching the cable.
- Keep the cable away from walking paths.
- Avoid placing the charger where a vehicle could hit it.
- Hang or coil the cable neatly.
- Open the vehicle doors without interference.
- Reach the charger comfortably without moving the vehicle.
The charger should be positioned so plugging in feels effortless. If you have to stretch a cable around the front of the Solterra every evening, the installation is technically functional but poorly planned.
Outdoor Installation
An outdoor charger can work very well when the Solterra is normally parked on a driveway or outside a garage.
The important thing is to select a charger specifically suitable for outdoor installation and follow its mounting and electrical instructions.
The chargers in this guide include models with substantial weather protection, such as NEMA Type 4, NEMA 4X and IP-rated enclosures.
But weather protection does not eliminate the need for good installation practices.
Think about:
- Direct exposure to rain and snow.
- Water around the electrical connection.
- Snow accumulation.
- Cable storage.
- Sun exposure.
- Freezing temperatures.
- Vehicle movement around the charger.
- Drainage around the mounting location.
Subaru’s own charging equipment documentation also illustrates the importance of environmental protection: its available charging cable is designed for indoor and outdoor use and carries an IP67 water-resistance rating.
Mounting Height and Accessibility
Do not mount the charger simply wherever there is an empty piece of wall.
The connector should be easy to reach, and the cable should hang naturally when it is not connected to the vehicle.
Electrical guidance for EVSE installation also addresses the location and height of charging equipment and coupling means, although the exact installation requirements depend on the equipment listing and applicable local code.
Your electrician should therefore follow the charger’s installation instructions and the applicable local requirements rather than relying on a generic mounting height found online.
Cable Management Is Part of the Installation
A long cable is useful only when you have somewhere sensible to put it.
This matters with the 23-, 24- and 25-foot cables featured in this guide. The additional reach can make parking much easier, but excess cable should not be left lying across the garage floor or driveway.
A good installation should include a practical place for the connector and cable.
A Good Cable Setup Should
- Keep the connector off the ground.
- Prevent the cable from becoming a trip hazard.
- Keep it away from vehicle tyres.
- Avoid sharp bends and unnecessary tension.
- Allow the cable to be coiled without excessive twisting.
- Keep the connector protected when not in use.
If the charger comes with a dedicated holster or cable-management system, use it. If not, install an appropriate wall-mounted holder rather than improvising with hooks or hardware that could damage the cable.
Safety Checks That Should Not Be Skipped
GFCI and Ground-Fault Protection
Ground-fault protection is an important part of EV charging safety.
Many modern EV chargers incorporate their own protective functions, and the specific protection arrangement depends on the EVSE and installation configuration. Some of the chargers covered in this article include built-in GFCI or ground-fault protection.
The Grizzl-E, for example, includes built-in GFCI and ground-fault protection, along with overcurrent, overvoltage and overtemperature protection.
The important point is not to assume that because the charger has one protective function, every other part of the electrical installation can be ignored.
Your electrician should verify the complete protection scheme required for the selected EVSE and local code.
Overcurrent Protection and Circuit Sizing
EV charging is a sustained electrical load, so circuit sizing deserves particular attention.
U.S. Department of Energy guidance on EVSE permitting references NEC requirements for sizing overcurrent protection for continuous EV charging loads.
In plain English, the breaker, wiring and EVSE need to be selected as a matched system.
That is why you should never:
- Increase the breaker rating simply to make a charger run at a higher current.
- Use undersized wiring.
- Assume an existing outlet is automatically suitable.
- Modify the charger’s current setting beyond the installation’s capability.
- Use an extension cord for Level 2 EV charging.
Subaru specifically advises against using extension cords with Level 1 or Level 2 charging.
Weatherproof Enclosures
For outdoor installations, look for a charger with an enclosure rating appropriate for the environment.
The ratings used by the chargers in this guide include NEMA 3R, NEMA 4, NEMA 4X and IP67, depending on the model.
Do not treat these ratings as interchangeable. They describe specific forms of environmental protection, and the manufacturer’s installation instructions still determine where and how the equipment can be mounted.
The electrical connection itself also matters. A weather-resistant charger does not make an incorrectly installed receptacle weatherproof.
Grounding and Electrical Connections
The charger must be properly grounded and connected according to its installation instructions.
This is one of the areas where DIY shortcuts are simply not worth taking. EV charging equipment can draw substantial current for long periods, so a connection that appears acceptable during a quick test is not necessarily an installation you want operating every night for years.
A qualified electrician should verify the grounding, termination points, breaker, conductor sizing and overall circuit before the charger is placed into regular service.
Permits and Code Checks Before the Charger Goes Live
Permit requirements are local, so there is no single permit rule that applies to every Solterra installation.
Your city, county, municipality or electrical authority may require a permit and inspection for installing a new 240V EV charging circuit, particularly when new wiring is being run from the electrical panel.
Before work begins, ask the electrician:
- Does this installation require an electrical permit?
- Who will obtain the permit?
- Will an inspection be required?
- Which local electrical code applies?
- Does the installation require a dedicated circuit?
- Does the existing panel have enough capacity?
- Are there any local requirements for outdoor equipment?
- Is the selected receptacle approved and suitable for EV charging?
- Will the installation pass inspection as configured?
This is one area where saving a little money by skipping the proper process can create much more trouble later.
A reputable electrician should be comfortable answering these questions before beginning the installation.
Questions to Ask Your Electrician Before Installation
You do not need to be an electrical engineer to have a useful conversation with an electrician.
I would ask these questions directly:
“Can my panel support this charger?”
This should be answered based on the actual electrical load and panel capacity, not simply whether there is an empty breaker position.
“What circuit does this exact charger require?”
Give the electrician the exact model, not just “I bought a 48A charger.”
Different chargers and configurations can have different requirements.
“Should I use plug-in or hardwired?”
Ask which configuration makes more sense for your home’s panel, parking location and long-term plans.
“Where would you mount it?”
An experienced electrician can often identify practical issues you may not notice, such as cable routing, conduit placement, panel access and vehicle clearance.
“Does this installation require a permit or inspection?”
Get this clarified before work starts.
“What protection does this EVSE require?”
Discuss GFCI, ground-fault protection, breaker requirements and any other protection specified by the manufacturer or applicable code.
“Can you verify the installation after everything is connected?”
The charger should be tested before you rely on it for daily charging.
What a Proper Installation Should Look Like When Finished
When the electrician is done, do not just plug in the Solterra and walk away.
Take a few minutes to inspect the setup.
You want to see:
- The charger firmly mounted.
- No loose conduit, fittings or mounting hardware.
- Cable routing that does not create a trip hazard.
- Connector storage that keeps it off the ground.
- No visible damage to the cable.
- Correct breaker and circuit identification.
- Outdoor connections appropriately protected.
- Charger indicators showing normal operation.
- The Solterra beginning a normal charging session.
- No unusual heat, smell, buzzing or repeated fault indications.
If anything looks or feels abnormal, stop using the equipment and have it checked.
The Real-World Installation Advice I Would Follow
The smartest approach is to buy the charger and plan the installation together, rather than treating them as two separate purchases.
Give the electrician the exact charger model, tell them where you normally park the Solterra, explain whether you want a plug-in or hardwired setup, and show them the cable length you intend to use.
Then let the electrical installation determine whether your preferred configuration makes sense.
For the Solterra, there is rarely a reason to make the installation unnecessarily complicated. Subaru already positions a 240V Level 2 charger as a practical home solution, particularly for overnight charging.
Get the circuit right, mount the charger where the cable naturally reaches the car, protect the equipment from its environment, and have the installation checked properly. Once those things are done, the daily routine becomes exactly what you want from home EV charging: park the Solterra, plug it in, and let the car handle the rest.
How to Use and Optimize Your Subaru Solterra Charging Setup
Once your Level 2 charger is installed correctly, the next step is making the charging routine work for you rather than simply plugging in whenever the battery gets low. A good setup should be predictable, economical and easy to manage, especially if the Solterra is your daily driver.
The biggest advantage of modern home chargers is that you can control when the vehicle charges, how much current the charger makes available, and how much energy the session uses. That does not mean you need to constantly adjust settings. In fact, the best setup is usually the one you configure once and then let run in the background.
Set a Charging Schedule That Matches Your Routine
If your Solterra normally comes home at roughly the same time each evening, scheduling can make home charging almost automatic.
Instead of immediately starting a charging session whenever the cable is connected, use the charger’s scheduling function to choose a preferred charging window. This can be particularly useful when your electricity plan has different rates during different parts of the day.
A practical routine might look like this:
- Arrive home and plug in the Solterra.
- Leave the vehicle connected rather than waiting until the battery is nearly empty.
- Set the charger to begin during your preferred charging period.
- Let the vehicle charge overnight.
- Unplug in the morning or leave the vehicle connected according to your normal routine and vehicle guidance.
The exact schedule should come from your electricity plan and driving needs, not from a generic “off-peak” time recommended online.
If your utility does not use time-of-use pricing, scheduling can still be useful. You may simply prefer charging at a predictable time when the rest of your household electrical demand is lower.
Do Not Chase the Highest Charging Current Every Night
This is one of the easiest ways to overcomplicate an otherwise simple setup.
A charger such as the Emporia, icapia, ChargePoint or WOLFBOX gives you the ability to adjust available charging current. That does not mean the maximum setting needs to be used every time.
If your Solterra has enough time to charge overnight at a lower current, there may be little practical reason to run the charger at its highest available setting every night.
For example, if you return home at 7 p.m. and leave at 7 a.m., you have a long charging window. The priority is simply to put enough energy back into the battery before your next drive.
A higher current setting becomes more useful when:
- You arrive home with a substantially depleted battery.
- You have a short charging window.
- You need more range before an early departure.
- Your newer Solterra can take advantage of higher Level 2 charging capability.
- You want additional charging headroom for a future EV.
The real goal is sufficient charging, not maximum charging.
Use Load Management to Be Kinder to Your Home Electrical System
Load management becomes particularly important with higher-current Level 2 chargers.
Your charger is not the only thing using electricity in the house. At the same time, you may have an electric water heater, HVAC system, oven, dryer, heat pump or other major appliances operating.
A charger configured for 48A or 50A can represent a substantial continuous electrical load, so the home’s electrical capacity should have been evaluated before installation.
Once installed, sensible charging habits can add another layer of control.
If your charger allows current adjustment, you can lower the charging current when your household electrical demand is unusually high. This is not a replacement for correctly sizing the circuit, but it can be a useful operational tool.
Think of it this way:
The electrical installation determines what is safe. The charger’s controls determine how you use that available capacity.
Do not use an app setting as a workaround for an undersized circuit or inadequate electrical panel. If the electrical system cannot support the desired charging configuration, the correct solution is an electrical assessment, not simply changing settings until the charger appears to work.
Use the Charging App for Information, Not Just Remote Control
The app is often treated as a way to start or stop charging, but that is only one part of what modern smart chargers can do.
The Emporia, icapia, ChargePoint and WOLFBOX setups in this guide offer different combinations of charging status, scheduling, energy information and current control.
Check Real-Time Charging Status
The most useful information is usually the simplest:
- Is the Solterra charging?
- What charging current is being supplied?
- How long has the session been running?
- How much energy has been delivered?
- Has the charger reported a fault?
- Did the scheduled session actually begin?
You do not need to check these figures every night.
The value comes when something changes. If you plug the Solterra in before going to bed and notice later that charging has not started, the app can help identify the problem without requiring you to walk back to the garage.
Use Reminders and Scheduling Together
Reminders are particularly useful if your charging routine changes throughout the week.
For example, you might normally charge overnight but have an early morning trip twice a week. A reminder can prevent you from forgetting to plug in, while a schedule controls when the actual charging begins.
That combination is more useful than repeatedly checking the battery throughout the evening.
Use Energy Data to Understand Your Real Charging Cost
Energy monitoring can be surprisingly useful after a few weeks of normal driving.
Instead of estimating your electricity use from the battery capacity alone, look at the actual energy delivered by the charger over multiple charging sessions.
You can start noticing patterns such as:
- How much electricity a normal commute uses.
- How much energy a longer weekend trip requires.
- Whether winter driving changes your charging requirements.
- How frequently you actually need a full charging session.
- How much electricity the Solterra consumes over a month.
This is where a connected charger can provide genuine value. You are not just controlling the charger; you are building a clearer picture of how the vehicle fits into your household energy use.
Do Not Treat App Data as Perfect Laboratory Measurements
Real-world charging involves losses between the electrical supply and the energy ultimately stored in the battery.
That means the number shown by an EVSE and the percentage shown by the vehicle are not necessarily going to match perfectly.
Use the app’s energy information to understand trends and charging behaviour, rather than expecting every session to produce an exact battery-to-electricity conversion figure.
That is a much more useful way to interpret the data.
Keep the Charger Firmware and App Up to Date
Firmware is easy to forget because a charger can continue doing its basic job even when you have not checked it for months.
But connected EV chargers can receive updates that improve compatibility, connectivity, stability or smart features. Depending on the manufacturer, updates may be delivered through the charger’s app or another connected management system.
Check for Updates During Initial Setup
When you first install a smart charger:
- Complete the manufacturer’s app setup.
- Connect the charger to the required WiFi network.
- Check whether a firmware update is available.
- Install the update before relying on advanced scheduling features.
- Confirm that the charger reconnects normally afterward.
- Test a basic charging session.
This gives you a clean starting point.
The icapia Sapphire Pro, for example, supports OTA firmware updates, so keeping the charger connected can be useful when new firmware becomes available.
Do Not Interrupt an Update
If the app says the charger is installing firmware, leave the equipment alone until the process is complete.
Do not switch off the electrical supply or disconnect the charger simply because the update appears to be taking longer than expected. Follow the manufacturer’s instructions for that particular model.
Keep the Charging App Updated Too
There are actually two pieces of software involved with many smart chargers:
The charger firmware controls the hardware.
The mobile application provides the interface you use to manage it.
Keeping both current reduces the chance of an avoidable compatibility problem between the charger and its app.
It is also worth keeping your phone’s operating system reasonably current because manufacturer applications can eventually stop supporting very old operating-system versions.
What to Do When WiFi Is Unavailable
A smart charger should not turn into an unusable box simply because your home internet connection goes down.
This is one reason I like having a clear distinction between smart functions and basic charging functions.
The Grizzl-E takes the simplest approach because it does not depend on WiFi or an app for normal charging.
The WOLFBOX E48 also provides physical controls through its RFID functionality, while the ChargePoint information supplied for this guide indicates that basic plug-and-charge operation remains available without WiFi.
That is important in real life. Your internet service can fail at 11 p.m., but your Solterra may still need to charge overnight.
The ideal setup is therefore:
WiFi for convenience, basic charging for reliability.
If your particular charger behaves differently, follow the manufacturer’s instructions rather than assuming offline functionality.
Optimize Charging Around Your Actual Driving
You do not need to charge the Solterra to 100 percent every night simply because you have a Level 2 charger.
Your charging routine should reflect how much you drive.
For Short Daily Commutes
If you only use a modest amount of the battery each day, plugging in overnight and allowing a scheduled charging session can be enough.
There is little reason to keep changing the current setting or manually starting sessions every evening.
Before a Long Trip
This is where the higher available output of your Level 2 installation becomes more useful.
If you know you have a long drive the following morning, check the battery level earlier in the evening rather than discovering at bedtime that you need significantly more energy than usual.
A smart charger makes this easier because you can see the current charging status and adjust the schedule if necessary.
During Periods of Heavy Household Electricity Use
If several high-power appliances are running at once, you can use the charger’s current adjustment or scheduling capabilities where appropriate.
Again, this is operational optimisation, not electrical safety management. The underlying circuit still needs to be correctly designed for the charger.
Build a Charging Routine You Rarely Have to Think About
The best home charging setup should eventually become boring.
That is actually a good thing.
Once you have:
- The correct connector or adapter.
- A properly installed Level 2 circuit.
- A sensible charging current.
- A schedule that matches your electricity plan.
- A practical cable-storage routine.
- Updated charger firmware.
- A reliable WiFi connection where smart features are needed.
…there should be very little reason to constantly monitor the system.
Plug in when you get home, let the schedule handle the timing, and check the app when you actually need information.
That is where the difference between a technically capable charger and a well-optimised charging setup becomes obvious. The charger is doing its job in the background while you get on with yours.
The Insider Optimization Tip
After your first month, look at your actual charging history rather than changing settings based on assumptions.
Check how much energy you typically use between charges, how long the Solterra usually needs to recover that energy, whether scheduled charging is working as intended, and whether you are regularly reaching the charger at the end of the day with a lower battery than expected.
Then make one practical adjustment at a time.
Maybe you need a slightly longer charging window. Maybe your current setting can be reduced without affecting your morning departure. Maybe scheduling is not saving anything because your utility uses a flat electricity rate. Or perhaps the charging data shows that your normal driving requires far less energy than you originally assumed.
That is the real advantage of a smart Subaru Solterra charging setup: use the data to make the system fit your life, rather than constantly changing your routine to fit the charger.
Subaru Solterra Charger Troubleshooting and Maintenance: Fix Small Problems Before They Become Bigger Ones
A good Level 2 charger should mostly disappear into your daily routine. You plug in the Solterra, charging starts, and the car is ready when you need it. When something does go wrong, however, it is useful to know whether you are dealing with a simple connection issue, a WiFi problem, a charger setting, or something that needs an electrician.
The important rule is do not troubleshoot an electrical installation by guessing. Basic checks are reasonable, but anything involving the panel, breaker, wiring, burning smells, damaged connectors or repeated electrical faults should be left to a qualified professional.
Start With the Simple Things First
If the Solterra does not begin charging, do not immediately assume the charger has failed.
Start with the basics:
- Make sure the charging connector is fully inserted into the vehicle.
- Check whether the charger is receiving power.
- Look at the charger display or status lights for an error message.
- Check the vehicle’s charging status.
- If the charger uses an app, open it and check whether the session has actually started.
- Confirm that a scheduled charging window has not delayed the session.
- If you recently changed the charging current, check that the new setting is appropriate.
- If using a J1772 charger with a NACS-equipped Solterra, verify that the correct adapter is properly connected.
This last point is particularly important for newer Solterra models. A charger and vehicle can both be working correctly while the charging session fails simply because the connector or adapter arrangement is wrong.
When the Solterra Is Plugged In but Not Charging
This is one of the most common situations owners will encounter, and there are several possible causes.
First, check whether the charger is waiting for a scheduled charging period. Smart chargers such as Emporia, icapia, ChargePoint and WOLFBOX can be configured to start charging at a particular time.
If scheduling is not the issue, check the vehicle itself. The Solterra may not request charging if the connector is not properly seated or if the vehicle has detected a charging-related condition.
A sensible sequence is:
- Stop the charging session if the charger allows it.
- Disconnect the connector from the vehicle.
- Wait briefly.
- Reconnect it firmly.
- Confirm that the charger indicates a connected vehicle.
- Check the Solterra’s charging status.
- If scheduling is enabled, verify the next start time.
- Try a normal immediate charging session if the charger supports that option.
If charging starts after reconnecting, the problem may have simply been a connection or session-state issue.
If the charger repeatedly refuses to start, do not keep reconnecting it indefinitely. Move on to checking the charger status and error information.
Common Subaru Solterra J1772 Charger Problems and What to Check
Charger Has No Power
If the charger appears completely inactive, check whether the electrical circuit supplying it has power.
For a plug-in unit, check that the connector is properly seated in the receptacle.
For a hardwired unit, do not open the electrical enclosure yourself. Check the charger’s external status indicators and have an electrician investigate the circuit if the unit remains without power.
Do not repeatedly reset a breaker that trips immediately. A breaker that trips again after being reset is telling you that something needs attention.
The Breaker Keeps Tripping
A breaker that trips once can have a number of explanations, but repeated tripping should not be treated as a normal charger behaviour.
Possible causes can include:
- An electrical circuit problem.
- Incorrect breaker or wiring configuration.
- Excessive electrical load.
- A charger fault.
- A problem with the receptacle.
- An installation issue.
If the breaker trips repeatedly, stop using the charger and contact the electrician who installed it.
Do not solve the problem by installing a larger breaker unless the entire circuit has been evaluated and is designed for that breaker. A larger breaker on wiring that was not designed for it can create a serious safety problem.
Charging Starts and Then Stops
If charging begins normally and later stops, check the charger and vehicle status before assuming a hardware failure.
With a smart charger, look at the app and determine whether the session ended normally or reported an error.
Also check whether:
- A scheduled charging window ended.
- The vehicle reached its configured charging limit.
- The charger lost its WiFi connection but still supports offline charging.
- The connector was disturbed.
- The charger reported an overtemperature or electrical protection event.
Several of the chargers covered in this guide include protective functions such as overcurrent, overvoltage, ground-fault and temperature protection. Those systems can stop or interrupt charging when the charger detects a condition outside its normal operating range.
That is not necessarily a sign that the charger is defective. It can be the protection system doing exactly what it was designed to do.
WiFi and App Problems Are Usually Different From Charging Problems
The Charger Works but the App Does Not
This distinction is important.
If the Solterra continues charging normally but the mobile app cannot connect, you are dealing primarily with a smart-control problem, not necessarily a charging problem.
Check:
- Whether your home WiFi is working.
- Whether the charger is connected to the correct network.
- Whether the charger requires a 2.4 GHz connection.
- Whether the mobile application is updated.
- Whether the charger is showing an active WiFi connection.
- Whether the manufacturer is experiencing a service interruption.
The WOLFBOX information supplied for this article specifically notes that its smart functions work better with 2.4 GHz WiFi, and some users may need to repeat the initial pairing process.
If the charger supports normal offline charging, you can continue using the Solterra while troubleshooting the app connection.
Do Not Confuse a WiFi Failure With an EVSE Failure
This is one of the most useful distinctions for smart charger owners.
If the app stops responding but the physical charger still starts a charging session, there is no reason to assume the charging hardware has failed.
You may temporarily lose:
- Remote monitoring.
- Charging notifications.
- Scheduling control.
- Energy information.
- Remote start or stop functions.
But basic charging can still work on chargers designed for offline operation.
The practical approach is to separate connectivity troubleshooting from electrical troubleshooting.
What to Do About Charging Errors and Fault Indicators
Read the Exact Error Before Resetting Anything
If your charger displays an error code, record it.
Take a photograph of the display if necessary, or note:
- The exact error message.
- When it appeared.
- Whether the Solterra was connected.
- Whether charging had already started.
- Whether the problem happens every time.
- Whether the charger was recently installed or moved.
- Whether the issue occurs only outdoors or during certain weather.
This information is much more useful to customer support or an electrician than simply saying, “The charger stopped working.”
Do Not Keep Resetting a Persistent Fault
A single fault can sometimes clear after a normal restart, but a fault that repeatedly returns deserves attention.
If the same error appears after a normal reset, follow the manufacturer’s troubleshooting instructions. If the instructions indicate an electrical fault, ground fault, temperature problem or hardware failure, stop experimenting with the equipment.
A charger that repeatedly reports an electrical protection fault should be investigated rather than repeatedly reset until it disappears.
When You Should Call a Professional
Some problems are well beyond normal owner troubleshooting.
Contact a qualified electrician or the charger manufacturer when you encounter:
- Repeated breaker trips.
- Burning smells.
- Smoke or visible melting.
- Discoloured electrical connections.
- A hot or damaged receptacle.
- Damaged charging cable insulation.
- A connector that has become physically damaged.
- Repeated ground-fault errors.
- A hardwired charger that has lost power.
- Faults that return immediately after a proper reset.
- Any concern about the electrical panel or circuit.
- An installation that does not match the charger’s specified requirements.
If the charger or cable has visible physical damage, do not continue charging simply to see whether it still works.
The cost of having an electrician inspect a questionable installation is small compared with the consequences of continuing to operate damaged electrical equipment.
When to Contact the Charger Manufacturer
Manufacturer support becomes particularly useful when the electrical installation appears normal but the charger itself is behaving incorrectly.
Contact the manufacturer when:
- The unit repeatedly displays the same hardware error.
- Firmware updates repeatedly fail.
- The app cannot pair after following the official setup procedure.
- The charger disconnects unexpectedly despite a normal electrical supply.
- The display or indicator lights behave abnormally.
- The unit appears to have failed while the circuit and vehicle are operating normally.
Have the model number, serial number, purchase information and photographs of the error available. That usually makes the support conversation much more efficient.
Seasonal Maintenance for an Outdoor Solterra Charger
Outdoor charging equipment deserves a little more attention than a unit installed inside a protected garage.
You do not need to perform complicated maintenance every month. A quick seasonal inspection is usually much more useful.
Before Winter
Cold weather can make charging cables less flexible, particularly when the cable has been sitting outside for several hours.
Before winter arrives:
- Inspect the cable for cuts or damaged insulation.
- Check the connector for visible damage.
- Make sure the cable holder is secure.
- Confirm that water cannot collect around the electrical connection.
- Check that snow will not block access to the charger.
- Make sure the cable will not be driven over or trapped under a vehicle.
- Keep the connector protected when it is not connected to the Solterra.
Do not force a stiff cable into a tight coil in freezing weather. Let it move naturally and avoid sharp bends.
During Snow and Freezing Conditions
If the charger is mounted outside, keep snow and ice from accumulating around the connector and charger housing.
Do not chip ice aggressively against the charging connector.
If the connector is frozen in place, follow the vehicle and charger manufacturer’s instructions rather than forcing it. The objective is to avoid damaging the connector, vehicle inlet or cable.
After Heavy Rain
Check the charger visually after unusually heavy weather.
Look for:
- Damaged enclosure.
- Loose mounting.
- Standing water around the electrical connection.
- Damaged cable insulation.
- Cracked connector housing.
- Any unusual fault indication.
A properly rated outdoor charger is designed to handle its specified environmental conditions, but physical damage or an improperly protected electrical connection is a different matter.
During Hot Weather
High temperatures can also affect charging equipment.
Make sure the charger has adequate clearance around its enclosure and is not covered by objects that restrict heat dissipation.
If the charger repeatedly stops during very hot conditions and displays an overtemperature warning, allow it to cool and check the manufacturer’s guidance.
Do not cover the charger with a cloth or improvised shade that blocks ventilation simply to keep sunlight off the housing.
A Simple Maintenance Routine That Takes Only a Few Minutes
You do not need to treat your EV charger like a piece of mechanical equipment.
A useful routine is simply:
Every few weeks:
Look at the cable, connector and charger housing for obvious physical damage.
Every few months:
Check the mounting hardware, cable holder and outdoor electrical connection visually.
Before winter:
Inspect the cable carefully and make sure snow and ice will not interfere with the charging location.
After severe weather:
Look for physical damage, water exposure or loose mounting.
When an app or firmware update appears:
Install it according to the manufacturer’s instructions and confirm that normal charging still works afterward.
Whenever something unusual happens:
Record the error before resetting everything repeatedly.
That is enough for most owners.
The Real Troubleshooting Rule for Your Solterra
The most useful distinction is between a vehicle problem, charger problem, connectivity problem and electrical installation problem.
If the Solterra charges normally with another compatible charger, investigate your home EVSE.
If the charger works with another compatible vehicle but not the Solterra, investigate the vehicle, connector or adapter arrangement.
If the charger works but the app does not, investigate WiFi and software rather than immediately assuming the hardware has failed.
If the breaker trips or there are signs of electrical damage, stop troubleshooting and involve a professional.
That simple process prevents a lot of unnecessary guessing.
The Insider Maintenance Tip
Keep a small record of your charger’s model, serial number, installation date, breaker rating and electrician’s details. Save the manufacturer’s support information and installation documentation somewhere you can find them quickly.
It sounds unnecessary when everything is working, but six months later, if the charger suddenly displays an error, those details can save a surprising amount of time.
And remember, the goal of maintenance is not to constantly interfere with the charger. A properly installed Solterra Level 2 charger should require very little attention. Keep the cable and connector in good condition, keep outdoor equipment clean and unobstructed, install firmware updates when appropriate, and take persistent electrical faults seriously. The rest should simply be part of your normal charging routine.
FAQs About Subaru Solterra Level 2 Chargers
Does a higher-amp Level 2 charger actually make a Subaru Solterra charge faster?
Not necessarily, and this is one of the easiest places to spend extra money without getting a real charging benefit.
A Level 2 charger makes a certain amount of AC power available, but the Solterra’s onboard charging system determines how much power the vehicle can actually accept. The 2025 Solterra is rated for up to 6.6 kW of Level 2 charging, while the redesigned 2026 model increases that capability to 11 kW.
So if you have an earlier Solterra, buying a 48A or 50A charger simply because the number looks bigger does not mean the vehicle will charge at that rate. There can still be good reasons to choose a higher-rated unit:
- More available electrical headroom.
- Adjustable charging current.
- Greater installation flexibility.
- Better suitability for a future EV.
- More flexibility if your driving needs change.
The real truth is that the highest-amp charger is not automatically the best Level 2 charger for Subaru Solterra. Your vehicle’s charging limit and your home’s electrical capacity matter more than the biggest specification on the product box.
Can I use a J1772 Level 2 charger with the newer Subaru Solterra that has NACS?
Yes, but the connector setup needs to be handled correctly.
The 2026 Subaru Solterra uses a NACS charging port, while the chargers in this guide use J1772 connectors. Subaru’s 2026 charging equipment includes a portable dual-voltage charging cable along with J1772 and CCS adapters, which gives owners flexibility between charging standards.
For a J1772 home charger, the basic arrangement is:
J1772 home charger → appropriate J1772-to-NACS adapter → Solterra
The important part is not simply finding an adapter that physically connects. Make sure the adapter is designed for the type of AC Level 2 charging you intend to use and follow the instructions from the vehicle and adapter manufacturers.
I would also avoid relying on an old charger compatibility list when buying equipment for a newer Solterra. Check the charging port on your exact model first. The move to NACS changes the connector equation, even though the underlying goal—safe AC home charging—has not changed.
Is it smarter to install a 40A charger or a 48A charger for a Subaru Solterra?
There is no universal winner here because the better fit depends on your Solterra, your electrical panel and the type of installation you want.
A 40A charger can be completely sensible when the vehicle does not need additional capacity or when your home’s electrical system is better suited to that level. A 48A charger becomes more interesting when you want additional headroom, especially with the 2026 Solterra and its higher 11 kW Level 2 capability.
But there is a useful distinction that gets missed in a lot of charger comparisons: a higher-rated EVSE can provide flexibility without necessarily making your current car charge faster.
Before choosing between 40A and 48A, I would look at:
- What your specific Solterra can accept.
- What your electrical panel can support.
- Whether you want NEMA 14-50 or hardwired installation.
- Whether you may use the charger with another EV later.
- Whether adjustable current control is important to you.
That is a much more useful decision process than simply buying the charger with the highest amperage.
Why would someone choose a simple charger like Grizzl-E when smart chargers offer WiFi, scheduling and energy monitoring?
Because a charger does not become better simply because it has more software attached to it.
If you plug in every evening and want the Solterra to charge without opening an app, creating an account or depending on WiFi, a simpler charger can actually be the more comfortable choice. Grizzl-E takes that straightforward approach, with the emphasis on charging rather than turning the EVSE into another smart-home device.
That can be a genuine advantage for someone who wants the charger to behave more like an appliance: plug in, charge and move on.
But the opposite can also be true. If you want scheduled charging, energy tracking or remote control, a connected option such as Emporia, icapia, ChargePoint or WOLFBOX gives you tools that a basic charger deliberately leaves out.
The important distinction is this: “smart” and “better” are not the same thing. A feature only adds value when it solves a problem you actually have.
Is a hardwired Level 2 charger worth it for a Subaru Solterra, or is NEMA 14-50 better?
A hardwired charger makes more sense when you are building a permanent home charging station and expect the equipment to remain in the same location for years. It can create a cleaner installation and is particularly useful for higher-current chargers designed around permanent electrical connections.
A NEMA 14-50 setup can make more sense when flexibility matters. You can unplug the EVSE later if you need to replace it or change the setup, although the receptacle still needs to be installed correctly for sustained EV charging.
The twist is that NEMA 14-50 does not automatically mean an existing 14-50 outlet is suitable for EV charging. The receptacle, breaker, wiring, grounding and EVSE all need to work together as a properly designed system.
For most homeowners, I would make the decision around the installation rather than treating one configuration as universally better:
Permanent charging station: hardwired can be a clean long-term solution.
Flexible or removable setup: a properly installed plug-in charger can be more convenient.
And if you are installing everything from scratch, have a qualified electrician evaluate the panel, circuit and proposed charger together. That small step can prevent you from building the charging setup around a specification that your home’s electrical system was never designed to support.
Final Verdict: Choosing the Right Level 2 Charger for Your Subaru Solterra
A Subaru Solterra home charger should make your life easier, not give you another system to manage every evening. After looking at charging output, connector compatibility, installation choices, cable reach, weather protection, smart controls and the realities of daily ownership, the biggest takeaway is surprisingly simple: there is no prize for buying the charger with the biggest number on the label.
The right choice depends on what your Solterra can actually accept and how your home is set up. Earlier models have a lower AC charging ceiling, while the newer Solterra can make better use of higher-capacity Level 2 equipment. That makes the 40A, 48A and 50A options in this guide useful for different reasons, but it does not mean every owner needs the highest-rated unit.
What Matters After the Spec Sheet
If you want smart energy monitoring and flexible control, Emporia and icapia give you plenty to work with. If your preference is simple, rugged charging without app dependence, Grizzl-E takes a very different and deliberately straightforward approach.
ChargePoint makes sense for someone who values its connected charging ecosystem, adjustable current and public charging network, while WOLFBOX E48 is particularly interesting when you want a permanent hardwired installation, a 25-foot cable and charging information directly on the unit.
Those differences are more important than trying to declare one charger universally superior.
The One Decision I Would Not Compromise On
Spend more time getting the installation right than debating a few amps between otherwise capable chargers.
A properly sized circuit, suitable breaker, correct wiring, sensible mounting position, good cable management and appropriate outdoor protection will affect your ownership experience far more than a specification you never actually use.
And if your Solterra uses NACS while the charger you choose uses J1772, sort out the adapter requirement before installation. Connector compatibility is something you want settled before the charger is mounted, not after.
The Real-World Takeaway
A good Level 2 setup should eventually become almost boring.
You park the Solterra, connect the charger, and walk away. The schedule starts when you want it to, the vehicle receives the power it can accept, the cable reaches without being stretched across the garage, and the system quietly does its job overnight.
That is ultimately what I would look for in a best Level 2 charger for Subaru Solterra: not the longest feature list, not the highest amperage and not the most impressive marketing claims, but a charger that fits the car, fits the electrical system and fits the way you actually live with the vehicle.
Choose the installation first, the charging capability second, and the smart features third. Get those three right, and your Solterra home charging setup should serve you well for years rather than becoming another piece of technology you constantly have to think about.
Also Check:


