

Best 3 Way Component Speakers (2026): Car Audio With Audiophile-Level Detail
A good 3-way component speaker system should do more than make your music louder. It should bring vocals forward, keep instruments distinct and reproduce high-frequency detail without making cymbals, vocals or guitars sound sharp during longer drives. The difference comes down to driver integration, crossover tuning and how well the system works with your car’s acoustics—not simply the number of speakers or their advertised wattage.
The DYNAUDIO Esotan 372 MKII sets a premium benchmark on paper with its 6.5-inch woofer, dedicated 4-inch midrange, 28mm textile-dome tweeter and 150W RMS power rating. Its 4-ohm impedance and adjustable crossover levels give installers useful options for building a balanced front soundstage. The other five systems take different approaches to clarity, tonal balance and dynamic performance, making the right choice dependent on your listening priorities and installation budget.
Before choosing, check your vehicle’s speaker mounting depth, cut-out dimensions, factory locations and amplifier compatibility. A 6.5-inch woofer does not guarantee a direct fit, particularly when a separate midrange and external crossover also need space. Getting these details right can matter just as much as choosing a premium speaker brand.
Best 3-Way Component Speakers for Car Audio: Top 2026 Picks for Clear Sound
#1. DYNAUDIO Esotan 372 MKII
Premium 3-Way Component Speakers for Audiophile Sound, Precise Vocal Imaging and High-End Car Audio
#2. HERTZ Mille Pro MPK 1633
High-Performance 3-Way Car Speakers for Detailed Instrument Separation, Dynamic Sound and Amplifier Upgrades
#3. Sony Mobile ES XS-163ES
6.5-Inch 3-Way Component Speakers for High-Resolution Car Audio, Clear Vocals and Detailed Treble
#4. Morel Maximo Ultra 603 MKII
3-Way Component Car Speakers for Smooth Vocals, Balanced Sound Quality and Everyday Listening
#5. KICKER 51KSS365 KS-Series
6.5-Inch 3-Way Car Audio Speakers for Powerful Front-Stage Sound, Clear Highs and Speaker Upgrades
#6. Focal Access 165 A3
3-Way Component Speaker System for Clear Treble, Improved Soundstage and Detailed Car Audio
Must Check: Best 6.5″ Component Car Speakers
Expert Tip
Before spending money on a 3-way component system, check where the midrange driver can actually be installed in your car. A dedicated midrange only helps when it can be positioned and integrated properly with the woofer and tweeter. Also, don’t judge a speaker by its maximum wattage alone. Check its RMS power handling, impedance, sensitivity and crossover requirements against your amplifier. A well-matched system can deliver cleaner vocals and better detail than a more expensive setup that has been installed poorly.
How We Choose These 3-Way Component Speakers
We selected these six systems by looking at what matters when upgrading a real car audio setup: driver configuration, sound-quality potential, power requirements, installation considerations and the needs of different buyers. Rather than treating every expensive speaker as automatically better, we considered what each system brings to the comparison.
- Driver design and sound reproduction: We looked at the dedicated woofer, midrange and tweeter arrangements, along with the available crossover features. These details help explain how each system is designed to handle bass, vocals and high-frequency detail.
- Power and amplifier compatibility: RMS ratings, impedance and sensitivity matter when matching speakers to an existing head unit or external amplifier. We considered the published specifications where available instead of relying on peak-wattage marketing.
- Different budgets and listening priorities: The DYNAUDIO Esotan 372 MKII and HERTZ Mille Pro MPK 1633 represent premium-focused options, while the Sony Mobile ES XS-163ES, Morel Maximo Ultra 603 MKII, KICKER 51KSS365 and Focal Access 165 A3 give readers other systems to compare. The aim is to help you narrow down your options, not to suggest that one speaker will suit every listener.
- Installation and vehicle fitment: A nominal 6.5-inch size does not guarantee a direct fit. Mounting depth, cut-out dimensions, available midrange locations, crossover placement and wiring can all affect installation. We recommend checking these details before ordering.
- Honest limits of the comparison: Manufacturer specifications can tell us about design and compatibility, but they cannot establish which speaker sounds best in every vehicle. Unless comparable independent listening tests are available, we do not present subjective sound rankings as measured results or claim hands-on testing that has not been performed.
Our goal is to make the choice clearer before you spend your money. The right 3-way component speakers are the ones that suit your vehicle, amplifier, installation options and listening preferences—not simply the ones with the highest price or biggest power figure.
#1. DYNAUDIO Esotan 372 MKII Series 6.5-Inch 3-Way Component Speakers
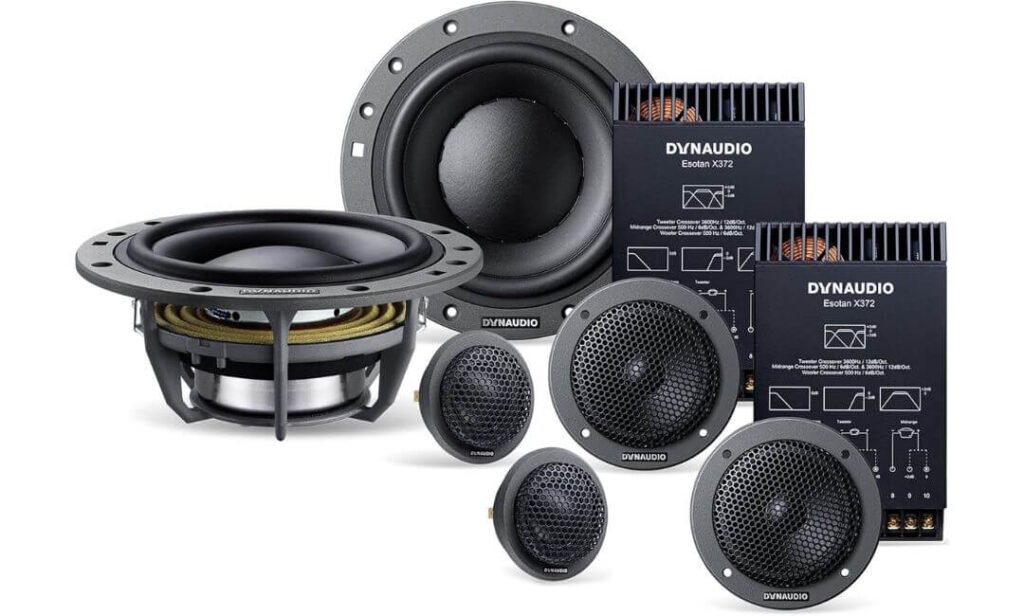
Quick Specs:
- Speaker Configuration: 3-way component system with separate woofer, midrange and tweeter
- Woofer: MF172 with MSP (Magnesium Silicate Polymer) cone and 65mm aluminium voice coil
- Midrange: MF171 with an updated aramid-fibre spider
- Tweeter: MT171 with a coated textile dome, neodymium magnet and 28mm aluminium voice coil
- Power Handling: 150W RMS / 400W peak (as supplied)
- Impedance: 4 ohms
- Frequency Response: 50Hz–20kHz (as supplied)
- Crossover: X372 with adjustable tweeter and midrange levels
Some speaker upgrades make music louder without making it easier to listen to. This Dynaudio system takes a more considered approach, using three dedicated drivers to reproduce different parts of the music. The MF172 woofer, MF171 midrange and MT171 tweeter work through the included X372 crossover, giving you a proper three-way setup rather than a conventional two-way component kit with an additional driver added as an afterthought.
The hardware is a big part of its appeal. The woofer uses an MSP cone and 65mm aluminium voice coil, while the midrange has an updated aramid-fibre spider designed to improve stability and power handling. Up top, the coated textile-dome tweeter uses a neodymium magnet and a 28mm aluminium voice coil. These are meaningful design choices for a system aimed at detailed reproduction, although the materials alone cannot guarantee how it will sound in your particular car.
The X372 crossover is especially important because it lets you adjust tweeter and midrange levels to suit the cabin. That flexibility can help when the dashboard, door locations and listening position make certain frequencies stand out too much. With a published rating of 150W RMS at 4 ohms, the kit can suit a serious amplified installation, but your amplifier’s output, crossover configuration and gain settings still need to be matched correctly.
(Italian-inspired listening character: refined detail, natural vocals and a carefully balanced soundstage.)
What We Like About the Design
- Dedicated three-way architecture: Separate drivers handle bass, midrange and treble, giving the system greater flexibility than a standard two-way component arrangement.
- Adjustable crossover levels: The X372 offers three tweeter-level positions and two midrange-level positions, according to the supplied specifications.
- Purpose-built driver materials: The MSP woofer cone and aramid-fibre midrange spider are specific design features, not just generic claims about sound quality.
- Serious amplification potential: The stated 150W RMS handling makes this worth considering for a properly matched external amplifier.
- Complete component arrangement: The tweeter, midrange, woofer and crossover are designed to work as one system, so you can plan the installation around a single matched kit.
One Installation Detail to Plan For
A three-way system needs more than a suitable 6.5-inch door opening. You must also find appropriate mounting positions for the separate midrange and tweeter, route the wiring and position the crossovers. Depending on your vehicle, speaker adapters, mounting brackets or fabrication work may be necessary; don’t assume the kit will fit every factory location without modification.
Where Its Three-Way Design Pays Off
The main reason to shortlist this system is its combination of dedicated midrange reproduction and crossover adjustment. Vocals and instruments occupy a large part of the audible spectrum, so their clarity depends on the entire installation—not simply on how much bass the woofer produces. The separate drivers give an installer more options for distributing those frequencies and balancing their levels in the cabin.
That does not make it an automatic winner over every Focal, Hertz, Sony or Morel system. Speaker placement, acoustic treatment, amplifier matching and tuning can change the outcome considerably. Its strongest case is for someone building a carefully integrated system and willing to get the installation right.
The Insider Pro-Tip
Before buying, ask your installer to map out all three driver positions and confirm the crossover wiring for your exact vehicle. If the midrange has nowhere suitable to go, the installation may require custom work—and that cost belongs in your budget alongside the speakers.
Also, treat the 150W RMS rating as a compatibility reference, not a target you must reach. A clean, correctly configured amplifier with suitable output can be a better choice than a more powerful unit running with poor gain settings. Confirm the manufacturer’s current installation instructions and crossover settings before connecting the system.
#2. HERTZ Mille Pro Series MPK 1633 6.5-Inch Three-Way Pro Audio Component System
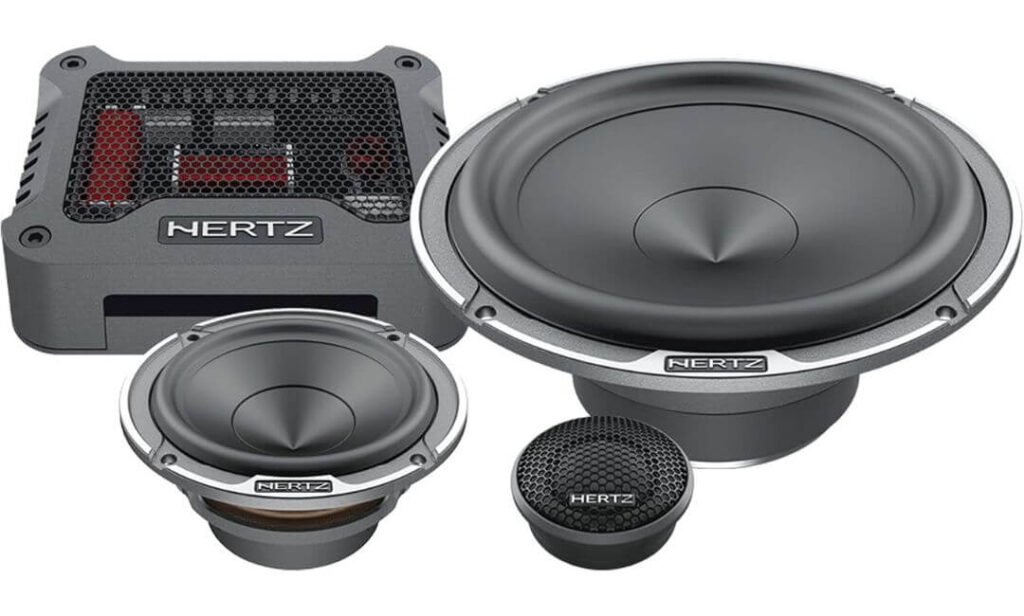
Quick Specs:
- Speaker Configuration: 3-way component system with dedicated woofer, midrange and tweeter
- Woofer: MP 165.3, 6.5-inch driver with V-Cone profile and Boundary Free rubber surround
- Midrange: MP 70.3, 3-inch driver with a neodymium double-magnet system
- Tweeter: MP 25.3, 29mm Tetolon fibre soft-dome design
- Power Handling: 150W RMS / 300W peak (as supplied)
- Impedance: 4 ohms
- Sensitivity: 92dB SPL (as supplied)
- Frequency Response: 40Hz–22.5kHz (as supplied)
- Crossover: MPCX 3.3 dedicated crossover network
A three-way speaker system is only as useful as the way its drivers work together. The MP 165.3 woofer, MP 70.3 midrange and MP 25.3 tweeter give this Hertz kit three dedicated drivers for handling different parts of the audio spectrum. That makes it worth considering if you’re upgrading from factory speakers and want a more carefully separated front-stage setup rather than simply chasing higher volume.
The woofer has a V-Cone profile and Boundary Free rubber surround, while the dedicated 3-inch midrange uses a neodymium double-magnet arrangement. The tweeter features a Tetolon fibre soft dome, a design intended to deliver detailed high frequencies without relying on an aggressively bright presentation. These construction details help explain the system’s approach, although the actual balance will still depend on placement, cabin acoustics and tuning.
The included MPCX 3.3 crossover is another important part of the package because it manages how frequencies are distributed between the three drivers. The supplied specifications list 150W RMS power handling, 4-ohm impedance and 92dB sensitivity. Those figures make amplifier matching worth considering, but they don’t mean you need to feed the speakers their maximum rated power to get useful results. A correctly configured amplifier and sensible crossover setup matter just as much.
(Italian-inspired sound character: energetic presentation, detailed vocals and controlled high-frequency definition.)
What We Like About This Component Design
- A dedicated 3-inch midrange: The MP 70.3 gives vocals and upper-midrange instruments their own driver rather than asking the woofer to cover the entire lower and middle frequency range.
- Purpose-built woofer surround: The Boundary Free rubber surround is designed to support woofer movement while helping the driver operate within its intended design limits.
- Tetolon fibre tweeter: The MP 25.3 uses a soft-dome design that suits buyers looking for detail in cymbals, vocals and other high-frequency sounds.
- Dedicated crossover network: The MPCX 3.3 is supplied as part of the system, so you can plan around the matched three-way arrangement instead of sourcing a separate crossover independently.
- Useful published power and sensitivity figures: The stated 150W RMS handling and 92dB sensitivity help when assessing amplifier compatibility, provided the figures are confirmed against the manufacturer’s documentation for the exact kit.
One Fitment Detail Worth Checking First
Although the woofer is a nominal 6.5-inch size, the dedicated midrange needs its own mounting location, and the tweeter may require a separate surface or flush-mount position. Check the mounting depth, cut-out dimensions, door clearance and crossover placement before ordering. A low mounting depth can help in some installations, but it does not guarantee direct fitment in every vehicle.
Where This Three-Way System Makes Sense
The appeal here is the combination of a dedicated midrange, a separate tweeter and a woofer designed with a specialised surround. Together, these features give an installer more control over how vocals, instruments and high frequencies are reproduced across the front of the cabin. The published 40Hz–22.5kHz frequency response also describes the manufacturer’s stated operating range, but it should not be taken as proof of deep subwoofer-level bass or uniform output at every frequency.
Compared with other systems on this list, the Hertz is a strong candidate for buyers who want a performance-oriented component setup with a dedicated crossover. However, there is no reliable basis for claiming that its 6.5-inch woofer performs like an 8-inch driver in every vehicle. If you want genuinely deep bass at higher volumes, a properly integrated subwoofer may still be necessary.
The Insider Pro-Tip
Before pairing this system with an external amplifier, check the amplifier’s RMS output at 4 ohms per channel and confirm how the crossover should be wired for the complete three-way kit. Don’t connect the woofer, midrange and tweeter as though they were three interchangeable full-range speakers. Follow Hertz’s installation instructions so each driver receives the intended frequency range.
If you’re choosing between this and another premium component system, compare the installation cost as well as the speaker price. The midrange mounting position, door treatment and final tuning can have a noticeable effect on the result, and those details are worth budgeting for before you buy.
#3. Sony Mobile ES XS-163ES 6.5-Inch 3-Way Component Speakers
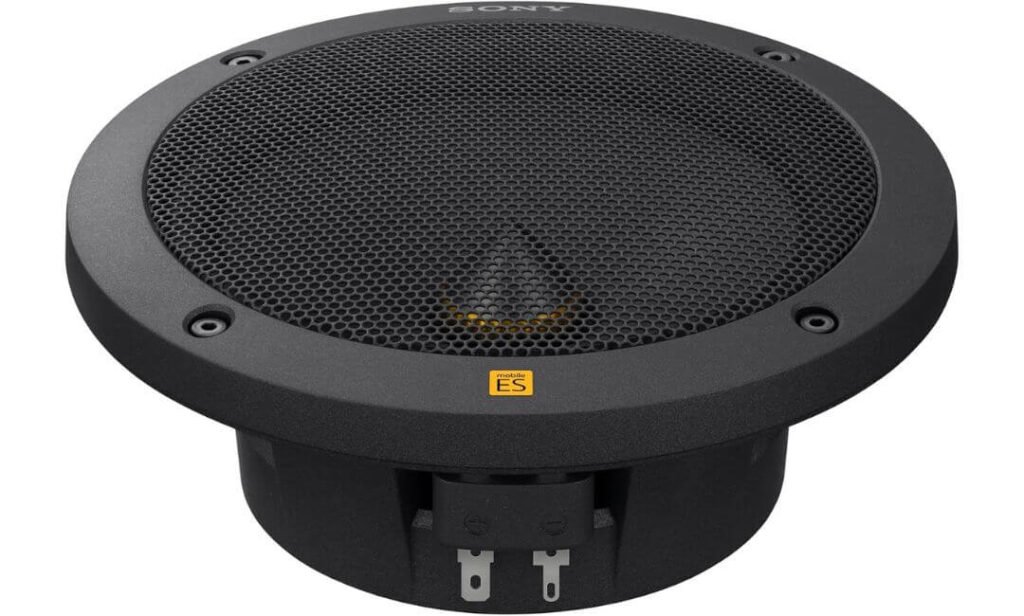
Quick Specs:
- Speaker Configuration: 3-way component system with separate woofer, midrange and tweeter drivers
- Woofer: 6.5-inch driver with a Lightweight Rigid Cellular aramid-fibre matrix diaphragm
- Midrange: 3.5-inch driver with an aramid-fibre matrix diaphragm
- Tweeter: Soft-dome design with high-frequency reproduction up to 40,000Hz
- Power Handling: 90W RMS / 270W peak
- Impedance: 4 ohms
- Sensitivity: 89dB (as supplied)
- Crossover: Two external crossover units included
- Frame Design: Five-beam frame with Dynamic Air Diffuser
- Warranty: 3 years, according to the supplied product information
Not every speaker upgrade needs to be built around maximum output. The Sony Mobile ES XS-163ES takes a more detail-focused approach, combining a 6.5-inch woofer, a dedicated 3.5-inch midrange and a soft-dome tweeter. With separate drivers handling different frequency ranges, this system gives you a proper three-way configuration for a front-stage upgrade rather than relying on one driver to cover too much of the musical spectrum.
One of its more interesting features is the Lightweight Rigid Cellular aramid-fibre matrix diaphragm used in the woofer and midrange. Sony also incorporates resonance-damping phase plugs to help maintain the intended frequency response around the crossover regions. These features are relevant when evaluating driver design, but they do not guarantee distortion-free sound or a particular tonal balance in every car.
The frame and cooling design deserve attention, too. Sony’s Five-beam Frame is designed to disperse resonance, while the Dynamic Air Diffuser supports airflow around the moving assembly and voice coil. The soft-dome tweeter is specified to reproduce frequencies up to 40kHz, extending beyond the conventional audible range for most listeners. The more practical buying considerations are its 90W RMS power handling, 4-ohm impedance and included external crossovers, which help determine how it should be integrated with your existing head unit or amplifier.
(Japanese-inspired listening character: clean presentation, detailed vocals and an emphasis on high-frequency refinement.)
What We Like About the Engineering
- Dedicated 3.5-inch midrange: Gives vocals and instruments their own driver, which can help with frequency distribution in a properly installed system.
- Aramid-fibre matrix diaphragms: Used in the woofer and midrange to balance rigidity and low moving mass.
- Resonance-conscious frame design: The Five-beam Frame and Dynamic Air Diffuser address vibration and airflow rather than relying on power ratings alone.
- External crossovers included: The kit includes separate crossover units for managing the intended frequency distribution between drivers.
- A useful amplifier reference: The stated 90W RMS handling at 4 ohms gives buyers a practical starting point when checking amplifier compatibility.
One Detail to Check Before Ordering
The 40kHz tweeter specification does not automatically mean you’ll hear more detail than with a system rated to 20kHz. Installation, crossover integration, driver quality and the audible frequency range all matter more than the upper limit alone. Also, confirm the supplied three-year warranty with the authorised seller in your region before purchase.
Where This Three-Way Setup Fits Best
The XS-163ES makes sense for someone who wants a carefully designed component system with a dedicated midrange and attention to resonance control. Its separate drivers and included crossovers provide the building blocks for a more organised front-stage installation, while the published 90W RMS rating makes amplifier matching particularly important. It is not necessary to run the system at its maximum rated power to benefit from a correctly installed upgrade.
Against the Dynaudio and Hertz options in this list, Sony offers a different balance of design features and power handling. However, specifications alone cannot establish which system will sound best. Cabin acoustics, speaker positioning, door treatment and tuning can all change the outcome, so treat this as a candidate to compare rather than an automatic winner.
The Insider Pro-Tip
Before choosing an amplifier, check its clean RMS output at 4 ohms per channel rather than its advertised peak wattage. Then confirm the crossover connections and mounting locations for all three driver types. The 3.5-inch midrange needs a suitable location of its own, and the woofer’s 6.5-inch size does not guarantee that it will fit every factory door opening.
If you’re upgrading a daily driver, spend time planning the installation before buying extra equipment. Proper mounting, secure wiring and correct crossover integration can make a more meaningful difference than chasing a larger power number.
#4. Morel Maximo Ultra 603 MKII 6.5-Inch 3-Way Component Speakers

Quick Specs:
- Speaker Configuration: 3-way component speaker system with dedicated woofer, midrange and tweeter
- Woofer: 6.5-inch driver with a treated paper composite cone
- Midrange: 2.5-inch dedicated midrange driver
- Tweeter: 1-inch soft-dome tweeter
- Power Handling: 90W RMS / 180W peak per speaker; 180W RMS / 360W peak per pair
- Impedance: 4 ohms
- Sensitivity: 90.5dB (as supplied)
- Frequency Response: 50Hz–20kHz
- Mounting Depth: 63mm (2.5 inches)
- Crossover: MXR Direct Crossovers
- Other Inclusions: Speaker grilles
A three-way setup becomes useful when each driver has a clear job. The Morel Maximo Ultra 603 MKII combines a 6.5-inch woofer, a separate 2.5-inch midrange and a 1-inch soft-dome tweeter, giving vocals and instruments their own dedicated driver rather than asking the woofer to handle the entire middle range. For someone upgrading factory speakers, that configuration offers a sensible starting point for building a more carefully balanced front stage.
Morel uses a treated paper composite cone in the woofer, alongside high-grade ferrite magnets and its External Voice Coil (EVC) technology. These are specific construction choices worth considering when comparing component systems. The 2.5-inch midrange also gives the installer a separate driver to position for vocal reproduction, although its final performance depends on placement, crossover integration and the acoustics of the cabin.
The practical specifications make this system easier to assess before purchase. It is rated at 90W RMS per speaker, with a stated 4-ohm impedance and 90.5dB sensitivity. The included MXR Direct Crossovers are designed to distribute frequencies to the appropriate drivers, while the 63mm mounting depth provides a useful reference when checking door clearance. That depth is not especially large, but it still needs to be compared with the available space in your particular vehicle.
(Italian-inspired listening character: balanced musical presentation, natural vocals and smooth high-frequency detail.)
What We Like About the Design
- Dedicated 2.5-inch midrange: Gives vocals and upper-midrange instruments their own driver, supporting a more deliberate three-way installation.
- Treated paper composite woofer cone: A practical material choice for a driver that must reproduce lower frequencies and part of the midrange.
- Soft-dome tweeter: Provides a dedicated high-frequency driver for treble detail without relying on the woofer to cover that range.
- MXR Direct Crossovers included: The matched crossover components help simplify planning for the complete system.
- Useful mounting and power figures: The stated 63mm depth and 90W RMS-per-speaker rating help you assess fitment and amplifier compatibility before spending money.
One Fitment Detail to Check
The 63mm mounting depth may suit some factory door locations, but it does not guarantee a direct fit. Check the window mechanism, door-panel clearance, mounting diameter and space required for the separate midrange. Depending on your vehicle, you may need adapter rings, brackets or additional installation work.
Where This Three-Way System Makes Sense
The main appeal is its combination of a dedicated midrange, treated-paper woofer and included crossover network. These features make it a relevant option for buyers who want to move beyond basic factory speakers without choosing a system solely on peak wattage. Its published 50Hz–20kHz frequency response describes the stated operating range, but it should not be interpreted as proof of strong sub-bass output at high volume.
Compared with the Dynaudio, Hertz and Sony options in this shortlist, the Morel gives you another combination of driver materials, power handling and installation dimensions to evaluate. There is no reliable basis for declaring it the best-sounding option without comparable listening tests. Your amplifier, mounting positions, door treatment and final tuning will all influence the result.
The Insider Pro-Tip
Before ordering, compare the speaker’s 63mm mounting depth with the actual clearance inside your door, including the space needed for the window glass when lowered. Check the midrange and tweeter locations separately; a suitable woofer opening alone does not complete a three-way installation.
For amplifier matching, use the stated 90W RMS per speaker as a reference rather than a power target. Confirm the amplifier’s clean output at 4 ohms and follow Morel’s crossover wiring instructions. Correct installation and tuning will matter more than simply choosing an amplifier with a larger advertised wattage.
#5. KICKER 51KSS365 KS-Series 6.5-Inch 3-Way Component Speakers
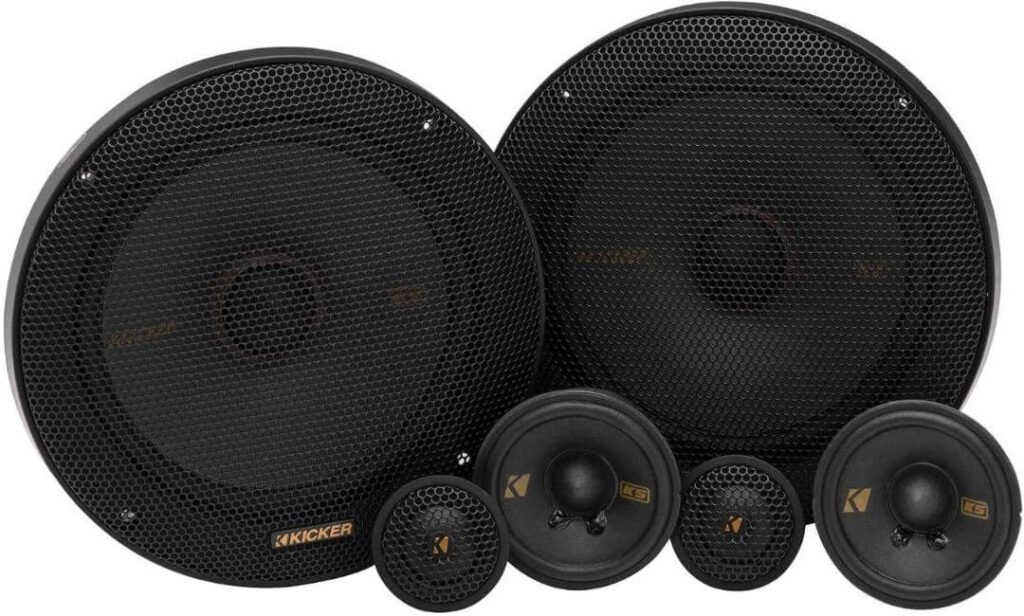
Quick Specs:
- Speaker Configuration: 3-way component system with separate woofer, midrange and tweeter
- Woofer: 6.5-inch driver
- Midrange: 2.75-inch dedicated midrange driver
- Tweeter: 1-inch tweeter
- Power Handling: 160W peak per pair (RMS rating should be confirmed against the manufacturer’s specifications)
- Impedance: 4 ohms
- Sensitivity: 91dB (as supplied)
- Frequency Response: 35Hz–21kHz (as supplied)
- Crossover: Inline 12dB crossover network
- Mounting Options: Angled, surface and flush tweeter mounts, plus three midrange mounting brackets
The KICKER 51KSS365 KS-Series takes a practical approach to three-way car audio, combining a 6.5-inch woofer, a dedicated 2.75-inch midrange and a 1-inch tweeter. That separate midrange gives installers another option for positioning vocals and instruments, while the dedicated tweeter handles higher frequencies. For drivers looking to upgrade their factory sound without jumping straight into a highly customised audio build, this configuration offers a useful starting point.
Its inline 12dB crossover network helps direct the appropriate frequency ranges to the individual drivers. KICKER also includes several tweeter mounting options, allowing the installer to choose a position that suits the vehicle’s interior and desired soundstage. The three mounting brackets for the midrange add flexibility, although the actual installation will depend on the available factory openings and mounting space.
The system’s stated 91dB sensitivity and 4-ohm impedance are useful figures when comparing it with other component speakers and checking amplifier compatibility. Its advertised frequency response extends from 35Hz to 21kHz, but that range alone does not guarantee deep bass or distortion-free playback at high volume. The supplied specifications list 160W peak power; verify the manufacturer’s RMS rating before choosing an amplifier.
(American car-audio character: lively playback, a flexible installation layout and an emphasis on everyday listening.)
What We Like About the Installation Design
- Dedicated 2.75-inch midrange: Provides a separate driver for vocals and instruments instead of relying on the woofer to reproduce the entire middle range.
- Multiple tweeter mounting options: Angled, surface and flush mounts give installers more freedom to position the tweeters.
- Three midrange mounting brackets: Help accommodate different vehicle layouts, subject to available space and compatible mounting points.
- Inline 12dB crossover network: Provides frequency separation for the three-way speaker arrangement.
- 91dB stated sensitivity: A useful comparison point when evaluating how the system may pair with a compatible amplifier.
One Specification Worth Verifying
The supplied information lists 160W peak power but does not clearly establish the RMS rating. Confirm the manufacturer’s rated continuous power handling before buying an amplifier or comparing this system with speakers rated at 90W or 100W RMS. Peak and RMS figures describe different things and should not be treated as interchangeable.
Where This Three-Way System Makes Sense
The KICKER’s strongest practical selling point is its installation flexibility. The separate midrange, multiple tweeter mounting options and included crossover network give installers several ways to arrange the front stage around a vehicle’s existing speaker locations. That flexibility may be especially useful in cars and trucks where the factory tweeter and midrange positions differ from one model to another.
Compared with the Morel Maximo Ultra 603 MKII, the KICKER places more emphasis on mounting options and installation adaptability. Both offer a dedicated midrange and tweeter, but the better choice depends on your available mounting locations, amplifier setup and preferred sound. Check the actual dimensions and vehicle-specific fitment rather than assuming the system will fit every GM, Ford, Jeep, Dodge or imported vehicle without modification.
The Insider Pro-Tip
Plan the midrange and tweeter positions before fitting the door panels back into place. Tweeter placement can affect how clearly vocals and high-frequency details appear to come from the front of the cabin, while the midrange position influences the balance between the woofer and the upper frequencies.
When connecting an amplifier, confirm the system’s RMS power handling and 4-ohm load requirements using the manufacturer’s documentation. Follow the supplied crossover wiring diagram, keep left and right channel connections consistent, and avoid judging performance by peak wattage alone. Correct positioning and tuning can make a greater practical difference than simply increasing amplifier power.
#6. Focal Access 165 A3 6.5-Inch 3-Way Component Speaker Kit
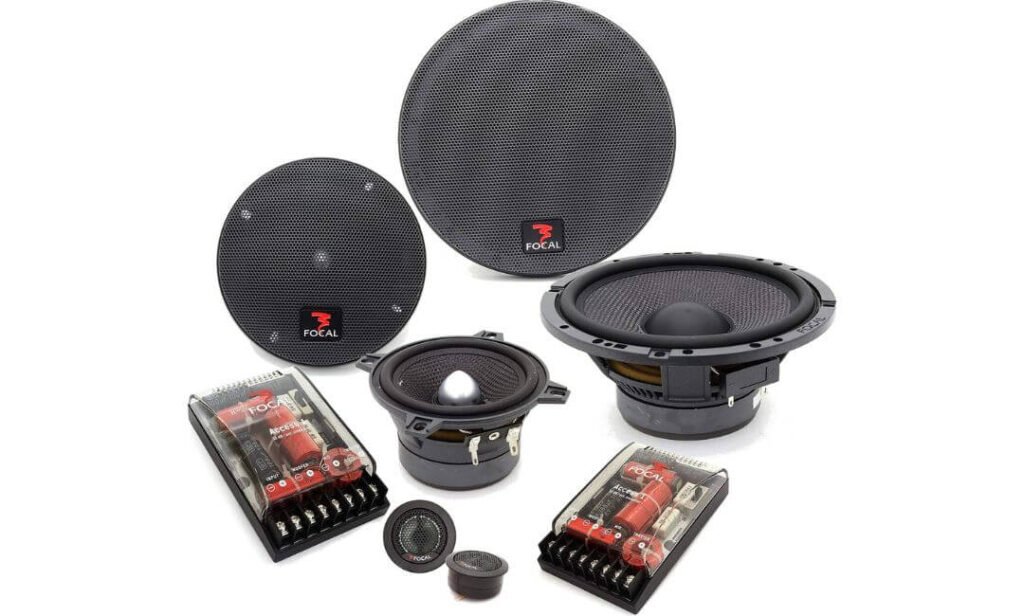
Quick Specs:
- Speaker Configuration: 3-way component system with separate woofer, midrange and tweeter
- Woofer: 6.5-inch driver with woven glass-fibre cone
- Midrange: Dedicated midrange driver with woven glass-fibre cone
- Tweeter: Aluminium inverted-dome design
- Power Handling: 160W maximum (RMS rating should be verified)
- Impedance: 4 ohms
- Surround Material: Butyl rubber
- Crossover: Separate crossover networks with 12dB/octave filtering (as supplied)
- Crossover Frequency Range: 300Hz–4kHz (as supplied; confirm the individual crossover points)
- Tweeter Adjustment: Three-level control
- System Components: Woofer pair, midrange pair, tweeter pair and crossover networks
Focal approaches the Access 165 A3 with a dedicated driver for each major frequency range. The 6.5-inch woofer handles bass and lower-midrange duties, while the separate midrange driver takes on vocals and much of the detail in instruments. An aluminium inverted-dome tweeter covers the higher frequencies, giving the installer more control over how the front stage is arranged than a conventional two-way component set typically allows.
The woven glass-fibre cones used in the woofer and midrange are a notable part of the design. Cone material influences stiffness, mass and resonance behaviour, all of which affect how a driver reproduces sound. Focal pairs this construction with butyl rubber surrounds, while the separate crossover networks divide the signal between the drivers. The quality of the final result still depends on installation, crossover integration and the acoustics of the vehicle.
A useful feature is the three-level tweeter adjustment, which allows the high-frequency output to be tailored to the cabin and listening position. That can help if the tweeters sound too prominent after installation, although the available settings are not a substitute for correct placement and tuning. The stated 160W maximum rating should also be treated separately from RMS power handling when matching the speakers to an amplifier.
(French speaker-design character: a driver-separated front stage with adjustable treble and a focus on sound imaging.)
What We Like About the Design
- Dedicated midrange drivers: Give vocals and instruments their own reproduction range rather than asking the woofer to handle all lower and middle frequencies.
- Woven glass-fibre cones: Provide a purpose-designed balance of stiffness and weight for the woofer and midrange.
- Aluminium inverted-dome tweeters: Offer a distinct tweeter design for high-frequency reproduction and stereo imaging.
- Three-level tweeter control: Helps adjust treble balance to suit the vehicle’s interior and speaker placement.
- Separate crossover networks: Provide the frequency filtering needed to integrate the three driver types.
One Crossover Detail to Check
The supplied information lists 12dB/octave filtering and a 300Hz–4kHz range, but that wording does not clearly identify each crossover point or which filter applies to each driver. Check the manufacturer’s wiring diagram and crossover specifications before installation. The correct connections and frequency allocation matter for both sound quality and safe driver operation.
Where This Three-Way System Makes Sense
The Focal Access 165 A3 is worth considering when your goal is a more carefully separated front soundstage, particularly for music where vocal placement and instrument detail matter. Its dedicated midrange and adjustable tweeter output provide useful tuning options, but the three-way layout works best when the vehicle offers suitable mounting positions for all three drivers.
Compared with the KICKER 51KSS365 KS-Series, the Focal places particular emphasis on its glass-fibre driver cones, inverted-dome tweeters and tweeter-level adjustment. Neither system is automatically the better choice for every car. Compare the actual driver dimensions, mounting depth, crossover layout, price and confirmed power ratings before deciding.
The Insider Pro-Tip
Before buying, confirm the midrange driver’s exact size and mounting requirements along with the woofer depth and tweeter mounting options. A nominal 6.5-inch woofer does not guarantee a direct fit, and the dedicated midrange needs a suitable location to integrate properly with the other drivers. You may need vehicle-specific brackets or minor installation work.
During setup, start with the tweeter at its neutral setting, then adjust it only after listening from the driver’s seat with familiar tracks. Check that vocals remain clear without the treble becoming distracting, and verify the amplifier’s RMS output at 4 ohms against Focal’s official specifications. A correctly positioned and balanced system is a better goal than simply maximising volume.
Best 3 Way Component Speakers (2026): Side-by-Side Specs and Features
Swipe horizontally to compare all six speaker systems →
| Speaker System | Driver Setup | Power & Impedance | Sensitivity | Crossover & Tuning | Main Strength | What to Check |
|---|---|---|---|---|---|---|
| Dynaudio Esotan 372 MKII Premium-focused | 6.5″ + 4″ + 28mm Woofer, dedicated midrange and textile-dome tweeter | 150W RMS 400W peak · 4Ω | Not confirmed in supplied specs | X372 crossover Adjustable midrange and tweeter levels | Driver-specific construction and adjustable crossover levels for a carefully tuned front stage. | Confirm mounting dimensions, crossover configuration and suitable midrange placement. |
| Hertz Mille Pro MPK 1633 Dynamic presentation | 6.5″ + 3″ + 29mm MP 165.3 woofer, MP 70.3 midrange and MP 25.3 tweeter, as supplied | 150W RMS 300W peak · 4Ω | 92dB As supplied | MPCX 3.3 Crossover network listed in supplied details | Dedicated midrange with Tetolon-fibre soft-dome tweeter and V-Cone woofer design. | Verify the exact MPK 1633 kit configuration and official crossover specifications before purchase. |
| Sony Mobile ES XS-163ES High-frequency extension | 6.5″ + 3.5″ + tweeter Aramid-fibre matrix woofer and midrange; soft-dome tweeter | 90W RMS 270W peak · 4Ω | 89dB As supplied | Two external crossovers Tweeter response listed up to 40kHz | Aramid-fibre matrix diaphragms and a dedicated midrange in the Mobile ES range. | Allow space for both crossover units and verify mounting depth and amplifier output. |
| Morel Maximo Ultra 603 MKII Everyday listening | 6.5″ + 2.5″ + 1″ Treated paper-composite woofer, midrange and soft-dome tweeter | 90W RMS per speaker 180W RMS per pair · 4Ω | 90.5dB As supplied | MXR Direct Crossovers Confirm the included network’s exact adjustment options | Dedicated midrange, soft-dome tweeter and a stated 63mm mounting depth. | Check the 63mm depth against window clearance and the available midrange mounting location. |
| KICKER 51KSS365 KS-Series Flexible mounting | 6.5″ + 2.75″ + 1″ Woofer, dedicated midrange and tweeter | 160W peak 4Ω · RMS rating needs confirmation | 91dB As supplied | Inline 12dB crossover Angled, surface and flush tweeter mounting options | Multiple tweeter mounts and three midrange brackets help accommodate different layouts. | Confirm RMS handling, driver dimensions and whether the supplied brackets fit your vehicle. |
| Focal Access 165 A3 Adjustable treble | 6.5″ + 4″ + 1″ Woven glass-fibre woofer and midrange; aluminium inverted-dome tweeter | 160W maximum 4Ω · RMS rating needs confirmation | Not confirmed in supplied specs | Separate crossover networks Three-level tweeter adjustment; confirm exact crossover points | Glass-fibre driver cones and tweeter-level adjustment for system integration. | Confirm individual crossover points, midrange fitment and the manufacturer’s RMS rating. |
3-Way Component Car Speakers Buying Guide for a Better-Matched Sound System
Choosing three-way component speakers involves more than comparing wattage, cone materials or brand names. The system needs to work with your car’s speaker locations, electrical setup and listening preferences. A well-designed set can provide clearer vocals and more controlled instrument separation, but those benefits depend on correct driver placement, crossover integration and amplifier matching.
The six systems in this guide take different approaches to driver design and installation. Before choosing one, work through the following factors in order. They will help you narrow the options based on what your car can accommodate and what your existing audio system can realistically support.
1. Start With Your Budget and the Total Installation Cost
Set a budget for the complete upgrade, not just the speaker kit. Three-way component systems contain more individual drivers and wiring than typical coaxial speakers, so installation can involve additional labour, mounting brackets, crossover placement and door-panel modifications.
Your final cost may include:
- Speaker kit: Compare the included woofers, midrange drivers, tweeters, crossovers and mounting accessories. Confirm whether the listed price covers a complete left-and-right pair.
- Installation hardware: Vehicle-specific adapters, mounting rings, fasteners and wiring adapters may be needed even when the woofer is advertised as 6.5 inches.
- Installation labour: A system with factory-compatible mounting points may be simpler to install than one requiring custom midrange locations or fabricated brackets.
- Amplifier or signal upgrades: You may be able to retain the factory head unit, but some systems benefit from a suitable external amplifier or a better-integrated audio signal.
- Sound treatment: Treating door panels can reduce unwanted vibration and improve the conditions in which the woofers operate. It is worth budgeting for where needed rather than assuming new speakers alone will eliminate every rattle.
Avoid spending the entire budget on the most expensive speaker set if it leaves no room for proper installation. A correctly mounted, sensibly tuned system can be more satisfying than a higher-priced kit installed in unsuitable locations.
2. Confirm Vehicle Compatibility Before Comparing Speaker Sizes
The first fitment check is your vehicle’s exact make, model, model year and trim. Factory audio packages can use different speaker locations, wiring arrangements and mounting depths within the same vehicle range. Some premium factory systems also use external amplifiers or vehicle-specific signal processing.
A 6.5-inch woofer is a nominal size, not proof of direct fitment. The opening may need an adapter, the mounting depth may interfere with the window mechanism, or the factory location may not accommodate a separate midrange driver.
Check these details before ordering:
- Woofer cut-out and mounting depth: Confirm the opening diameter, screw pattern and available depth, including space for the magnet and wiring.
- Window and door clearance: Make sure the speaker and mounting ring will not obstruct the window glass, regulator or door mechanism when the window is fully lowered.
- Midrange location: Identify a suitable factory opening or a practical mounting position. The driver should integrate with the woofer and tweeter rather than being placed wherever space happens to be available.
- Tweeter mounting: Check whether the original tweeter position accepts the new driver, or whether a flush, surface or angled mount is required.
- Crossover location: Allow room for the crossover units, keep them away from moisture where possible, and secure them against vibration.
- Electrical integration: Determine whether the factory wiring, amplifier and audio processing are compatible with the new system.
Do not assume a manufacturer’s broad vehicle-compatibility statement guarantees a bolt-in installation for every trim. Check a reliable vehicle-specific fitment database, the speaker manufacturer’s installation documentation or a qualified installer who can inspect the actual mounting locations.
3. Understand RMS Power, Peak Power and Amplifier Matching
Power ratings are useful only when you compare the right figures. RMS or continuous power handling indicates how much power a speaker is designed to handle under specified conditions, while peak or maximum ratings describe a higher short-duration figure that should not be used alone to choose an amplifier.
When comparing component systems, check both the speaker’s continuous power handling and the amplifier’s rated output at the relevant impedance. Also consider the sensitivity rating, available head-unit output and whether the system will be used with a factory amplifier or an aftermarket unit.
A practical matching checklist:
- Confirm the speaker kit’s official RMS power-handling rating.
- Check the amplifier’s RMS output per channel at the speaker’s rated impedance.
- Make sure the amplifier can drive the load safely and is not being asked to operate below its supported impedance.
- Set gain correctly; the gain control is for matching input signal levels, not simply increasing volume.
- Avoid sustained clipping, which can damage speakers even when the amplifier’s advertised power appears suitable.
A high-wattage amplifier is not automatically necessary. If the speakers are reasonably sensitive and the listening level is moderate, an existing head unit or factory amplifier may be sufficient, provided the electrical load and available clean output are appropriate. An external amplifier becomes more useful when the current system lacks clean volume, dynamic headroom or the output needed by the selected speakers.
The important distinction is between having enough clean power and merely having a large number printed on an amplifier’s specification sheet.
4. Compare Sensitivity and Impedance Together
Sensitivity and impedance help explain how a speaker may behave in a particular audio system, but neither should be judged in isolation.
Sensitivity describes how much sound output a speaker produces for a given input under a specified measurement method. Higher sensitivity can be helpful when using a head unit with limited power. However, sensitivity figures are only directly comparable when the measurement conditions are the same, such as 1 watt at 1 metre versus 2.83 volts at 1 metre. Those methods can produce different-looking ratings, particularly when comparing speakers with different impedances.
Impedance describes the electrical load presented to the amplifier. A speaker’s nominal impedance is not constant across all frequencies, so the amplifier must be designed to handle the load safely.
Use these specifications as a combined assessment:
| Specification | What it tells you | What to check |
|---|---|---|
| RMS power handling | The speaker’s stated continuous power capability | Match it sensibly with clean amplifier output |
| Peak or maximum power | A higher short-duration rating under the manufacturer’s conditions | Do not use it as the only amplifier-matching figure |
| Sensitivity | Relative output under a defined measurement method | Compare ratings measured using the same method |
| Nominal impedance | The speaker’s stated electrical load | Confirm the amplifier supports that load |
| Frequency response | The frequency range quoted under the stated test conditions | Check the measurement tolerance and do not assume the range guarantees even output |
A speaker rated at 91dB sensitivity is not automatically better than one rated at 89dB. The measurement method, frequency balance, installation and amplifier all affect the result. Similarly, a wide quoted frequency range does not prove that the speaker will reproduce every frequency at the same volume.
5. Are 2-Ohm or 4-Ohm Speakers the Better Choice?
Neither impedance is universally superior. The right choice depends on the amplifier, the speaker system and the way the installation is wired.
A 2-ohm load can allow a compatible amplifier to deliver more power than it would into a 4-ohm load. That is useful only if the amplifier is explicitly rated to operate safely at 2 ohms on the relevant channel. The extra output also depends on the amplifier’s design, power supply, thermal limits and operating conditions.
A 4-ohm system is common in aftermarket component-speaker installations and works with many compatible head units and amplifiers. It may draw less current than a lower-impedance load under comparable conditions, but that does not automatically make it more efficient or better sounding. Actual acoustic output also depends on sensitivity and the power delivered.
Before deciding, ask:
- Does the amplifier specify stable operation at the speaker’s nominal impedance?
- Is the impedance rating for one driver, one complete component system or a particular wiring arrangement?
- Does the crossover network specify how the included drivers should be connected?
- Will changing impedance increase power within the amplifier’s limits, or cause excessive heat and protection shutdowns?
Do not choose a 2-ohm speaker simply because you expect it to be louder. A properly matched 4-ohm system can provide excellent output, while an incompatible low-impedance load can overheat an amplifier or trigger its protection circuit.
For the six systems compared in this article, the supplied specifications list 4-ohm impedance. Verify the exact model documentation before purchase, particularly if your vehicle uses a factory amplifier designed around a different load.
6. Do You Need an Amplifier for a 3-Way Component System?
No, not in every installation. A compatible factory head unit or existing amplifier may power a three-way component kit, provided its output, impedance compatibility and signal quality are suitable. However, the fact that a speaker has three drivers does not mean it requires three amplifier channels per side.
In a conventional passive component system, the supplied crossover network divides the audio signal between the woofer, midrange and tweeter. The amplifier can feed the complete left and right component systems through two channels, assuming the crossover and wiring are designed for that arrangement. A four-channel amplifier is often used when powering the front component system and a separate rear speaker pair.
An active three-way setup is different. It uses electronic crossovers and separate amplifier channels for individual drivers, which requires compatible signal processing, correct crossover configuration and careful level alignment. Do not wire a passive kit as an active system unless its documentation and your audio equipment support that configuration.
| Existing setup | Is an additional amplifier necessary? | Practical advice |
|---|---|---|
| Factory head unit with adequate clean output | Not always | Check speaker impedance, available output and listening volume |
| Factory system with an external amplifier | Not always | Confirm the amplifier’s load rating and signal compatibility |
| Aftermarket head unit with modest built-in power | Depends on the speaker and listening level | An external amplifier may provide more clean headroom |
| Dedicated aftermarket amplifier | Not necessarily | Match its RMS output to the speakers and their impedance |
| Active DSP-based three-way installation | Usually requires a planned multichannel setup | Confirm channel count, crossover control and tuning capability |
If your current system plays loudly enough but sounds unbalanced, an amplifier alone may not solve the problem. Driver positioning, crossover settings, door resonance and the factory equalisation can all influence the result. Diagnose the weak point before buying additional equipment.
7. Evaluate the Crossover Design and Available Adjustments
The crossover is a critical part of a three-way component system because it determines which frequencies reach each driver. A well-integrated setup needs the woofer, midrange and tweeter to work together without large response gaps, excessive overlap or drivers being asked to reproduce frequencies outside their intended operating ranges.
Look beyond the fact that a crossover is included. Check whether it is a passive network, how the filters are specified, which drivers connect to each output and whether the design offers any level adjustment. A quoted slope such as 12dB per octave describes how the signal attenuates beyond a filter’s transition region; it does not, by itself, establish that the system will sound better than one with a different slope.
Useful features include:
- Tweeter-level adjustment: Can help balance high-frequency output when the tweeter is mounted close to the listener or in a reflective location.
- Separate midrange and tweeter adjustment: Offers more control over tonal balance when the system supports it.
- Clearly labelled connections: Reduce the risk of incorrect wiring during installation.
- Suitable crossover mounting: Keeps components secure and protected from moisture, moving parts and vibration.
Do not assume every three-way kit provides the same tuning options. Some offer multiple adjustment levels, while others use a more straightforward crossover arrangement. Follow the exact wiring diagram supplied with your chosen model.
8. Consider Cone Materials, Surrounds and Tweeter Construction
Driver materials matter because they influence stiffness, mass, damping and resonance. They do not determine sound quality on their own. The complete driver design, motor structure, suspension, crossover and installation all contribute to the final response.
Woofer and midrange cones: Paper composites, woven glass fibre, aramid-fibre materials and other engineered diaphragms can all work well when properly designed. A rigid cone is not automatically superior; controlling unwanted resonances and keeping the driver’s response well behaved are just as important.
Surrounds: Rubber surrounds are common in car speakers because they can provide flexible suspension and durability under normal automotive conditions. Material quality and the design of the suspension matter more than a broad claim that one surround material will always last longer.
Tweeters: Textile soft domes and aluminium inverted domes take different approaches to high-frequency reproduction. Neither is guaranteed to sound smoother or more detailed in every installation. Tweeter position, crossover integration and the cabin’s reflective surfaces can have a significant effect on perceived brightness.
Voice coils and magnets: These components influence motor strength, thermal behaviour and how the driver responds to the electrical signal. Larger or more expensive components do not automatically translate into better sound without considering the complete design.
Treat advertised features as reasons to investigate a speaker, not as proof that it will outperform every competing system. Where long-term durability matters, also check the manufacturer’s warranty, installation requirements and support for replacement components.
9. Choose a Sound Character That Suits Your Listening Habits
A three-way design creates more opportunities to distribute frequency reproduction between dedicated drivers, but it does not guarantee a particular sound signature. Some systems may be voiced for an energetic presentation, while others may suit listeners who prioritise balanced vocals or a more restrained treble response.
Think about what you actually listen to and what currently bothers you about your car’s audio system.
- Vocals, podcasts and acoustic music: Pay attention to midrange clarity, natural vocal balance and whether speech remains intelligible at ordinary listening levels.
- Rock, metal and live recordings: Look for convincing separation between vocals, guitars, cymbals and other instruments without excessive treble emphasis.
- Electronic music and hip-hop: Consider midbass control and whether you will need a dedicated subwoofer for deeper bass.
- Long motorway drives: A balanced presentation that remains comfortable over time may be more useful than a system that initially sounds impressive because of boosted treble.
- Detailed listening: Pay attention to imaging, tonal balance and how consistently the system sounds across the driver’s seat and passenger seat.
A speaker system cannot create deep sub-bass simply because its published frequency response begins at a low number. Door-mounted woofers are affected by the enclosure formed by the door, installation sealing, available excursion and cabin acoustics. If you want strong output at very low frequencies, a properly integrated subwoofer may still be worthwhile.
10. Plan the Installation Before You Buy
Three-way systems need a workable location for every driver and the crossover network. The midrange is especially important because adding a third driver only helps when it can be integrated effectively with the woofer and tweeter.
Before ordering, establish the following:
- Map the factory speaker locations. Identify the woofer, factory tweeter and any existing midrange positions. Check whether the original system uses separate amplification or a factory crossover.
- Measure the available space. Confirm cut-out diameter, mounting depth, grille clearance, window movement and access behind the panels.
- Choose realistic driver positions. Use suitable factory locations where possible, and determine whether custom brackets or fabrication are required.
- Plan crossover and wiring routes. Allow secure, dry mounting positions for crossover components and protect wiring from sharp metal edges, moisture and moving window mechanisms.
- Confirm electrical compatibility. Match the amplifier to the speaker system and check whether the factory audio signal needs correction or integration hardware.
- Budget for tuning. Allow time to balance left and right output, adjust crossover settings where available and check for rattles after the panels are reassembled.
If you are keeping the factory head unit, make sure the new speakers will work with the vehicle’s existing signal processing. Some factory systems apply equalisation or use unusual wiring arrangements, so a simple speaker swap may not deliver the expected result without additional integration work.
Final Checks Before Placing Your Order
Use this checklist to narrow your choices without relying on marketing claims alone.
- My vehicle’s model year, trim and speaker locations have been checked.
- Woofer cut-out, mounting depth and window clearance have been verified.
- There is a suitable mounting location for the dedicated midrange and tweeter.
- The kit includes the crossover components and mounting hardware I need.
- The official RMS power rating and nominal impedance are confirmed.
- My head unit or amplifier can drive the system safely with adequate clean output.
- The crossover wiring and adjustment options suit my installation plan.
- The total budget includes adapters, labour, wiring and any necessary sound treatment.
- I have checked the manufacturer’s warranty and exact model specifications.
The strongest choice is not necessarily the most expensive kit or the one with the highest maximum-wattage figure. Prioritise a system that fits your vehicle, matches your amplifier and gives you a practical way to position and integrate all three drivers. That is what turns a promising specification sheet into a worthwhile everyday upgrade.
3-Way Component Car Speakers Installation Guide for Cleaner Sound and Proper Driver Integration
Installing a three-way component speaker system involves more than replacing the factory woofers and connecting a few wires. You need to position the woofer, midrange and tweeter correctly, integrate the crossover network, protect the wiring and make sure the amplifier can drive the system safely. Poor installation can lead to weak midbass, harsh treble, uneven vocals and rattles, even when the speakers themselves are well designed.
Before starting, read the installation manual for your exact speaker kit and vehicle. The wiring arrangement, crossover connections and mounting requirements differ between systems. If your vehicle uses a factory amplifier, integrated audio processing, airbag wiring near the door panels or a complicated active audio system, consult a qualified car-audio installer before modifying the wiring.
Tools and Materials to Prepare Before Installation
Having the correct tools ready reduces the chance of damaging door panels, connectors or speaker wiring during the job.
| Tool or material | Why you need it |
|---|---|
| Plastic trim-removal tools | Help release door-panel clips without unnecessarily scratching or marking the interior |
| Screwdrivers and socket set | Remove factory speakers, panel fasteners and mounting hardware |
| Vehicle wiring diagram | Helps identify speaker connections and factory audio-system components |
| Digital multimeter | Checks electrical continuity and helps investigate wiring faults |
| Speaker mounting adapters | Provide a secure fit when the factory opening or screw pattern differs |
| Suitable speaker wire and connectors | Provide reliable connections without loose or exposed conductors |
| Foam gasket or closed-cell sealing material | Helps seal gaps between the speaker adapter and mounting surface |
| Automotive sound-deadening material | Reduces unwanted panel vibration when installed in suitable areas |
| Cable ties and protective sleeving | Keep wiring secured away from window mechanisms and sharp edges |
| Safety glasses and work gloves | Help protect your hands and eyes during panel removal and installation |
You may also need tools for removing factory connector pins, installing tweeter mounts or fabricating a midrange bracket. Avoid buying extra equipment until you have checked how the selected kit fits your vehicle.
Step 1: Disconnect Power and Remove the Interior Panels Safely
Start with the vehicle parked securely, the ignition switched off and the key removed. Follow the vehicle manufacturer’s instructions for disconnecting the battery when required. Disconnecting the battery can reset some vehicle settings, and certain vehicles require specific procedures to preserve electronic functions. Never probe or modify airbag circuits.
Remove the door-panel fasteners and release the retaining clips using plastic trim tools. Work around the panel gradually rather than pulling it away forcefully. Door panels may have hidden screws, electrical connectors, courtesy lights, lock cables and window-switch wiring attached to them.
Once the panel is loose, support it while disconnecting the necessary connectors. Keep the fasteners organised so they return to their original positions. Inspect the area behind the panel before removing the factory speaker, paying attention to moisture barriers, wiring routes and the window regulator.
Do not cut the factory wiring immediately. Identify the original connectors and determine whether a vehicle-specific adapter harness is available. Retaining the factory harness makes the installation easier to reverse and reduces the risk of creating electrical problems.
Step 2: Identify the Factory Wiring and Test-Fit Every Driver
Before connecting the new system, identify the factory speaker wires and confirm which channels feed the left and right sides. Wire colours are not universal across manufacturers or model years, so use the correct wiring diagram rather than relying on a generic colour chart.
If the vehicle has a factory amplifier, determine whether the speaker wires carry amplified output or whether an integration interface is needed. Some factory systems use equalisation, active crossovers or separate outputs for individual drivers. Connecting a new passive component system without understanding the existing signal arrangement can result in incorrect frequency distribution or an unsuitable signal level.
Next, test-fit the woofer, midrange, tweeter and crossover components before making permanent changes.
- Check the woofer’s mounting diameter, depth and screw alignment.
- Lower the window fully and confirm that the glass and regulator clear the speaker and mounting adapter.
- Identify a suitable location for the dedicated midrange, ensuring that its mounting position will not obstruct door handles, controls or visibility.
- Check the tweeter’s flush, surface or angled mounting options against the available space.
- Find a secure location for the crossover network, away from moisture and moving components.
- Confirm that the door panel can be refitted without pressing against the speaker cone, surround, grille or wiring.
A nominal 6.5-inch speaker does not guarantee a direct fit. A mounting adapter may solve the screw-pattern problem, but it will not automatically solve insufficient depth or interference with the window mechanism.
Step 3: Decide Between Passive and Active Crossover Wiring
The crossover arrangement determines how the audio signal reaches the woofer, midrange and tweeter. Before connecting anything, establish whether the kit is designed for passive operation or whether you intend to use an active system with compatible signal processing and separate amplifier channels.
Passive crossover installation
A passive component kit generally uses a crossover network to divide the incoming audio signal between the drivers. The amplifier sends a full-range signal to the designated crossover input, and the crossover routes the appropriate frequency bands to the woofer, midrange and tweeter according to the manufacturer’s design.
Follow the exact terminal labels and wiring diagram supplied with the kit. Some systems use one crossover network per side, while others have separate filter sections or specific wiring arrangements. Do not assume every three-way kit uses the same number of terminals or identical connections.
A conventional passive setup can often use one amplifier channel for the left component system and another for the right component system. This is possible because the crossover handles the division between the three drivers on each side. The amplifier must still support the complete system’s electrical load.
Active crossover installation
An active system divides the signal electronically before it reaches the amplifier channels. Separate channels then power the woofer, midrange and tweeter individually. This arrangement requires compatible digital signal processing or active crossover equipment, sufficient amplifier channels and correctly configured filters.
Active operation can provide more control over crossover points, levels, time alignment and equalisation. However, it also introduces more wiring and tuning complexity. Incorrect filter settings can send unsuitable frequencies to a driver, potentially causing distortion or damage.
Important: Do not connect a passive component kit as an active system simply by bypassing its supplied crossover. Confirm that the individual drivers, amplifier channels and signal processor are suitable for the intended configuration, and follow the manufacturer’s instructions.
Step 4: Connect the Woofer, Midrange and Tweeter Correctly
Once the crossover arrangement is confirmed, make the connections with the system powered down. Use the correct terminals for each driver and maintain consistent polarity throughout the installation.
For a passive system, the usual signal path is:
- Connect the amplifier’s left or right speaker output to the corresponding crossover input.
- Connect the crossover’s designated woofer output to the woofer.
- Connect the midrange output to the dedicated midrange driver.
- Connect the tweeter output to the tweeter.
- Repeat the arrangement for the other side, following the exact diagram supplied with the kit.
Do not guess which output is intended for each driver. A crossover may include additional terminals, level adjustments or specific wiring instructions that are not interchangeable between brands.
Use properly sized wire and secure connectors. Avoid leaving bare conductors exposed, and make sure connections cannot loosen when the door moves or vibrates. Route cables away from sharp metal edges, moving window components, door locks and other mechanisms.
For vehicles with factory speaker wiring, an adapter harness can help retain the original connectors. If you must modify wiring, confirm the circuit first and make secure automotive-grade connections. Never use wire colour alone as proof of polarity or channel identity.
Step 5: Mount the Woofer With a Secure Seal
The woofer’s installation affects midbass output, unwanted vibration and the amount of sound that escapes around the mounting surface. A speaker that is loosely fitted or surrounded by gaps may sound weaker than expected, even when the driver itself is capable of good performance.
Use a suitable mounting adapter if required, and secure it firmly to the door’s mounting points. Place an appropriate gasket between the speaker and adapter, and between the adapter and the mounting surface where needed. The aim is to reduce air leaks and prevent hard surfaces from vibrating against one another.
Door speakers typically operate in the door’s available acoustic space rather than a purpose-built speaker enclosure. The door’s inner and outer metal surfaces, openings and moisture-management design all influence performance. Avoid blocking factory drainage holes or sealing the door in a way that traps water where it should not collect.
Should You Seal or Port the Door Panel?
Most factory door-speaker installations are not equivalent to a conventional sealed or ported subwoofer enclosure. The door contains openings, moving parts and moisture-management features, so do not treat it like a box that should simply be sealed completely.
Focus on the following:
- Seal the speaker-to-adapter interface to reduce unwanted air leakage around the mounting surface.
- Secure the mounting adapter so the speaker does not move against the door.
- Use suitable automotive sound-deadening material on appropriate metal panels to reduce resonance.
- Preserve factory water barriers and drainage paths.
- Do not add a port or block door openings unless a properly engineered installation specifically calls for it.
Sound-deadening material can help reduce panel vibration, but it is not a guaranteed bass upgrade by itself. Correct speaker mounting, door sealing and the driver’s available operating conditions remain important.
Step 6: Position the Midrange and Tweeter for a Coherent Front Stage
The midrange and tweeter are not merely extra speakers to fit wherever space is available. Their placement affects how vocals appear in the cabin, how high-frequency details are perceived and how smoothly the three drivers blend together.
The midrange should be installed securely in a suitable factory location or purpose-built mount. Avoid placing it behind a solid obstruction or directly against a surface that could restrict its output. Make sure the mounting position does not interfere with door handles, window operation, safety equipment or the interior trim.
Tweeter placement requires similar care. A higher position may help the soundstage appear to come from the dashboard, but the result depends on the cabin and the direction in which the tweeter faces. Strong reflections from glass or hard trim can make the treble seem more prominent. An angled mount may help direct the output, but there is no universal angle that works best in every vehicle.
When possible, test the available mounting positions before drilling or cutting the interior. Secure the drivers properly and refit the trim carefully to ensure the grilles do not press against the diaphragms.
Step 7: Set the Crossover Points and Filter Slopes Carefully
Crossover points determine where one driver hands over frequency reproduction to another. Filter slopes describe how quickly the signal is attenuated beyond the filter’s transition region. Both settings affect the overlap between drivers, their output levels and how smoothly the system sounds.
For a passive component kit, use the supplied crossover network and its specified connections. The manufacturer has designed the network around the included drivers, so changing components or bypassing filters can alter the response and may expose a driver to unsuitable frequencies.
For an active setup, use the speaker manufacturer’s recommended crossover settings as the starting point. The correct values depend on the individual drivers, their mounting locations, their usable frequency ranges and the processing equipment. There is no single crossover frequency or slope that is ideal for every three-way system.
During tuning:
- Start with the manufacturer’s recommended crossover points and slopes.
- Set sensible output levels for the woofer, midrange and tweeter.
- Avoid sending excessive low-frequency energy to a small midrange driver.
- Check that the woofer and midrange integrate smoothly rather than creating a noticeable gap or peak.
- Make small adjustments, listening for changes in vocal balance and instrument definition.
- Keep the volume moderate while checking the system for distortion or mechanical noise.
A steeper filter is not automatically better, and a crossover setting that sounds impressive on one track may be poorly balanced on another. The objective is smooth integration, not simply making each driver sound prominent on its own.
Step 8: Use Equalisation After the Speakers Are Properly Integrated
Equalisation can correct some tonal imbalances, but it should not be the first solution to every sound-quality problem. Before applying substantial EQ, verify the wiring, polarity, crossover configuration, mounting seals and driver levels.
Start with the head unit’s tone controls and sound enhancements set to a neutral or known baseline. Disable unnecessary bass boosts, loudness processing or factory sound modes during initial checks. These features can make it harder to identify the actual cause of an imbalance.
Listen to familiar recordings containing clear vocals, sustained bass notes, cymbals and a variety of instruments. If the treble sounds too strong, first check tweeter placement and available crossover-level adjustments. If the midbass is weak, inspect mounting seals, polarity and door resonance before boosting low frequencies.
Use small EQ adjustments and listen at a consistent volume. Large boosts can consume amplifier headroom and increase distortion, while deep dips in a vehicle’s response may not be practical to correct with EQ alone. If your system includes a digital signal processor, a calibrated measurement microphone and suitable tuning software can help identify response problems more reliably than memory-based listening alone.
Step 9: Check Polarity, Phase Alignment and Channel Balance
Polarity and phase are related, but they are not the same thing. Polarity refers to the electrical positive and negative connections. Phase describes the relative timing relationship between signals at a given frequency, and it can be affected by crossover filters, driver characteristics and physical placement.
Incorrect polarity between the left and right speakers, or between drivers that should integrate together, can reduce output in parts of the frequency range. A common symptom is weak or hollow-sounding bass, although similar symptoms can also come from poor door sealing, incorrect crossover settings or cabin acoustics.
Use this checklist before finalising the installation:
- Confirm that left and right amplifier outputs are connected to their intended crossover inputs.
- Check the positive and negative terminals at every driver against the manufacturer’s wiring diagram.
- Verify that all crossover outputs feed the correct woofer, midrange and tweeter.
- Listen to familiar mono vocals and bass passages to check whether the central image remains stable.
- Compare the left and right sides at a moderate volume and check for unusual differences in level or tonal balance.
- If a DSP provides time alignment, use its setup procedure rather than changing wiring polarity at random to compensate for timing issues.
Do not reverse a tweeter or midrange connection simply because the sound appears louder in one configuration. Some crossover designs account for driver acoustic phase in their intended wiring arrangement. Follow the kit’s instructions and use appropriate measurements or professional tuning when the correct relationship is uncertain.
Step 10: Reassemble the Door and Check for Rattles
Once the speakers are wired and the initial sound check is complete, secure the crossover network and all loose wiring. Move the window through its full travel where the installation permits, and confirm that no cable, connector or mounting bracket can contact the glass or regulator.
Before replacing the door panel, check that the moisture barrier is restored correctly and that factory clips, fasteners and electrical connectors are accounted for. Refit the panel without forcing it into place. Resistance can indicate a trapped cable, a misplaced clip or a speaker grille that is touching the trim.
Play music at a moderate volume and listen for rattles around the speaker grille, door handle, window switches and trim edges. If you hear a buzz, locate the source before adding more material. A loose clip, cable against metal or poorly secured adapter can often be fixed directly.
Do not assume every rattle comes from the speaker cone. Door panels and nearby trim can vibrate in response to bass energy even when the speaker is operating normally.
Troubleshooting Common Three-Way Speaker Installation Problems
| Problem | Possible cause | What to check |
|---|---|---|
| Weak or hollow bass | Incorrect polarity, poor mounting seal, phase interaction or door resonance | Verify wiring, mounting gaskets and the door installation |
| Vocals sound distant or uneven | Midrange placement, crossover integration or left-right level imbalance | Check driver locations, crossover connections and channel levels |
| Treble is too bright | Tweeter position, reflections, crossover level or EQ settings | Adjust placement or the provided tweeter-level control before applying heavy EQ |
| One driver is silent | Incorrect crossover connection, loose wiring, damaged cable or driver fault | Power down the system and inspect the wiring diagram and connections |
| Sound distorts at higher volume | Clipping, excessive EQ boost, unsuitable crossover settings or driver overload | Reduce volume, check gain and verify amplifier compatibility |
| Door panels rattle | Loose fasteners, unsecured wiring, vibrating trim or adapter movement | Secure the affected component and inspect the panel before adding damping |
| Amplifier enters protection | Load incompatibility, wiring short, overheating or an amplifier fault | Switch off the system and check the load and wiring against the amplifier manual |
| Sound changes when the window moves | Insufficient mounting clearance or wiring interference | Stop using the system until the window mechanism and wiring are inspected |
If a driver remains silent or the amplifier repeatedly enters protection, stop testing at high volume. Disconnect power as appropriate and investigate the cause before continuing. Repeatedly powering an incorrectly wired or overloaded system can damage equipment.
Final Installation Checks Before Daily Use
Before considering the job complete, verify that all drivers are firmly mounted, the crossover networks are secured, wiring is protected and the door’s original moisture-management features are restored. Check that windows, locks, switches and other controls work normally, and confirm that the door panels fit without pressure against the speakers.
Start with moderate volume, familiar music and conservative amplifier settings. Listen for balanced vocals, stable imaging, clean midbass and treble that remains comfortable. Make adjustments gradually instead of increasing gain or applying large EQ boosts to compensate for an installation problem.
A successful three-way component installation is not about making the woofer, midrange and tweeter individually loud. It is about getting all three to work together as one coherent system. Correct fitment, sound sealing, safe wiring, suitable crossover settings and careful tuning are what allow the speakers to deliver their intended performance.
Sound Quality Deep Dive: What Makes a 3-Way Component Speaker System Audiophile-Grade
A three-way component speaker system is not automatically audiophile-grade just because it uses three separate drivers. The real test is how well the woofer, midrange and tweeter work together across the audible frequency range. When they are properly matched and installed, a three-way design can offer clearer vocal reproduction, more convincing instrument separation and a more stable front soundstage. When the drivers are poorly integrated, the same setup can sound bright, disconnected or less natural than a well-designed two-way system.
The difference comes down to several factors working together, including frequency response, crossover behaviour, distortion, dynamic capability and installation. The quality of the source signal and amplifier also matters, but spending more on individual components will not automatically solve problems caused by poor positioning or incorrect tuning.
Frequency Response Balance Across the Three Drivers
Each driver in a three-way component system has a different role. The woofer handles bass and lower-midrange frequencies, the dedicated midrange reproduces much of the vocal and instrumental range, and the tweeter covers the upper frequencies. The exact division depends on the driver’s characteristics and the crossover design.
The important point is that these ranges must blend smoothly. A system can have impressive bass and sparkling treble but still sound unnatural if there is a dip or peak where the woofer hands over to the midrange, or where the midrange transitions to the tweeter.
A balanced response generally helps with:
- Natural vocals: Voices should sound recognisable and proportionate, without becoming excessively thin, nasal or forward.
- Instrument separation: Guitars, piano, strings and percussion should remain distinguishable without one frequency range dominating the others.
- Consistent tonal character: A cymbal should not sound unusually sharp simply because the tweeter is too prominent, and vocals should not lose body because the midrange is underrepresented.
- Listening comfort: A balanced system can remain enjoyable over longer drives without requiring constant volume or tone adjustments.
Frequency response specifications are useful, but a quoted range such as 35Hz–21kHz does not tell the whole story. It does not necessarily show how evenly the speaker reproduces that range, how loud it can play at the frequency extremes, or how its response changes after installation in a car door.
For a more meaningful assessment, look for frequency-response measurements that include the measurement conditions and tolerance, ideally supported by measurements of the individual drivers and the complete system. In-car response will still differ because of the cabin, mounting position and reflections.
Why the Crossover Matters More Than Simply Adding a Third Driver
The crossover is one of the most important parts of a three-way component system because it determines how the drivers share the audio signal. Its job is not just to split frequencies, but to help the drivers operate within suitable ranges and combine without obvious tonal gaps, excessive overlap or problematic interference.
A passive crossover uses electrical components to filter the signal before it reaches each driver. An active setup uses electronic processing before the amplifier channels, allowing more independent control when the system and installation support it.
Neither approach is automatically superior in every car. A well-designed passive network can provide excellent integration with relatively straightforward installation. An active system offers more tuning flexibility, but it also requires suitable processing, enough amplifier channels and the knowledge to configure each driver safely.
When evaluating a crossover, consider the following:
- Crossover points: These determine where one driver begins handing over to another. The correct points depend on the actual drivers, not a universal frequency recommendation.
- Filter slopes: These describe how quickly frequencies are attenuated beyond the crossover region. The chosen slope affects overlap, phase behaviour and how much unwanted energy reaches each driver.
- Level matching: The woofer, midrange and tweeter need to produce appropriate relative output. A tweeter-level adjustment can help, but it cannot fix every integration problem.
- Acoustic alignment: The drivers’ physical locations and acoustic characteristics influence how their outputs combine at the listening position.
- Wiring and polarity: Incorrect connections can change the relationship between drivers and cause cancellations or an uneven response.
A crossover labelled 12dB per octave is not automatically better or worse than one using a steeper slope. The full design, including the driver’s response and the acoustic result, determines whether the transition sounds natural.
Soundstage and Imaging: Why Driver Placement Changes What You Hear
Soundstage describes the perceived width, depth and placement of sound in front of the listener. Imaging refers to how clearly individual voices and instruments appear to occupy specific positions within that soundstage.
In a car, the listening environment makes this particularly challenging. The driver sits much closer to the left-side speakers than the right-side speakers, while the dashboard, windscreen, door trim and seating position all affect reflections and timing.
A three-way system can provide more flexibility because the midrange and tweeter can be positioned separately from the woofer. However, that flexibility only helps when the locations are chosen carefully and the crossover integrates the drivers correctly.
For better imaging, pay attention to:
- Midrange positioning: This driver carries much of the information that helps voices and many instruments sound present and intelligible.
- Tweeter direction: A tweeter aimed directly at the listener can sound different from one aimed toward a reflective surface. Neither orientation is universally correct.
- Left-right balance: Unequal output or timing between the two sides can pull the perceived centre image away from its intended position.
- Time alignment: A digital signal processor can adjust channel delays where supported, helping compensate for different distances between the listener and the drivers.
- Cabin reflections: Glass, hard dashboard surfaces and door trim can reinforce or cancel portions of the response.
Do not judge a system’s imaging simply by how high its tweeters are mounted. The result depends on the entire installation, including the midrange position, crossover behaviour, channel balance and the seat from which the system is tuned.
Dynamic Range and Transient Response
Dynamic range describes the difference between quieter and louder parts of a recording. A capable system should reproduce subtle details without losing its composure when the music becomes more demanding. Transient response refers to how accurately the system reproduces rapid changes in sound, such as a drum strike, a plucked string or the initial attack of a piano note.
These characteristics are influenced by more than the speaker cone material. Driver motor design, suspension behaviour, thermal limits, crossover integration, amplifier headroom and installation all play a role.
A system that sounds clear at low volume may become harsh or compressed when played loudly if the amplifier clips, the drivers reach their limits or the crossover sends excessive energy to a small driver. Conversely, a properly matched system with sufficient clean headroom can preserve musical contrasts without requiring the volume to be pushed to its maximum.
When assessing dynamic performance, listen for:
- Attack and decay: Percussion should have a clear initial impact without sounding unnaturally sharp, while the sound should fade naturally rather than lingering because of unwanted resonance.
- Quiet detail: Low-level musical elements should remain audible without needing excessive volume.
- Loud passages: The system should retain separation and tonal balance as the recording becomes more energetic.
- Bass control: Kick drums and bass guitar should remain distinct instead of merging into a single boomy sound.
- Composure at higher levels: Harshness, rattling or obvious compression can indicate an installation issue, unsuitable settings or equipment reaching its limits.
Advertised peak wattage does not establish how well a system handles dynamics. Confirm the RMS ratings and amplifier compatibility, then pay attention to distortion and balance at the listening levels you actually use.
Distortion Control and the Importance of Clean Power
Distortion can come from the speaker itself, the amplifier, the source signal or the vehicle installation. It may appear as rough vocals, brittle treble, fuzzy bass notes or mechanical noises that become more obvious when the volume increases.
An amplifier with insufficient clean output can clip when pushed hard, but using an amplifier with a larger rating does not guarantee better sound either. The speaker must be matched to the amplifier’s output and electrical load, and the gain must be set correctly.
The same applies to equalisation. Boosting bass or treble heavily can use up available amplifier headroom and make distortion more likely. If a system sounds thin or harsh, investigate its mounting, crossover settings, polarity and frequency balance before adding large EQ boosts.
For a sensible setup:
- Confirm that the amplifier supports the speaker system’s nominal impedance.
- Match amplifier output to the manufacturer’s continuous power-handling recommendations.
- Set gain according to the source signal and amplifier instructions, rather than treating it as a volume control.
- Keep crossover settings within the drivers’ recommended operating ranges.
- Check door mounting, panel vibration and wiring before assuming the speaker itself is defective.
Good distortion control is not about playing as loudly as possible. It is about preserving a clean, balanced sound at the volumes you need.
How the Front Three-Way System Should Work With Rear Speakers and a Subwoofer
The front stage should usually remain the main focus of a car-audio system because the driver spends most of the time facing forward. Rear speakers can provide additional ambience and fill, while a subwoofer can reproduce the deepest bass that door-mounted woofers may struggle to deliver at useful output levels.
Adding more speakers does not automatically create a better result. Rear speakers that are too loud can pull vocals and instruments behind the listener, while an incorrectly integrated subwoofer can make bass sound detached from the rest of the music.
Integrating Rear Fill
Rear speakers can be useful for passengers and for a fuller cabin presentation, but they generally should not overpower the front component system. Set their level conservatively and check whether they improve the overall experience without disturbing the forward image.
If the vehicle has factory rear speakers, consider whether they need replacing at all. The budget may be better spent on front-stage installation, sound treatment or amplifier integration if the existing rear speakers are adequate for their supporting role.
Integrating a Subwoofer
A subwoofer is worth considering if you want deeper low-frequency output, especially for electronic music, hip-hop, film soundtracks or recordings with substantial sub-bass. A door woofer’s published lower-frequency limit does not guarantee strong, clean output at that frequency once installed in the vehicle.
For a smoother transition, set the subwoofer crossover so that it complements the front woofers rather than creating an obvious gap or excessive overlap. The ideal settings depend on the front speakers, subwoofer enclosure, vehicle acoustics and available signal processing.
Also check polarity and phase integration at the crossover region. If bass output becomes weaker when the subwoofer and front speakers play together, investigate their relative timing, polarity and crossover settings before simply increasing the subwoofer level.
Choosing the Right System Architecture
| System arrangement | Main benefit | Important consideration |
|---|---|---|
| Front three-way component system only | Concentrates the upgrade on the main listening stage | Deep bass output may remain limited |
| Front three-way plus rear speakers | Provides fuller coverage for passengers | Rear output can weaken the forward soundstage if set too high |
| Front three-way plus subwoofer | Extends low-frequency output and reduces the bass burden on the front system | Crossover, phase and level must be integrated carefully |
| Front three-way, rear fill and subwoofer | Can provide a more complete full-range system | Requires more attention to amplification, signal processing and tuning |
Listening Notes: How to Evaluate a System in a Real Car
Listening tests are most useful when you compare systems under similar conditions. Different volume levels, recordings, equaliser settings and cabin layouts can make one setup seem better even when the difference comes from something other than the speakers themselves.
If you have the opportunity to audition a system, use familiar recordings with different types of material. You do not need specialist test tracks to identify obvious problems, but a varied selection can reveal more than listening to one bass-heavy song.
| What to play | What to listen for | What may indicate a problem |
|---|---|---|
| Spoken voice or a vocal-led recording | Natural tone, clear words and stable centre placement | Nasal vocals, excessive sibilance or a voice that seems to drift to one side |
| Acoustic guitar or piano | Note separation, natural decay and believable tone | Ringing, brittle attacks or an uneven tonal balance |
| Live recording with percussion | Clear instrument separation and convincing attack | Cymbals that dominate the mix or percussion that sounds blurred |
| Bass guitar and kick drum | Defined notes and controlled impact | Boomy bass, weak midbass or a loss of definition |
| A busy musical passage | Separation between simultaneous instruments | The mix becoming congested or harsh as volume increases |
| A quiet passage followed by a louder section | Preservation of small details and musical contrast | Sudden harshness, obvious compression or distortion |
When comparing two systems, keep playback volume as similar as possible. A slightly louder setup often sounds more impressive at first, so unequal volume can mislead the comparison. Also use the same source, recording and processing settings where possible.
A test in a showroom or another vehicle cannot perfectly predict how a system will sound in your own car. Speaker position, cabin dimensions, door construction and seat location can change the result considerably. Treat an audition as useful evidence, not a guarantee of identical performance after installation.
Which Vehicles and Listening Environments Suit a Three-Way System?
A three-way component system can work in many vehicle types, but its suitability depends on the available mounting locations and the quality of the installation.
Cars with factory midrange or tweeter locations: These can provide useful mounting options for a separate midrange and tweeter, although the original openings still need to be checked for driver dimensions and acoustic suitability.
Trucks and larger cabins: A larger interior does not automatically require more powerful speakers. The key considerations are listening distance, cabin reflections, available speaker locations and the amount of clean output required.
Vehicles with limited door space: These may need custom midrange mounting or a different speaker configuration. A high-quality two-way system can be a more sensible choice if there is no practical location for a third driver.
Daily commuters: A well-integrated system with balanced vocals, comfortable treble and adequate clean volume can be more useful than one tuned primarily for maximum output.
Enthusiast builds: Drivers who want greater control over imaging, time alignment and tonal balance may benefit from a system designed around a compatible digital signal processor and suitable multichannel amplification. This approach requires more installation and tuning work.
The cabin is part of the audio system. A speaker’s reputation or construction material cannot overcome every limitation caused by poor mounting, reflections or unsuitable placement.
What Makes the Six Compared Systems Different?
The models in this guide use different driver sizes, materials and crossover approaches. Those differences are worth considering, but published specifications alone do not establish which system sounds best in every vehicle.
- DYNAUDIO Esotan 372 MKII: Its supplied specifications list a dedicated 4-inch midrange, a textile-dome tweeter and adjustable crossover levels. Installation planning is important to take advantage of those separate drivers.
- HERTZ Mille Pro MPK 1633: The supplied details describe a 3-inch midrange, V-Cone woofer and Tetolon-fibre soft-dome tweeter. Confirm the exact kit configuration and crossover specifications before buying.
- Sony Mobile ES XS-163ES: Its listed aramid-fibre matrix diaphragms and separate crossover units make the driver construction and installation layout key points to evaluate.
- Morel Maximo Ultra 603 MKII: The supplied specifications include a treated paper-composite woofer, a 2.5-inch midrange and a soft-dome tweeter. Check the stated mounting depth against the vehicle.
- KICKER 51KSS365 KS-Series: Multiple tweeter mounting options and midrange brackets may be useful when working with different factory layouts. Confirm its official RMS rating before amplifier matching.
- Focal Access 165 A3: Its supplied details highlight woven glass-fibre cones, aluminium inverted-dome tweeters and three-level tweeter adjustment. Verify the exact crossover points and driver dimensions.
These are differences in design and stated features, not proof that one model delivers superior imaging, lower distortion or better tonal balance in every installation. Those outcomes depend on the full system and should be assessed using reliable measurements or a properly controlled listening comparison.
Final Verdict: Judge the Integration, Not Just the Driver Count
An audiophile-grade result comes from getting the fundamentals right: smooth frequency response, suitable crossover integration, clean amplifier output, controlled distortion and a front soundstage that makes musical performances feel coherent. A third driver can help distribute the workload, but it also adds another crossover transition and another installation decision that must be handled correctly.
Before choosing a system, check the manufacturer’s complete specifications, confirm vehicle fitment and plan how the woofer, midrange and tweeter will be positioned. Give equal attention to the crossover network, amplifier compatibility and the way rear speakers or a subwoofer will integrate with the front stage.
The best system is the one that reproduces music naturally in your vehicle at your preferred listening level. That means clear vocals, believable instruments, controlled bass and treble that remains comfortable over long drives, not simply the highest power rating or the most elaborate specification sheet.
3-Way Component Speaker Installation by Vehicle Type: Sedans, SUVs, Trucks and Custom Builds
A three-way component speaker system can work well in a sedan, coupe, SUV or truck, but the installation plan should reflect the vehicle’s actual speaker locations, door construction and factory audio setup. The main challenge is not finding a 6.5-inch woofer that fits the opening. It is finding suitable positions for the separate midrange and tweeter, integrating the crossover correctly and making sure the finished installation does not interfere with windows, door controls or factory safety equipment.
Before ordering a kit, check the exact model year, trim and audio package. Two versions of the same vehicle may use different speaker sizes, factory amplifiers or mounting arrangements. The following scenarios explain what to inspect and where installation problems commonly arise.
Installing Three-Way Component Speakers in Sedans
Sedans often provide conventional front-door speaker locations, but the available space varies considerably between models. Some have a factory tweeter near the mirror sail panel or dashboard, while others use a single door speaker or a factory system with several separately powered drivers.
The front doors are usually the first place to investigate for a component-speaker upgrade. Check the woofer opening, mounting depth and window clearance before selecting a 6.5-inch system. A mounting adapter can solve differences in screw patterns or opening shape, but it cannot create extra depth if the magnet or speaker basket interferes with the window mechanism.
The midrange and tweeter need equally careful planning. If the vehicle has suitable factory positions, retaining them can reduce the amount of fabrication required. However, a new midrange should not simply be placed in an unused opening without considering how its output blends with the woofer and tweeter.
Sedan installation checklist
- Confirm front-door woofer diameter, cut-out and mounting depth.
- Check window clearance with the glass fully lowered.
- Identify factory tweeter locations and available midrange mounting points.
- Check whether the factory system uses an external amplifier or active crossover.
- Reserve a dry, secure location for crossover components.
- Inspect door sealing and trim vibration after installation.
For a daily-driven sedan, prioritise secure mounting, balanced front-stage imaging and comfortable sound at normal listening levels. Custom fabrication is worthwhile only when it solves a real placement or acoustic problem.
Fitting a Three-Way System in Coupes
Coupes can present different challenges because door lengths, seating positions and interior trim layouts often differ from those in sedans. The front speakers may be relatively far from the listener, or the available tweeter and midrange locations may be limited by the door design.
A longer door does not necessarily provide more usable mounting depth. Window regulators, reinforcement bars, door handles and trim structures can occupy much of the available space. Measure the actual mounting area rather than assuming that a larger door will accept a deeper speaker.
In a two-door vehicle, the front speakers also carry most of the listening experience for occupants in the cabin. This makes correct driver positioning and left-right balance particularly important. If you are considering custom midrange pods or angled tweeter mounts, test their positions before permanently cutting or modifying the trim.
Coupe installation checklist
- Measure the speaker opening and available depth behind the door card.
- Check window movement and door reinforcement clearance.
- Plan midrange and tweeter positions around the seating position.
- Confirm that custom mounts will not obstruct door handles or controls.
- Test the soundstage from the driver’s seat before finalising the mounts.
- Secure wiring so it cannot move against the door structure.
For a coupe, the aim is a cohesive front soundstage without compromising everyday usability. A well-installed system in the original locations may be preferable to an elaborate custom layout that creates reflections or makes the interior awkward to use.
Installing Three-Way Component Speakers in SUVs
SUVs often offer more interior space than smaller cars, but that does not guarantee easier speaker installation. Door panels may contain substantial trim, storage pockets, factory acoustic components and complex wiring. Some vehicles also have factory premium audio systems with separate amplification and carefully integrated speakers.
Begin by identifying every factory speaker position and understanding how the original system routes its signal. If the vehicle already has separate midrange and tweeter locations, those positions may be useful for the new component system. However, the original drivers may have been designed to work with factory equalisation or a dedicated amplifier, so the replacement system may require additional integration work.
The rear doors should not automatically be treated as the next upgrade priority. For many drivers, improving the front stage and correcting door vibration offers more value than replacing every factory speaker. If rear speakers are retained, keep their level balanced so that vocals and instruments remain anchored toward the front.
SUV installation checklist
- Confirm the factory audio package and whether it includes a separate amplifier.
- Measure front-door mounting depth and inspect the window mechanism.
- Identify suitable locations for the dedicated midrange and tweeter.
- Check wiring routes, door connectors and crossover mounting space.
- Preserve factory moisture barriers and drainage paths.
- Check rear-speaker balance if the existing rear system remains in use.
For family SUVs and daily drivers, durable mounting, protected wiring and easy service access matter as much as sound quality. Avoid placing crossover units where luggage, moisture or routine door servicing could damage them.
Upgrading Three-Way Component Speakers in Trucks
Trucks can make excellent candidates for a front-stage upgrade, but fitment varies between regular-cab, extended-cab and crew-cab configurations. Door geometry, factory speaker locations and the available space behind the trim can differ even within the same model range.
Start with the exact year, cab configuration and factory audio package. Do not assume a fitment claim for one trim applies to every version of the truck. A 6.5-inch woofer may require a vehicle-specific adapter, and a dedicated midrange may need a separate bracket or a custom location.
Cabin acoustics also deserve attention. In a regular-cab truck, the driver and passenger sit relatively close to the speakers, and nearby glass and hard surfaces can affect perceived treble and imaging. Larger crew cabs have different listening distances and rear-speaker arrangements. These differences influence placement and tuning, not just the required power rating.
Truck installation checklist
- Confirm cab style, model year, trim and factory audio configuration.
- Check woofer depth, mounting adapters and window clearance.
- Verify a secure midrange location that does not obstruct door hardware.
- Protect crossover units and wiring from moisture and vibration.
- Inspect door panels for resonance after mounting the speakers.
- Tune the system from the normal driving position.
If the truck is used for towing, work or frequent rough-road driving, pay particular attention to secure fasteners, protected wiring and weather-related exposure. A well-supported installation is more dependable than one that relies on loose brackets or unsecured crossover components.
OEM Integration and Common Mounting Adapters
Keeping the factory audio system can reduce installation complexity, but only when the new speakers are electrically and acoustically compatible with it. Some factory systems use a separate amplifier, frequency-specific speaker outputs or digital processing that affects how aftermarket speakers perform.
Before disconnecting the original system, identify whether the signal to the front door is full-range or already filtered. Feeding a passive three-way crossover from a signal that has already been heavily filtered can leave gaps in the frequency response. In other vehicles, a factory amplifier may use an impedance or wiring arrangement that requires an integration interface.
Common installation parts include:
| Component | When it may be needed | What to verify |
|---|---|---|
| Speaker mounting ring | The factory opening or screw pattern differs from the new woofer | Opening size, mounting depth and clearance behind the speaker |
| Vehicle-specific wiring harness | You want to retain the original vehicle connector | Correct pinout and compatibility with the factory audio system |
| Tweeter mounting adapter | The original tweeter opening does not accept the new driver | Mounting diameter, depth and grille clearance |
| Midrange bracket or pod | The vehicle lacks a suitable factory midrange location | Secure support, driver orientation and unobstructed output |
| Crossover mounting hardware | The supplied crossover needs a safe mounting position | Moisture exposure, vibration, cable routing and service access |
| Foam gasket or sealing material | Gaps exist between the speaker and mounting surface | Compatibility with the materials and preservation of door drainage |
| Audio integration interface | The factory amplifier or signal processing is not directly compatible | Vehicle-specific electrical and signal requirements |
Adapters should solve fitment or connection problems without forcing the speaker into an unsuitable location. If the mounting ring moves, the speaker sits at an angle or the trim presses against the cone, the installation needs correcting before the system is used at high volume.
Custom Builds and Show-Car Installations
A custom installation offers more freedom over driver placement, appearance and system tuning. It can also introduce additional acoustic, structural and safety considerations. A visually impressive speaker pod is not necessarily an acoustically good one, and a clean-looking installation should never compromise visibility, door operation or occupant protection.
For a custom three-way front stage, decide where the woofer, midrange and tweeter should sit before designing the brackets or trim panels. Consider the driver’s listening position, the direction of each driver, the available mounting depth and the effect of nearby reflective surfaces.
Custom pods should be rigidly supported and designed around the driver’s actual dimensions. The mounting structure must not flex excessively, buzz against adjacent trim or expose wiring. Door-mounted pods also need to account for moisture and the door’s moving components.
For show cars, additional attention may be needed for concealed wiring, removable service panels, grille alignment and the finish of custom trim. Plan access to fuses, crossover components and connections so that maintenance does not require unnecessary dismantling.
Custom installation checklist
- Establish the driver locations and acoustic goals before fabricating panels.
- Use mounting structures suited to the driver’s dimensions and weight.
- Confirm door, window, seat and control clearance throughout their full movement.
- Secure wiring and crossover components behind removable or accessible panels.
- Avoid obstructing airbags, visibility, safety equipment or normal vehicle operation.
- Test for panel vibration, reflections and driver integration before completing the trim.
- Confirm that the finished system can be serviced without damaging the custom work.
For a show build, appearance and sound should be planned together. Custom fabrication is most successful when the visual design supports correct driver placement rather than dictating it.
How to Choose the Right Installation Approach
Use this decision process before committing to a speaker kit or paying for fabrication.
- Confirm fitment: Check the exact vehicle year, trim, cab or body style and factory audio package.
- Map all three driver positions: Make sure the woofer, midrange and tweeter can be installed and integrated sensibly.
- Choose the electrical approach: Decide whether the factory system can power the kit or whether an amplifier or signal interface is needed.
- Plan mounting and protection: Account for adapters, door sealing, crossover placement, wiring and moisture.
- Set the tuning plan: Determine how the crossover, levels, polarity and any digital processing will be configured.
- Test before finishing: Verify window movement, panel clearance, sound balance and unwanted vibration before permanently refitting all trim.
If the vehicle cannot accommodate a separate midrange without major compromises, a good two-way component system may be the more sensible purchase. The third driver is useful only when there is a practical way to mount and integrate it.
Final Fitment Checklist Before Buying
- The exact vehicle and factory audio configuration have been identified.
- The woofer’s cut-out, mounting depth and window clearance have been checked.
- A suitable midrange position is available.
- The tweeter can be mounted securely without obstructing the interior.
- Required adapters, wiring harnesses and crossover mounting hardware are accounted for.
- Factory amplification, impedance and signal processing have been checked.
- The installation preserves moisture barriers, drainage and normal door operation.
- The total cost includes installation, tuning and any required fabrication.
The best installation is the one that fits the vehicle properly, integrates all three drivers and remains safe and serviceable after the trim is back in place. Whether you are upgrading a sedan, a coupe, an SUV, a truck or a custom show car, fitment and driver integration should come before brand preference or advertised power figures.
Maintenance and Longevity for 3-Way Component Car Speaker Systems
A well-installed three-way component speaker system should not need constant attention, but its lifespan depends on more than the quality of the drivers. Heat, moisture, dust, loose mounting hardware, excessive amplifier output and poor wiring can gradually affect performance. Because the woofer, midrange and tweeter handle different parts of the audio signal, problems may appear in one driver long before the rest of the system shows any obvious change.
The best approach is preventive maintenance. Keep the speakers protected from environmental exposure, inspect the installation periodically and investigate changes in sound before they become permanent faults. You do not need to dismantle the door panels every month, but knowing what to check can help you avoid unnecessary repairs.
Protecting Tweeters and Midrange Drivers in Hot Climates
High cabin temperatures are a particular concern in vehicles parked outdoors for long periods. In hot weather, dashboard and door-panel temperatures can rise considerably above the surrounding air temperature. Repeated heating and cooling can affect adhesives, plastics, wiring insulation and mounting materials over time.
The drivers themselves also generate heat during use. Voice coils become warmer as electrical power is converted into sound and heat, while prolonged high-volume listening can increase thermal stress. Excessive power, amplifier clipping and sustained distortion can make the situation worse.
To reduce avoidable wear:
- Park in the shade when practical: A shaded parking space or suitable sunshade can help reduce cabin heat exposure, although it cannot eliminate high temperatures.
- Avoid prolonged high-volume playback in a heat-soaked cabin: Allow the interior to cool before demanding sustained high output from the system.
- Keep tweeters clear of obstructions: Do not cover the grille with thick material or place objects directly against the driver.
- Inspect mounting materials: Heat can contribute to adhesive failure or loosening in poorly secured custom mounts.
- Use suitable automotive components: Wiring, connectors, mounting materials and protective coverings should be appropriate for the temperatures and conditions inside a vehicle.
Tweeters deserve particular care because their diaphragms and voice coils are small, and they may be damaged if excessive low-frequency energy reaches them due to incorrect crossover wiring or settings. A correctly installed passive crossover helps protect the tweeter within the limits of its design, but it cannot compensate for every wiring error or sustained overload.
The midrange should also receive the frequency range intended by its manufacturer. Do not bypass its crossover or experiment with aggressive active settings unless the driver and signal-processing setup are designed for that arrangement.
Moisture, Dust and Door-Speaker Protection
Car doors are not completely dry environments. Water can pass through the outer window seals and enter the door cavity before draining through designated openings. Factory moisture barriers help prevent water from reaching the cabin, while the speaker mounting arrangement must tolerate the conditions for which it was designed.
Problems can occur when an installation blocks drainage, damages the moisture barrier or leaves exposed connections in an unsuitable location. Moisture may also affect aftermarket crossover units, connectors and mounting hardware if they are installed without adequate protection.
Follow these precautions:
- Keep factory drainage holes open and restore the moisture barrier after any door-speaker work.
- Use suitable gaskets between the speaker, adapter and mounting surface where required.
- Secure crossover networks in locations protected from water and excessive vibration.
- Check exposed connectors for corrosion, looseness or damaged insulation.
- Avoid spraying cleaning products or water directly into speaker grilles.
- Do not assume a speaker is waterproof simply because its cone or surround appears robust.
Dust and debris can also accumulate around exposed tweeters and grilles. Clean accessible surfaces gently with a soft, dry brush or a clean microfibre cloth. Avoid pressing on the diaphragm, inserting tools through the grille or using compressed air at close range, as these methods can damage delicate components or push debris further inside.
Protective Grilles, Mounting Hardware and Sound-Dampening Materials
Protective grilles help prevent accidental contact with the woofer cone and other vulnerable components. They are especially useful in vehicles where passengers, luggage or frequently handled objects can reach the speaker. However, the grille must have sufficient clearance so it does not touch the cone or surround during normal operation.
Check the following during routine inspections:
- Grilles and trim: Look for cracks, loose clips or signs that the grille is pressing against the speaker.
- Mounting screws: Check for looseness if rattles develop, following the manufacturer’s installation instructions and tightening guidance.
- Adapters and brackets: Make sure the speaker remains firmly supported and does not move against the door panel.
- Wiring and connectors: Inspect accessible connections for chafing, corrosion or cables trapped against moving components.
- Sound-dampening material: Check for loose edges or material interfering with window mechanisms, drainage or service access.
Automotive sound-dampening material can reduce panel resonance and help prevent certain rattles, but it is not a substitute for proper speaker mounting. Adding more material will not fix a loose crossover, an incorrect polarity connection or a damaged driver. Apply products only to suitable surfaces and avoid covering drainage openings or interfering with factory safety components.
If your system uses custom midrange pods or surface-mounted tweeters, inspect their fasteners and surrounding trim as well. Vibration can gradually reveal weaknesses in a poorly supported mount, particularly on rough roads.
A Simple Cleaning and Maintenance Routine
Most owners can keep their system in good condition with occasional visual checks and sensible cleaning. The goal is to identify obvious issues without unnecessarily removing door panels or disturbing a working installation.
| When to check | What to inspect | What to do |
|---|---|---|
| During normal interior cleaning | Accessible speaker grilles and tweeter surfaces | Remove loose dust gently with a soft, dry cloth or brush |
| Every few months, depending on use | Sound changes, rattles and loose-looking trim | Investigate new noises and check accessible mounting points |
| After door-panel repairs or speaker servicing | Wiring, crossover placement and moisture barriers | Confirm that connections are secure and factory barriers are restored |
| After water exposure or interior leaks | Door moisture barriers, exposed connectors and crossover locations | Have affected components inspected before continued use if moisture may have reached electrical parts |
| After amplifier or audio-system changes | Crossover connections, gain and signal-processing settings | Verify safe driver operation and correct system configuration |
These are practical inspection intervals, not manufacturer-mandated service schedules. Follow the speaker and vehicle manuals if they specify different procedures, and inspect sooner if you notice a change in performance.
Recognising Early Signs of Speaker Wear or Failure
A speaker does not always stop working suddenly. Some problems develop gradually, such as intermittent connections, increased distortion, changes in tonal balance or mechanical noises. Identifying the symptoms early can help prevent further damage and avoid replacing a driver unnecessarily.
Distortion or Crackling at Higher Volume
If the sound becomes rough when the volume increases, possible causes include amplifier clipping, excessive equalisation, a loose mounting component or a driver reaching its operating limits. Distortion does not automatically mean the speaker has failed.
Lower the volume and return the audio settings to a known baseline. If the problem persists at moderate levels, inspect the installation and check amplifier gain, crossover settings and wiring. Stop testing at high volume until the cause is identified.
A Tweeter That Sounds Harsh or Becomes Silent
A tweeter that sounds unusually sharp may be affected by placement, reflections, incorrect crossover settings or excessive level adjustment. If it stops producing sound, possible causes include a loose connection, a crossover fault or damage to the driver.
Check the manufacturer’s wiring diagram and the accessible connections before concluding that the tweeter needs replacement. Never connect a tweeter directly to a full-range amplifier output unless the manufacturer explicitly permits that arrangement.
Weak Vocals or an Uneven Midrange
If vocals suddenly sound thin, distant or less intelligible, the midrange may not be receiving the intended signal. Incorrect crossover wiring, polarity problems, a loose connector or a driver fault can all produce similar symptoms.
Compare the left and right sides using familiar recordings at a moderate volume. If one side sounds noticeably different, inspect its connections and crossover routing. Remember that equaliser changes, source settings and factory audio processing can also affect vocal balance.
Buzzing, Rattling or Mechanical Noise
A buzzing sound that appears only on certain notes may come from a loose grille, mounting ring, door clip or cable vibrating against the panel. It can also indicate a damaged speaker surround or another mechanical problem.
Locate the source before tightening or replacing parts. If the noise follows the music’s bass notes but disappears when the volume is reduced, inspect the mounting and door trim carefully. Avoid pressing on the cone while the speaker is operating.
Intermittent Sound or One Driver Cutting Out
If a speaker works intermittently, a loose connector, damaged wire, crossover fault or amplifier problem may be responsible. Heat and vibration can expose a weak connection, particularly where wiring passes through a door or near a moving component.
Switch off the system before inspecting connections. Do not repeatedly increase the volume to make an intermittent driver start working again, as this can worsen an existing fault.
Troubleshooting Symptoms Before Replacing Components
| Symptom | Possible cause | Sensible first check |
|---|---|---|
| One tweeter has no output | Loose wiring, crossover fault or failed tweeter | Check the correct crossover output and connections with the system powered down |
| Midrange sounds weaker on one side | Polarity issue, loose connector or driver fault | Compare left and right wiring against the installation diagram |
| Bass sounds weaker after servicing | Incorrect polarity, poor speaker seal or mounting issue | Inspect the woofer connections and mounting gasket |
| Rattling increases with bass | Loose trim, adapter or cable | Identify the vibrating part and secure it correctly |
| Sound becomes harsh at high volume | Clipping, excessive EQ, unsuitable crossover settings or driver overload | Reduce volume and check amplifier and crossover settings |
| Output cuts out after extended listening | Thermal protection, overheating amplifier or an intermittent connection | Stop high-volume playback and inspect the amplifier and wiring |
| Sound changes when a door moves | Damaged or trapped wiring, loose connection or mechanical interference | Have the door wiring and window mechanism inspected |
These symptoms are clues, not definitive diagnoses. A similar sound can have several causes, so check the signal chain and installation before purchasing replacement drivers.
How to Extend the Life of the Complete Audio System
Speaker longevity depends on the entire installation, not only the cone material or the brand name. An appropriate amplifier, correctly configured crossover and secure mounting reduce unnecessary stress on the drivers.
Keep these principles in mind:
- Match the amplifier correctly: Check continuous power handling, nominal impedance and the amplifier’s supported load.
- Set gain properly: Do not use gain as a substitute for volume, and avoid sustained clipping.
- Preserve the crossover design: Keep passive filters connected as specified, or use an appropriate active setup with correctly configured processing.
- Avoid excessive EQ boosts: Large boosts can consume headroom and increase distortion.
- Maintain the mounting and door protection: Secure the drivers, protect wiring and preserve factory moisture barriers and drainage.
- Investigate changes promptly: New distortion, intermittent output or unusual rattles should be checked before the system is pushed harder.
If a driver is damaged, replace it with a compatible part and verify its electrical and crossover requirements. Replacing only one driver may be possible, but differences in model, sensitivity or specifications can affect the tonal balance between the left and right sides. Consult the manufacturer or an experienced installer when matching replacement components.
Final Maintenance Advice
A three-way component system should deliver consistent sound without needing frequent adjustments. Occasional cleaning, sensible volume levels, correct amplifier settings and secure installation are usually more valuable than repeated dismantling or unnecessary upgrades.
Pay particular attention to the tweeter and midrange connections, crossover protection, door moisture barriers and any new rattles or changes in sound. If the system develops persistent distortion, intermittent output or signs of water damage, stop pushing it and investigate the cause.
The best way to protect your investment is to prevent avoidable stress, preserve the installation and deal with small faults before they affect the rest of the system.
FAQs About 3-Way Component Car Speakers
Are 3-way component speakers worth installing in a Toyota Tundra or Subaru Crosstrek with the factory audio system?
They can be, but the result depends more on the factory system and installation than on the number of drivers. A three-way kit gives the woofer, midrange and tweeter separate roles, which can improve how vocals and instruments are reproduced when the drivers are positioned and crossed over correctly. However, if the factory amplifier has limited clean output or the original system uses dedicated signal processing, replacing the speakers alone may not deliver the improvement you expect.
Before buying, check three things:
- Whether the factory system sends a full-range signal to the front speakers or uses separate filtered outputs.
- Whether the new woofer, midrange and tweeter have suitable mounting locations.
- Whether the factory amplifier can handle the replacement system’s impedance and power requirements.
A properly installed two-way system can outperform a poorly integrated three-way kit. The third driver is worthwhile when your vehicle can accommodate it and the crossover can blend all three drivers effectively.
Will 3-way component speakers improve vocals and soundstage more than expensive 2-way speakers?
Not automatically. A three-way design gives the manufacturer more freedom to distribute frequencies between the woofer, midrange and tweeter, but it also introduces another crossover transition that must be handled correctly. If the midrange is poorly positioned or its output does not blend smoothly with the other drivers, vocals can sound disconnected rather than more lifelike.
A well-designed two-way system can have excellent imaging and natural vocals, particularly when it uses a capable woofer, a properly integrated tweeter and a suitable crossover. The three-way option becomes more attractive when the installation allows the dedicated midrange to reproduce vocals and instruments without compromising the overall tonal balance.
When comparing systems, listen for natural vocal tone, stable centre imaging and consistent sound as the volume increases. Do not judge them solely by driver count, maximum wattage or the number of frequency ranges listed on the packaging.
Can a 3-way component speaker system run from a factory head unit without an amplifier upgrade?
Yes, provided the head unit or factory amplifier can safely drive the system and deliver enough clean output for your listening habits. A passive three-way component kit generally uses its crossover network to distribute the signal between the three drivers, so it does not necessarily require three amplifier channels per side.
The limitation is available clean power, not simply the fact that the system has three drivers. If you frequently turn the volume up and hear harshness, compression or distortion, the factory system may be running out of headroom. However, those symptoms can also result from incorrect crossover settings, poor installation or factory signal processing.
Before purchasing an amplifier, verify:
- The speaker system’s official RMS power handling and nominal impedance.
- The factory amplifier’s rated output and minimum supported load.
- Whether the factory signal is full-range or already filtered.
- Whether an integration interface or signal processor is needed.
An aftermarket amplifier can provide more clean headroom, but it will not correct a badly positioned midrange or an incorrectly wired crossover.
Why do some 3-way component speakers sound harsh or lose bass after installation, even when the specifications look good?
This is one of the most misleading parts of upgrading car audio: published specifications cannot predict the complete in-car result. Harsh treble may come from a tweeter aimed at a reflective surface, excessive tweeter output, clipping or poor crossover integration. Weak bass can result from an air leak around the woofer adapter, incorrect polarity, door-panel resonance or an unsuitable crossover configuration.
Troubleshoot the installation before replacing the speakers:
- Check woofer, midrange and tweeter wiring against the manufacturer’s diagram.
- Inspect the woofer mounting gasket and make sure the speaker is firmly secured.
- Return equalisation and amplifier gain to sensible baseline settings.
- Check the crossover connections and any available tweeter-level adjustments.
- Listen again at a moderate, consistent volume.
If the sound changes significantly when the left and right channels are compared, investigate polarity and channel balance. Do not reverse driver connections randomly, because some crossover designs rely on specific electrical and acoustic phase relationships.
Is it better to spend more on premium 3-way component speakers or budget for a DSP, sound treatment and professional tuning?
For many installations, spending the entire budget on premium speakers is not the best use of money. A capable speaker system needs suitable mounting, adequate clean power and proper integration to deliver its potential. If the factory doors vibrate, the midrange has nowhere suitable to go or the crossover is configured incorrectly, a more expensive kit may not solve the underlying problem.
A sensible upgrade order is:
- First, confirm fitment and electrical compatibility. Avoid buying a system that requires unexpected fabrication or an incompatible amplifier.
- Second, install and seal the speakers properly. Correct mounting and controlled panel vibration can make a meaningful difference.
- Third, evaluate the system before adding equipment. An amplifier may help with clean output, while a DSP can help when channel-level, crossover or time-alignment adjustments are genuinely needed.
- Finally, consider premium drivers or a subwoofer if the remaining limitations justify the expense.
A DSP is not essential for every passive three-way system, and sound-deadening material does not automatically create deeper bass. The right investment depends on the actual weakness in your current setup. A balanced system with correct installation and tuning is often a better purchase than premium hardware that has not been integrated properly.
Final Verdict on the Best 3-Way Component Speakers
The right 3-way component speakers should make music sound more complete, not simply louder. A dedicated midrange can help vocals and instruments come through with greater definition, while a properly integrated woofer and tweeter can create a more cohesive front soundstage. But these benefits depend on the complete installation, and a well-designed two-way system can still be the better choice when your vehicle cannot accommodate three drivers properly.
The DYNAUDIO Esotan 372 MKII stands out on paper for its dedicated 4-inch midrange and adjustable crossover levels, while the HERTZ Mille Pro MPK 1633 offers a different approach with its V-Cone woofer and Tetolon-fibre tweeter. The Sony Mobile ES XS-163ES, Morel Maximo Ultra 603 MKII, KICKER 51KSS365 KS-Series and Focal Access 165 A3 each bring their own driver designs and installation considerations. These differences help narrow your shortlist, but specifications alone cannot establish which system will sound best in your car.
Before spending your money, confirm the exact kit specifications, RMS power handling, amplifier compatibility and mounting requirements. Pay particular attention to the midrange location, crossover wiring, door sealing and tweeter positioning. If your budget is limited, leave room for proper installation rather than stretching it entirely on the speakers.
Ultimately, the best three-way component system is the one that works with your vehicle and sounds balanced from the driver’s seat. Clear vocals, controlled bass, comfortable treble and convincing instrument separation matter far more than a headline wattage figure or an impressive list of materials. Choose for the system you can install and tune properly, and you are far more likely to enjoy the upgrade long after the excitement of buying new speakers has passed.
Also Check:


